

Easy Baked Ziti (Cheesy, Saucy, Crowd-Pleasing)
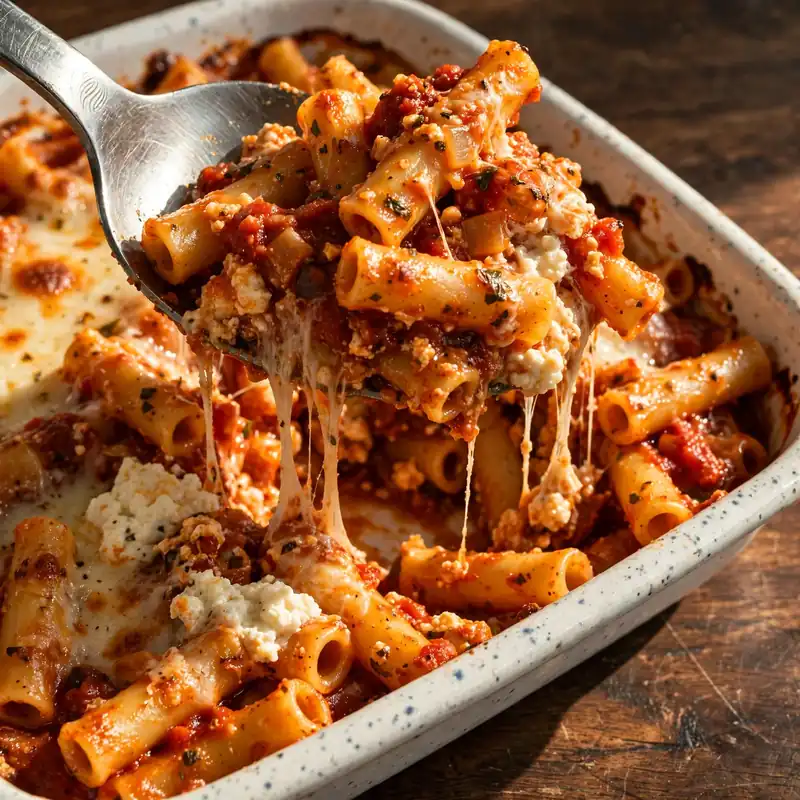
Pull a baked ziti from the oven when the mozzarella on top has gone golden in patches and the tomato sauce is visibly bubbling around the edges of the dish, and the whole kitchen smells like something that has been cooking all day even though it hasn’t. The cheese stretches when you serve the first spoonful. The pasta underneath is coated in sauce all the way through, not dry in the middle the way baked pasta can get when it is not done properly. The ricotta sits in pockets between the layers, soft and mild against the sharpness of the tomato.
This baked ziti recipe uses a quick homemade meat sauce built from ground beef and canned crushed tomatoes, layered with ricotta, mozzarella, and Parmesan in a standard 9×13 baking dish. It comes together in about 55 minutes, feeds eight people generously from one dish, and holds up through reheating in a way that makes leftovers as good as the original. It works as a weeknight dinner when you need to feed a group and as a make-ahead dish for gatherings where oven space is precious.

Why You’ll Love This Baked Ziti
- Feeds eight from one dish. A fully loaded 9×13 baking dish of baked ziti serves eight adults generously as a main course. No sides required unless you want them. Nothing about the recipe gets harder when you scale it.
- The sauce goes all the way through. Cooking the pasta slightly under al dente before baking, then finishing it in the oven surrounded by sauce, means every piece of ziti absorbs flavor from the inside rather than just being coated on the outside.
- Three-cheese layering that actually holds together. Ricotta between the layers, mozzarella on top, and Parmesan throughout: each cheese serves a distinct purpose in flavor and texture, and the combination holds a clean slice rather than falling apart when served.
- Make-ahead friendly. Assemble the dish completely, refrigerate it covered for up to 24 hours, and bake it the next day. The pasta absorbs some of the sauce overnight, which deepens the flavor and makes it even better.
- Leftover quality is genuinely high. Baked ziti reheats without drying out or becoming rubbery, which is not true of all baked pasta dishes.
Ingredients You’ll Need
Recipe Timing
| Detail | Info |
|---|---|
| Servings | 8 |
| Difficulty | Easy |
| Course | Main Course |
| Cuisine | Italian-American |
| Prep Time | 20 minutes |
| Cook Time | 35 minutes |
| Total Time | 55 minutes |
For the pasta, ziti is the traditional shape: wide tubes that catch sauce inside and out and hold their structure through the bake without collapsing. Penne rigate is the closest substitute and works nearly as well. Rigatoni is a wider option that works too. Avoid thin pastas like spaghetti or angel hair, which turn mushy in a baked dish.
Cook the pasta 2 to 3 minutes less than the package’s al dente time. It will continue cooking in the oven while absorbing the sauce, and pasta cooked to full al dente before baking ends up overcooked in the finished dish.
For the ricotta, full-fat ricotta gives you the creamiest, most cohesive pockets in the finished dish. Part-skim ricotta works but can release slightly more water during baking, making the sauce thinner. If using part-skim, drain the ricotta in a fine mesh strainer over a bowl for 20 minutes before mixing.
- 500g (1 lb) dry ziti pasta. The structural base of the dish. Cook it underdone on purpose so the oven finishes it properly.
- 500g (1 lb) ground beef. The protein in the meat sauce. Use 80/20 or 85/15 for the best flavor: leaner beef has less fat to carry flavor through the sauce.
- 1 medium yellow onion, finely diced. Cooked with the beef to build the aromatic base of the meat sauce.
- 4 cloves garlic, finely minced. Added after the onion softens. The garlic needs 60 seconds in the pan to bloom before the tomatoes go in.
- 2 cans (800g / 28 oz total) crushed tomatoes. The primary sauce base. Crushed tomatoes give a thicker, more coating sauce than diced. Don’t drain: all the liquid goes into the sauce.
- 1 teaspoon dried oregano. Classic Italian-American seasoning for meat sauce.
- 1 teaspoon dried basil. Adds a slightly sweet, floral note that balances the acidity of the tomatoes.
- 1/2 teaspoon red pepper flakes. Optional but recommended: adds a very mild, pleasant background heat that disappears into the sauce rather than standing out.
- 1 teaspoon fine sea salt + 1/2 teaspoon black pepper. Season the sauce directly; adjust at the end before assembling.
- 1 teaspoon sugar. A small amount rounds out the acidity of the canned tomatoes without making the sauce taste sweet.
- 2 tablespoons olive oil. For cooking the aromatics at the start of the sauce.
- 450g (16 oz) full-fat ricotta cheese. Layered between the pasta for creamy pockets throughout. Mixed with an egg and seasoning before using.
- 1 large egg. Mixed into the ricotta to bind it slightly and prevent it from becoming grainy during baking.
- 1/4 teaspoon fine sea salt + a pinch of black pepper (for the ricotta mixture).
- 2 tablespoons fresh flat-leaf parsley, finely chopped (optional, for the ricotta). Adds a fresh note to the ricotta layer.
- 2 cups (200g) shredded low-moisture mozzarella cheese, divided. Half goes between the layers; half goes on top to form the golden, stretchy crust.
- 1/2 cup (50g) freshly grated Parmesan cheese, divided. Mixed through the layers and scattered over the top. Adds a sharp, savory note that mozzarella alone doesn’t provide. Grate it fresh: pre-grated Parmesan contains anti-caking agents that prevent it from melting smoothly.

Allergen and Dietary Disclosure
This recipe contains gluten (pasta), dairy (ricotta, mozzarella, Parmesan), and eggs (in the ricotta mixture).
For a gluten-free version, use a certified gluten-free ziti or penne pasta. Most good-quality rice-based or chickpea-based pasta holds up well in a baked dish, though the texture is slightly different from wheat pasta.
For a vegetarian version, skip the ground beef entirely and replace it with 2 cans of drained lentils, 500g of sliced cremini mushrooms cooked down until their liquid evaporates, or a combination of both. The sauce technique stays identical.
For a dairy-free version, use dairy-free ricotta (cashew-based versions work best in this application), a meltable plant-based mozzarella, and nutritional yeast in place of Parmesan. The result is different but works for those with dairy restrictions.
Free from nuts and soy as written. Not guaranteed safe for any specific allergy without checking all individual ingredient labels.
Step-by-Step Directions
Step 1: Cook the Pasta Underdone
Bring a large pot of water to a rolling boil and add a generous amount of salt: the water should taste noticeably salty, like a light broth. Add the dry ziti and cook for 2 to 3 minutes less than the package’s al dente time. Drain and toss immediately with a drizzle of olive oil to prevent the pieces from sticking together as they cool. Set aside.

Chef’s Note: Salting the pasta water is not just tradition: it is the only opportunity you have to season the pasta itself from the inside. Pasta cooked in unsalted water tastes flat no matter how seasoned the sauce around it is.
Step 2: Make the Meat Sauce
Heat the olive oil in a large, deep skillet or Dutch oven over medium-high heat. Add the ground beef and break it apart into small, even pieces using a wooden spoon or a heat-safe spatula. Cook, stirring occasionally, until the beef is fully browned with no pink remaining and the liquid released has mostly evaporated, about 6 to 8 minutes. The browning creates a layer of fond on the pan that adds depth to the finished sauce.
Food Safety Note: Ensure ground beef reaches a minimum internal temperature of 71°C (160°F) during this browning stage. No pink should remain in any piece before proceeding.
Drain excess fat if the beef is very fatty, leaving about 1 tablespoon in the pan. Add the diced onion and cook over medium heat for 3 to 4 minutes until softened. Add the minced garlic and cook for 60 seconds, stirring constantly.

Step 3: Build and Simmer the Sauce
Pour the crushed tomatoes into the pan with the browned beef and onion. Add the dried oregano, basil, red pepper flakes, salt, black pepper, and sugar. Stir everything together, scraping any browned bits from the bottom of the pan into the sauce. Bring to a gentle simmer over medium heat, then reduce to low and cook uncovered for 10 to 12 minutes, stirring occasionally, until the sauce thickens slightly and the flavors come together. Taste and adjust salt before removing from the heat.
Chef’s Note: The 10 to 12 minutes of simmering concentrates the sauce just enough to coat the pasta without making it so thick it dries out in the oven. A sauce that seems slightly loose at this stage is correct: it will reduce further during the 25-minute bake.
Step 4: Prepare the Ricotta Mixture
In a medium bowl, combine the full-fat ricotta, the egg, salt, black pepper, and the fresh parsley if using. Stir until completely smooth and the egg is fully incorporated. The egg binds the ricotta so it stays in distinct pockets during baking rather than melting into the sauce and disappearing.
Step 5: Preheat and Prepare the Baking Dish
Preheat the oven to 190°C (375°F). Spread about 1/2 cup of the meat sauce in a thin, even layer across the bottom of a 9×13 inch (23x33cm) baking dish. This base layer prevents the bottom layer of pasta from sticking and drying out during baking.
Step 6: Assemble the Layers
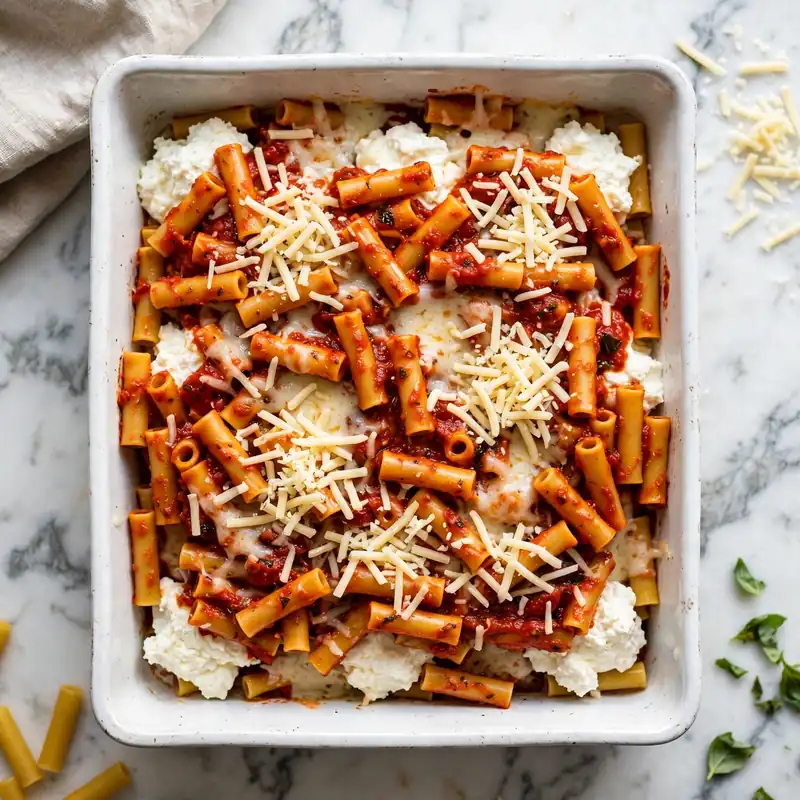
Combine the drained pasta with the remaining meat sauce in the pot or a large bowl and toss until every piece of pasta is well coated. Transfer half of the sauced pasta into the prepared baking dish and spread it into an even layer. Drop the ricotta mixture in heaped spoonfuls across the pasta layer, distributing it as evenly as possible without pressing it flat. Scatter 1 cup of the shredded mozzarella and 1/4 cup of the Parmesan over the ricotta layer. Add the remaining sauced pasta on top, spreading it evenly. Finish with the remaining 1 cup of mozzarella and the remaining 1/4 cup of Parmesan scattered across the entire top surface.
Step 7: Bake Until Golden and Bubbling
Cover the baking dish tightly with aluminum foil and bake on the center rack at 190°C (375°F) for 20 minutes. Remove the foil and continue baking for a further 12 to 15 minutes until the mozzarella on top is golden brown with darker caramelized patches, the sauce at the edges is visibly bubbling, and the internal temperature of the dish reads at least 74°C (165°F) on an instant-read thermometer. Rest the baked ziti for 10 minutes before serving: the cheese and sauce settle during this time and the dish portions much more cleanly.
Common Mistakes and Troubleshooting
| Problem | Cause | Solution |
|---|---|---|
| Pasta is mushy after baking | Cooked to full al dente before baking | Always undercook pasta by 2 to 3 minutes before assembling; it finishes cooking in the oven |
| Dish is dry in the center | Too little sauce used; covered foil removed too early | Ensure pasta is well coated with sauce before layering; keep foil on for the full 20 minutes |
| Cheese on top not browning | Oven temperature too low or foil left on entire time | Remove foil for the final 12 to 15 minutes; if still pale, switch to broil for 2 to 3 minutes |
| Ricotta turned grainy and watery | Egg not mixed in; part-skim ricotta used without draining | Always add an egg to the ricotta mixture; drain part-skim ricotta before using |
| Sauce too thin in finished dish | Sauce not simmered enough before assembly, or very wet canned tomatoes | Simmer sauce until it coats a spoon before assembling; use crushed rather than diced tomatoes |
| Bottom layer sticking to the dish | No sauce layer at the base of the dish | Always spread a thin layer of sauce at the bottom before the first pasta layer |
Variations and Substitutions
Vegetable Baked Ziti: Skip the ground beef and replace it with a combination of sautéed mushrooms, diced zucchini, and baby spinach. Cook the vegetables in the same olive oil and aromatics until their moisture evaporates, then proceed with adding the tomatoes and building the sauce. The finished dish is just as satisfying and naturally lower in fat.
Spicy Baked Ziti: Double the red pepper flakes and add 1 teaspoon of smoked paprika to the meat sauce. For more direct heat, stir 1 tablespoon of sambal oelek or harissa into the sauce alongside the tomatoes. The heat level builds through the layers and mellows slightly during the bake.
Baked Ziti With Spinach and Ricotta: Add 200g of fresh baby spinach, wilted in a dry pan over medium heat for 2 minutes until collapsed, into the ricotta mixture. Squeeze out all the excess water from the spinach before mixing. The spinach adds color, iron, and a slightly earthy flavor that works very well against the tomato sauce.
Cheesy Three-Meat Version: Add 200g of diced halal beef or chicken sausage alongside the ground beef for a more substantial, complex meat sauce. Brown both together in the same pan before proceeding with the aromatics and tomatoes.
White Baked Ziti (No Tomato): Replace the tomato sauce with a simple bechamel: 3 tablespoons butter, 3 tablespoons flour, cooked together for 60 seconds, then 3 cups of whole milk whisked in gradually and simmered until thick. Season with salt, pepper, and nutmeg. Layer this white sauce with the pasta, ricotta, and cheese in the same sequence. The result is a completely different dish, cream-forward and very rich.
Individual Portions: Divide the assembled ziti into 8 single-serving oven-safe ramekins or small baking dishes. Reduce the covered bake time to 15 minutes and the uncovered time to 8 to 10 minutes. Individual portions serve well at gatherings where slicing a large dish at the table is less practical.
Serving Suggestions
- With garlic bread. The sauce in baked ziti is worth mopping up, and a thick slice of garlic bread handles it better than any utensil. Toast it in the oven on the rack below the ziti for the last 8 minutes of the uncovered bake time.
- With a simple green salad. A crisp romaine or mixed greens salad with a sharp vinaigrette cuts through the richness of the cheese and meat sauce and rounds out the plate without adding more cooking. Dress it just before serving.
- With roasted vegetables on the side. Roasted broccoli, zucchini, or bell peppers alongside give the plate color and a lighter contrast to the pasta’s richness without competing for the main course’s attention.
- As a standalone party dish. At a gathering, baked ziti serves well as the centerpiece dish because it holds its temperature in the covered dish for up to 30 minutes after coming out of the oven. Keep a sheet of foil loosely over the top between servings to retain heat.
- With sparkling water and lemon. The acidity of the tomato sauce makes a cold, acidic drink the best pairing alongside it. Sparkling water with a squeeze of lemon is refreshing against the richness of the cheese without competing with the flavors.
- The next day for lunch. Cold baked ziti eaten at room temperature the day after baking is a completely satisfying experience: the sauce has set into the pasta, the cheese has firmed up, and the flavors are more unified than they were the day before. Reheat it or eat it cold, both work.

Tips for the Best Results
- Undercook the pasta every time. This is the most important single step in a baked pasta dish. Pasta that goes into the oven fully cooked will be overcooked and soft by the time the cheese is golden. The 2 to 3 minute undercooked pasta finishes in the oven and comes out at exactly the right texture.
- Cover with foil for the first stage of baking. The covered phase traps steam inside the dish, which heats the pasta and ricotta evenly and prevents the top layer from burning before the center is hot. Removing the foil for the last 12 to 15 minutes produces the golden, caramelized cheese surface that makes baked ziti look and taste the way it should.
- Rest the dish before serving. Ten minutes of rest after baking allows the cheese to settle and the sauce to stop actively bubbling, which produces cleaner, more structured portions when you serve it. Cutting into a just-pulled baked ziti results in the filling spilling out rather than holding its shape.
- Grate your own Parmesan. It takes 2 extra minutes and makes a meaningful difference in flavor. Pre-grated Parmesan contains cellulose powder as an anti-caking agent, which affects how it melts and dulls its flavor noticeably in a baked application.
- Use crushed tomatoes, not diced. Crushed tomatoes break down into a sauce that coats the pasta evenly during baking. Diced tomatoes stay in larger pieces that don’t distribute as evenly and leave the sauce thinner and less cohesive around the pasta.
Storage Tips
Refrigerator
Cool the baked ziti completely before covering the dish tightly with plastic wrap or aluminum foil. It keeps in the refrigerator for up to 4 days. The pasta absorbs more sauce as it sits, which actually deepens the flavor and makes reheated portions taste richer than the original serving. Store in the baking dish or transfer to an airtight container in individual portions for easier weekday reheating.
Freezer
Baked ziti freezes very well, either fully baked or assembled but unbaked. For unbaked: assemble completely, cover tightly with two layers of plastic wrap and a layer of foil, and freeze for up to 3 months. Bake from frozen at 190°C (375°F) covered for 60 minutes, then uncovered for 15 to 20 minutes. For baked: cool completely, portion into freezer-safe containers, and freeze for up to 3 months. Thaw overnight in the fridge before reheating.
Reheating
From the fridge: cover the dish with foil and reheat at 175°C (350°F) for 20 to 25 minutes until heated through. Remove the foil for the last 5 minutes to re-melt and lightly re-brown the cheese. For single portions, the microwave at 50% power in 90-second intervals works well: add a tablespoon of water over the portion before microwaving to add steam and prevent the pasta from drying out.
Nutrition Information
Per serving (1/8 of the full dish, approximately 350g)
| Nutrient | Amount |
|---|---|
| Calories | 610 kcal |
| Protein | 38g |
| Carbohydrates | 55g |
| Fiber | 3.5g |
| Sugar | 8g |
| Total Fat | 26g |
| Saturated Fat | 13g |
| Cholesterol | 115mg |
| Sodium | 720mg |
| Vitamin C | 10mg |
| Calcium | 360mg |
| Iron | 4mg |
| Potassium | 620mg |
Nutrition values are approximate and may vary based on brands and portion sizes.
Why This Recipe Works
The two-stage baking method (covered then uncovered) solves the most common baked ziti problem: a top that is dry and rubbery while the center is still cool and under-seasoned. The covered first stage traps steam inside the dish and heats the entire assembly from the outside in, cooking the pasta through and warming the ricotta pockets without allowing any surface moisture to escape. Removing the foil for the final stage lets the mozzarella dehydrate slightly on its surface, which is what causes it to brown and caramelize into the golden, slightly crisp crust rather than staying pale and soft.
Mixing an egg into the ricotta is a technique used in lasagna for exactly the same reason it works here. Raw ricotta at baking temperatures can weep water, become grainy in texture, and lose its distinct pocket quality as it spreads into the surrounding sauce. The egg protein sets during baking and holds the ricotta together in its original texture, which is why well-made baked ziti has distinct creamy pockets rather than a uniformly pink, ricotta-tinged sauce throughout.
The decision to slightly undercook the pasta before baking is not about time management. It is about how starch behaves in a baked environment. Pasta that has already reached al dente has absorbed most of the water it will take on. During a 35-minute bake surrounded by tomato sauce, it continues absorbing liquid and cooking further. Pasta at full al dente going in comes out overcooked going out. Pasta at 2 minutes shy of al dente going in comes out at exactly the right texture.
The ricotta layer between the pasta sections rather than mixed throughout creates a textural and flavor contrast that makes each bite slightly different from the last. Ricotta stirred through everything becomes uniform and disappears into the background. Kept in pockets, it delivers a concentrated creaminess against the sharper tomato and beef flavors that makes the dish feel more layered and intentional.
I’ve tested this recipe with both crushed and diced canned tomatoes. The crushed tomato version produced a more cohesive, coating sauce that distributed evenly through the pasta during baking. The diced version left larger tomato pieces that didn’t break down fully during the bake and created an uneven sauce distribution, with some pasta pieces very sauced and others barely touched.
Frequently Asked Questions
Can I make baked ziti ahead of time?
Yes, and making it ahead produces a better result than baking immediately after assembly. Assemble the dish completely, cover tightly, and refrigerate for up to 24 hours before baking. The pasta absorbs some of the sauce overnight, which deepens the flavor and ensures every piece is well coated. Add 10 to 15 minutes to the covered bake time if baking directly from the refrigerator since the dish starts cold.
Why is my baked ziti dry in the center?
Dry centers happen for two reasons: the pasta was fully cooked before baking and absorbed all available sauce during the oven time, leaving none to keep it moist, or the foil was removed too early and steam escaped before the center was heated through. Keep the foil on for the full 20 minutes, use pasta that was undercooked by 2 to 3 minutes, and make sure the sauce coverage is thorough before layering.
Can I use a different pasta shape instead of ziti?
Yes. Penne rigate is the most common substitute and works just as well: the ridges hold sauce and the tubes catch filling. Rigatoni is wider and also works well in this recipe, producing a slightly heartier bite. Avoid long pasta shapes like spaghetti or linguine, which tangle into clumps and don’t distribute through the layers evenly.
How do I know when baked ziti is fully cooked?
The most reliable checks are the bubbling sauce at the edges of the dish and the golden-brown, caramelized cheese on top. The sauce should be actively bubbling at the sides when the dish comes out of the oven. If you want to confirm the center is hot, insert an instant-read thermometer into the middle of the dish: a reading of 74°C (165°F) or above means the filling is safely heated through. The 10-minute rest after baking is not optional: it completes the cooking and allows the layers to settle.
Can I leave out the ricotta or substitute it?
The ricotta creates the creaminess between the layers that distinguishes baked ziti from a simple pasta bake. You can reduce the amount (use 225g instead of 450g) for a lighter version, but leaving it out entirely changes the character of the dish significantly. Cottage cheese is a workable substitute for ricotta: drain it well and use it in the same quantity. The texture is slightly grainier than ricotta but the flavor is similar.
Is baked ziti gluten-free?
As written, this recipe uses regular wheat-based pasta and is not gluten-free. A certified gluten-free pasta, either rice-based or chickpea-based, substitutes directly in the same quantity. Gluten-free pasta can soften faster than wheat pasta, so reduce the pre-bake cooking time by an additional minute and check the texture carefully. Everything else in the recipe is naturally gluten-free.
Can I freeze baked ziti before or after baking?
Both work well. Freezing unbaked gives you slightly better pasta texture after baking because the pasta hasn’t gone through a second heating cycle yet. Freeze the fully assembled, unbaked dish for up to 3 months, covered tightly. To bake from frozen, add the dish directly to a 190°C (375°F) oven covered with foil for 60 minutes, then uncover for 15 to 20 minutes. Fully baked ziti also freezes well for up to 3 months; thaw overnight in the fridge before reheating.

Conclusion
Baked ziti earns its place on any regular dinner rotation because it consistently delivers more than the effort going into it suggests. The meat sauce takes 20 minutes. The assembly takes another 10. The oven handles everything else. What comes out is a dish with layers of flavor and texture that feeds a table full of people without requiring anything beyond standard pantry ingredients and one baking dish. The leftovers are genuinely good, the make-ahead option is genuinely practical, and the whole thing comes together with techniques that are simple enough to do on a weeknight without thinking twice. Baked ziti is not a recipe you make once. It is the kind of recipe you make regularly because it always works.
If you loved this recipe, save it to your pasta recipes Pinterest board so you can find it easily later. For more healthy recipes and daily food inspiration, follow TheCookingVibes on Pinterest.
Easy Baked Ziti
Ingredients
Equipment
Method
- Cook ziti in salted boiling water for 2 to 3 minutes less than the al dente time on the package. Drain and toss with a drizzle of olive oil to prevent sticking.
- Heat olive oil in a large skillet over medium-high. Brown the ground beef, breaking it into small pieces, until no pink remains and juices have evaporated, about 6 to 8 minutes. Drain excess fat, leaving about 1 tablespoon. Add onion and cook 3 to 4 minutes. Add garlic and stir 60 seconds.
- Add crushed tomatoes, oregano, basil, red pepper flakes, salt, pepper, and sugar. Stir and simmer over low heat for 10 to 12 minutes until slightly thickened. Taste and adjust salt.
- In a bowl, stir together ricotta, egg, salt, pepper, and parsley until smooth.
- Preheat oven to 190°C (375°F). Spread 1/2 cup of meat sauce across the base of a 9×13 inch baking dish.
- Toss the drained pasta with the remaining meat sauce. Spread half in the dish. Drop ricotta mixture in spoonfuls over the pasta. Scatter 1 cup mozzarella and 1/4 cup Parmesan over the ricotta. Add the remaining pasta layer. Top with remaining mozzarella and Parmesan.
- Cover tightly with foil and bake 20 minutes. Remove foil and bake 12 to 15 minutes more until cheese is golden and sauce bubbles at the edges. Rest 10 minutes before serving.
Notes
- Always undercook the pasta by 2 to 3 minutes before baking; it finishes in the oven.
- Mix an egg into the ricotta to keep it in distinct creamy pockets rather than spreading into the sauce.
- Assemble and refrigerate covered up to 24 hours ahead; add 10 to 15 minutes to covered bake time if going in cold.
- Rest 10 minutes after baking for clean, structured portions.
