Chewy Oatmeal Cookies — Crispy Edges, Perfectly Soft Centers
Pull a tray of Chewy oatmeal cookies from the oven and give them exactly 5 minutes on the pan before you move them. That brief wait is where the centers firm up from the carryover heat while the edges stay slightly crispy and the whole cookie develops the chew that makes this one of the most satisfying textures in home baking. Bite into one too early and it falls apart; wait those 5 minutes and it holds together cleanly with a center that’s dense and soft without being raw.
This oatmeal cookies recipe uses old-fashioned rolled oats, melted brown butter, brown sugar, one egg plus one yolk, and a full teaspoon of cinnamon. The melted and browned butter is the ingredient decision that separates these from a standard batch: it adds a toasted, nutty depth that plain melted butter and creamed butter both miss. No chilling required, no mixer needed, and the full recipe comes together in one bowl in about 30 minutes from start to finished cookie. Add-ins are optional, and the base recipe is designed to be excellent with nothing extra in it at all.

Why You’ll Love Chewy Oatmeal Cookies Recipe
- Brown butter makes a genuine difference. Browning the butter before mixing it into the dough takes about 5 minutes and adds a nutty, toasted depth that plain melted butter simply doesn’t produce; the flavor of the finished cookie is noticeably more complex.
- One bowl, no mixer needed. The entire dough comes together with a whisk and a spatula; nothing to cream, nothing to chill, nothing to clean beyond the one bowl and the baking sheet.
- Chewy center, crispy edge, every time. A higher ratio of brown sugar to white sugar and the addition of one extra egg yolk produce a center that stays soft and dense rather than cakey or dry, while the edges bake to a distinct crispness.
- Ready in 30 minutes. From browning the butter to pulling finished cookies off the pan, this recipe takes 30 comfortable minutes at a pace that doesn’t rush anything.
- Excellent plain and flexible with add-ins. The base dough is balanced and well-flavored on its own; raisins, chocolate chips, and nuts all work cleanly without requiring any adjustments to the recipe quantities or timing.
Ingredients You’ll Need For Chewy Oatmeal Cookies
Recipe Timing
| Detail | Info |
|---|---|
| Servings | 18 cookies |
| Difficulty | Easy |
| Course | Dessert, Snack |
| Cuisine | American |
| Prep Time | 15 minutes |
| Cook Time | 12 minutes |
| Rest Time | 5 minutes (on pan after baking) |
| Total Time | 32 minutes |
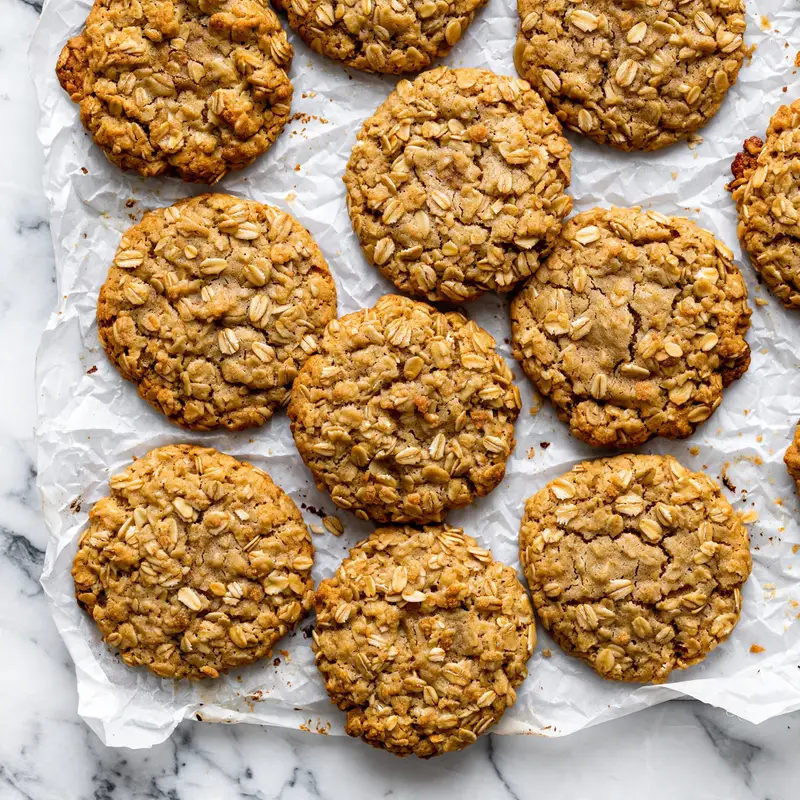
For the oats, old-fashioned rolled oats are the only type that produces the right texture in this recipe. Quick oats absorb moisture faster and produce a softer, more uniform cookie that lacks the distinct chewy texture and visible oat structure that defines a proper oatmeal cookie. Instant oats dissolve almost completely into the dough and produce a result that’s closer to a soft sugar cookie with a faint oat flavor. Old-fashioned rolled oats hold their shape, provide the characteristic chew, and create the slightly rustic surface texture that makes these cookies look and taste the way they should.
For the butter, you need it browned, not just melted. The process takes 5 minutes and the result is noticeably different: brown butter has hundreds of additional flavor compounds produced during the cooking process that plain butter doesn’t contain. Use unsalted butter so you can control the salt level precisely; salted butter varies in sodium content by brand and can produce a noticeably saltier cookie than intended.
For the sugar, the combination of brown and white sugar is intentional. Brown sugar contributes moisture and chewiness through its molasses content; white sugar promotes spreading and crisp edges. A dough made with only brown sugar produces a cookie that’s dense and barely spreads; only white sugar produces one that spreads too thin and turns crispy throughout. The 2:1 ratio of brown to white in this recipe produces the ideal balance.
- 115g (1/2 cup or 1 stick) unsalted butter — browned before use; this is the most important flavor decision in the recipe; see step 1 for the browning method
- 150g (3/4 cup, packed) light brown sugar — the primary sweetener; contributes chewiness and moisture through its molasses content
- 50g (1/4 cup) granulated white sugar — promotes spreading and crisps the edges; do not substitute all brown sugar
- 1 large egg plus 1 egg yolk, room temperature — the whole egg provides structure; the extra yolk adds richness and contributes to the dense, chewy center; room temperature eggs incorporate more smoothly than cold
- 1 1/2 teaspoons pure vanilla extract — the dominant flavor companion to the cinnamon; use pure extract rather than imitation for a cleaner flavor
- 1 teaspoon ground cinnamon — the characteristic spice of a good oatmeal cookie; a full teaspoon is the right amount; less produces a barely noticeable warmth
- 1/2 teaspoon baking soda — the leavening agent; reacts with the sugar to produce the slight lift that prevents the cookies from being too dense
- 1/2 teaspoon fine salt — essential even with unsalted butter; salt amplifies the sweetness and makes the brown butter and cinnamon more distinct
- 135g (1 cup, spooned) all-purpose flour — measured by spooning into the cup, never scooping; the structural base of the cookie; too much flour from over-measuring produces a dry, crumbly result
- 180g (2 cups) old-fashioned rolled oats — the signature ingredient; provides the chew, texture, and flavor that defines this cookie
Optional add-ins (choose one or combine, up to 180g total):
Raisins, semi-sweet chocolate chips, dried cranberries, chopped walnuts or pecans

Allergen and Dietary Disclosure
This oatmeal cookies recipe contains gluten (all-purpose flour and oats; oats are naturally gluten-free but frequently processed in shared facilities with wheat), dairy (butter), and eggs. Optional add-ins may introduce additional allergens: walnuts and pecans contain tree nuts, and chocolate chips may contain dairy.
For gluten-free: replace the all-purpose flour with an equal quantity of certified gluten-free 1:1 baking flour blend, and use certified gluten-free rolled oats. The texture of the finished cookie is very close to the standard version; the cookies may spread slightly more and benefit from refrigerating the dough for 20 minutes before baking.
For dairy-free: replace the butter with vegan butter sticks (not spread, which has a higher water content) and brown it the same way as regular butter. The browning will be slightly less pronounced in color but the flavor improvement is still there. Most vegan butter sticks brown in about the same time as dairy butter.
For egg-free: replace the egg and yolk with 3 tablespoons of aquafaba (the liquid from a can of chickpeas) whisked until slightly foamy. The texture will be slightly more crispy and less chewy, but the cookies hold together and taste very good.
This recipe has not been tested in a certified allergen-free kitchen and cannot be guaranteed safe for any specific allergy.
Equipment Needed
- Light-colored rimmed baking sheet — light-colored aluminum produces more even browning than dark non-stick pans, which absorb more heat and can overbrown the bottoms of the cookies before the tops are set. A rimmed sheet prevents cookies from sliding off during transport and makes the sheet easier to handle.
- Parchment paper — essential for preventing sticking and making cleanup effortless. Silicone baking mats also work; greased baking sheets are a last resort but produce less consistent browning.
- Medium saucepan with a light-colored interior — for browning the butter. A light-colored interior, such as stainless steel, is critical because it lets you see the color of the milk solids changing from white to golden to amber. A dark non-stick pan hides the color change and makes it very easy to take the butter past brown into burnt.
- Cookie scoop, 1.5 tablespoon capacity — for portioning the dough into uniform balls that bake at the same rate. Inconsistent cookie size means some will be done before others; a scoop produces consistent results every time. A regular tablespoon works but requires estimating portions by eye.
- Wire cooling rack — for transferring the cookies off the hot baking sheet after the 5-minute pan rest. Leaving cookies on the hot sheet beyond 5 to 6 minutes continues baking them from the bottom up and can produce a harder, more brittle texture than intended.
Step-by-Step Directions
Step 1: Brown the Butter
Place the butter in a medium light-colored saucepan over medium heat. Let it melt completely, then continue cooking, stirring every 30 seconds, for 3 to 5 minutes. The butter will go through stages: first it foams, then the foam subsides, then small golden specks begin to appear on the bottom of the pan as the milk solids separate and toast. The moment those specks turn amber and the butter smells like toasted hazelnuts or caramel, remove the pan from the heat immediately and pour the brown butter into a large mixing bowl. Don’t leave it in the hot pan; the residual heat will continue cooking it. Allow it to cool at room temperature for 8 to 10 minutes before adding the sugar.

Chef’s Note: The transition from brown butter to burnt butter takes less than 30 seconds when the milk solids reach the right temperature. The signal is simultaneous: the color of the solids turns amber at the exact moment the smell becomes nutty and fragrant. Remove from heat at that precise moment, not slightly after; a pan of dark, bitter burnt butter means starting over.
Step 2: Mix the Sugars and Eggs
Preheat the oven to 175°C (350°F) and line two baking sheets with parchment paper. Once the brown butter has cooled enough that it’s warm but not hot, add both sugars to the bowl and whisk vigorously for 60 seconds until the mixture is smooth and slightly darker from the brown sugar dissolving into the butter. Add the whole egg, the egg yolk, and the vanilla extract. Whisk for another 60 seconds until the mixture looks pale, slightly thickened, and completely uniform. The extra whisking here, beyond just combining the ingredients, begins to build a small amount of structure in the batter that contributes to the cookie’s chew.
Chef’s Note: Whisking the egg and sugar mixture for the full 60 seconds after the eggs go in produces a slightly emulsified base that holds together better during baking than a briefly stirred mixture. You can see the difference: a properly whisked mixture will fall from the whisk in a continuous ribbon rather than dripping in separate drops.

Step 3: Add Dry Ingredients
Add the cinnamon, baking soda, and salt directly to the wet mixture and whisk briefly just until distributed. Switch to a spatula. Spoon the flour into the cup measure rather than scooping directly from the bag; scooping compacts the flour and adds 10 to 15% more than the recipe needs, which produces a dry, dense cookie. Add the spooned-and-leveled flour to the bowl and fold with the spatula until no dry white patches remain. The dough at this stage will look slightly thick and glossy.
Step 4: Fold in the Oats
Add the rolled oats to the dough and fold them through with the spatula, using broad strokes that bring the dough up from the bottom of the bowl over the oats. Continue folding until the oats are evenly distributed throughout with no dry oat piles remaining. If adding any optional mix-ins, fold them in now with the same motion. The dough will be thick and slightly sticky; this is correct.

Step 5: Portion and Arrange
Use the cookie scoop to portion the dough into 18 equal balls, approximately 1.5 tablespoons each. Place them on the prepared baking sheets with 5cm of space between each; these cookies spread to about 8cm in diameter during baking and need room to expand without merging. Do not flatten the dough balls before baking; they spread naturally from the oven heat. Flattening them further produces cookies that are too thin and crispy throughout rather than soft in the center.
Chef’s Note: If the dough feels very soft and sticky and the balls don’t hold their shape well, refrigerate the portioned dough balls on the baking sheet for 15 minutes before baking. Slightly chilled dough balls spread more slowly in the oven and produce a slightly thicker, chewier cookie. This is especially useful in a warm kitchen.
Step 6: Bake and Rest
Bake one tray at a time on the center rack for 11 to 13 minutes. At 11 minutes, the edges should be a light golden-brown color and the centers will still look underbaked, puffed, and slightly shiny. This is the correct time to pull them. The cookies continue cooking on the hot pan for 5 minutes after the oven door closes, and that carryover heat sets the center to the right chewy consistency. Cookies that look fully set when pulled from the oven will be over-baked and hard when cooled. After 5 minutes on the pan, transfer to a wire rack to cool completely.
Common Mistakes and Troubleshooting
| Problem | Cause | Solution |
|---|---|---|
| Cookies spread too thin and flat | Butter was too hot when the sugar was added, or too little flour | Let brown butter cool for 8 to 10 minutes before adding sugar; always measure flour by spooning, never scooping |
| Cookies don’t spread and stay thick and doughy | Too much flour from scooping rather than spooning the measure, or too cold | Measure flour correctly; if kitchen is cold, let the portioned dough sit at room temperature for 10 minutes before baking |
| Cookies hard and dry after cooling | Overbaked, or pulled from the oven when the centers looked fully set | Pull when the edges are golden and the centers still look underbaked; the pan’s carryover heat finishes the center |
| Butter burnt rather than browned | Left in the pan on heat too long, or heat too high | Use medium heat; watch constantly once foaming subsides and remove the moment the solids turn amber |
| Cookies fall apart when lifted from the pan | Moved before the 5-minute pan rest was complete | Always wait the full 5 minutes; the structure sets from the residual heat during that time |
| Oats taste dry and raw-tasting | Quick oats or instant oats used instead of old-fashioned rolled oats | Only old-fashioned rolled oats produce the right texture; quick oats change the entire character of the cookie |
Variations and Substitutions
- Oatmeal raisin cookies: Fold 150g of raisins into the dough along with the oats. Soaking the raisins in warm water for 10 minutes before adding them plumps them and prevents them from drying out further during baking. Drain and pat dry before folding in. This is the classic version and the plumped raisin texture against the chewy oat base is genuinely better than using dried raisins straight from the bag.
- Oatmeal chocolate chip cookies: Fold 170g of semi-sweet chocolate chips into the dough with the oats. The slight bitterness of semi-sweet chocolate pairs better with the brown sugar and cinnamon base than milk chocolate, which can make the cookie taste overly sweet overall.
- Oatmeal cranberry white chocolate: Add 100g of dried cranberries and 80g of white chocolate chips to the dough together. The tart cranberries and sweet white chocolate against the cinnamon-spiced oat base produce a more complex flavor combination than either ingredient contributes on its own.
- Brown butter oatmeal walnut cookies: Add 100g of roughly chopped walnuts folded in with the oats. Toast the walnuts in a dry skillet over medium heat for 3 to 4 minutes until they smell nutty and fragrant before chopping; toasted nuts add considerably more flavor than raw ones. Pecans substitute directly.
- Spiced oatmeal cookies: Add 1/4 teaspoon of ground nutmeg, 1/4 teaspoon of ground ginger, and 1/8 teaspoon of ground cloves alongside the cinnamon. The expanded spice blend produces a warmer, more aromatic cookie that’s particularly well-suited to fall and winter baking. No other adjustments are needed.
- Gluten-free oatmeal cookies: Replace the all-purpose flour with a certified gluten-free 1:1 baking flour blend at the same quantity, and use certified gluten-free old-fashioned rolled oats. The dough may be slightly stickier; refrigerate the portioned balls for 15 minutes before baking to help them hold their shape. The finished cookie is very close in texture to the standard version.
Serving Suggestions
- Serve warm, within 15 to 20 minutes of coming off the cooling rack, when the center is at its most tender and the edges are still slightly crispy from baking. A cookie that’s been sitting at room temperature for 3 hours is still very good, but the textural contrast between edge and center is most pronounced while the cookie is still warm.
- A cold glass of whole milk alongside is the pairing that works best with the warm cinnamon and brown sugar base; the fat in the milk tempers the sweetness and the cold temperature contrasts with the warm cookie.
- Crumble two or three cookies over a scoop of vanilla ice cream in a bowl for an oatmeal cookie sundae. The cookie pieces absorb the melting ice cream and the resulting texture combines crunch, chew, and cream in a way that works considerably better than either component alone.
- Pack individually in small cellophane bags tied with ribbon for gifts or bake sale packaging. Oatmeal cookies are structurally sturdy enough to handle wrapping and transportation without crumbling or breaking.
- Serve as part of a cookie platter alongside chocolate chip cookies and snickerdoodles for a party or gathering. The oatmeal cookies hold their texture at room temperature for several hours, making them a practical choice for a spread that needs to sit out.
- Pair with a strong cup of black coffee or a latte for an afternoon snack. The bitter coffee contrasts with the sweet cookie and makes the cinnamon and brown butter notes more distinct.

Tips for the Best Results
- Brown the butter completely, every time. The flavor difference between a cookie made with plain melted butter and one made with properly browned butter is significant enough to notice without side-by-side comparison. The toasted milk solids produce a nutty, caramelized depth that carries through the whole cookie. The 5 minutes it takes is worth building into the routine every time you make this recipe.
- Measure flour by spooning into the cup, not scooping from the bag. Scooping compacts flour into the measuring cup and consistently adds 10 to 15% more than the recipe intends. That extra flour produces cookies that are dry, barely spread, and taste slightly raw. Spoon the flour lightly into the cup and level with a straight edge.
- Pull the cookies when the centers still look underdone. This is the instruction that most directly determines whether the finished cookie is chewy or hard. When the edges are golden and set but the center looks slightly puffed and not quite matte, they’re done for the oven. The 5-minute rest on the hot pan finishes the center through residual heat. If you wait until the entire cookie looks set in the oven, the finished cookie will be crunchy rather than chewy.
- Bake one sheet at a time on the center rack. Baking two sheets simultaneously requires using two racks, which means one sheet bakes hotter and one cooler. The cookies on different racks develop different degrees of browning and need to be rotated, which complicates the timing. One sheet at a time on the center rack produces the most consistent results with minimal attention.
- Let the brown butter cool before adding sugar. Hot butter added to sugar begins to dissolve and caramelize it in a way that changes the dough’s structure before baking. The dough becomes looser and produces cookies that spread more than intended. Warm-but-not-hot butter, at around 45 to 50°C, incorporates smoothly without this issue.
Storage Tips
Refrigerator
Baked oatmeal cookies store in a sealed container at room temperature for 5 days. Refrigerating them is not necessary and actually makes the texture slightly firmer and less pleasant; the cold draws moisture out of the cookie over time. If you must refrigerate them, bring them to room temperature for 20 minutes before eating.
Freezer
Both baked cookies and portioned unbaked dough balls freeze very well. For baked cookies, cool completely, layer between sheets of parchment paper in a freezer-safe container or bag, and freeze for up to 3 months. For unbaked dough balls, freeze on the baking sheet in a single layer until solid (about 1 hour), then transfer to a freezer bag and store for up to 3 months. Bake frozen dough balls directly from the freezer by adding 2 to 3 minutes to the standard bake time; no thawing needed.
Reheating
To restore the just-baked texture of a room-temperature or previously frozen cookie, place it on a baking sheet in a preheated 160°C (325°F) oven for 4 to 5 minutes. The center softens and the edges re-crisp to something very close to the original baked texture. Microwave reheating at 50% power for 15 to 20 seconds warms the cookie quickly but produces a softer, slightly steam-softened texture rather than the oven’s crispier result.
Make-ahead note: Portioning the dough and freezing the unbaked balls is one of the most practical ways to use this recipe. Keep a bag in the freezer and bake 3 to 4 cookies at a time whenever the occasion calls for it. The quality of a cookie baked from frozen dough is essentially identical to one baked from fresh dough.
Nutrition Information
Per serving, approximately one cookie (1/18 of the recipe), without optional add-ins:
| Nutrient | Amount |
|---|---|
| Calories | 155 kcal |
| Protein | 2.5g |
| Total Carbohydrates | 22g |
| Dietary Fiber | 1g |
| Total Sugar | 12g |
| Total Fat | 7g |
| Saturated Fat | 4g |
| Cholesterol | 32mg |
| Sodium | 85mg |
| Vitamin C | 0mg |
| Calcium | 15mg |
| Iron | 0.8mg |
| Potassium | 65mg |
Nutrition values are approximate and may vary based on brands and add-in choices. Optional mix-ins not included.
Why This Recipe Works
Brown butter produces a measurably more flavorful cookie than plain melted butter because of a specific chemical reaction called the Maillard reaction between the milk solids and the heat. Butter is approximately 80% fat, 18% water, and 2% milk proteins and sugars. When butter is heated past the point where all its water has evaporated, the remaining milk proteins and trace sugars react with each other under heat to produce hundreds of new aromatic compounds: furanones, pyrazines, and various aldehydes associated with the nutty, caramelized, almost toffee-like aroma of browned butter. Plain melted butter contains none of those compounds because it never reaches the temperature needed to trigger the reaction. In a baked cookie where the base fat is the dominant flavoring component, the difference between brown butter and regular butter is immediately detectable.
The ratio of brown to white sugar in the dough directly controls the cookie’s texture through two different mechanisms. Brown sugar contains 3 to 5% molasses, which is hygroscopic: it attracts and retains moisture from the surrounding environment. In a baked cookie, this moisture retention keeps the interior of the cookie soft and slightly sticky well after baking, which is what produces the characteristic chew. White sugar, by contrast, promotes spreading because it has a lower melting point than brown sugar and liquefies earlier in the oven, allowing the cookie to spread outward before the structure sets. The 3:1 ratio of brown to white in this recipe is calibrated to produce maximum chew with enough spread to create the thin, crispy edge rather than a thick, cakey disc.
The extra egg yolk beyond the whole egg is doing specific structural work. Egg whites contain primarily water and protein; they add structure and set the cookie during baking but contribute little to richness. Yolks are approximately 30% fat and contain emulsifying lecithin compounds that bind fat and water into a stable, cohesive mixture. Adding a second yolk without a second white increases the fat and emulsifier content of the dough without adding additional water, which produces a dough that bakes into a richer, more tender, denser center than a single-egg version. The single-egg cookie is good; the egg-plus-yolk version has a noticeably more luxurious texture in the center of each bite.
Pulling cookies from the oven when the center looks visually underbaked is a technique calibrated around carryover cooking. When a baking sheet is removed from a 175°C (350°F) oven, the metal retains that heat and continues to conduct it into the base of the cookie for 4 to 6 minutes. The cookie’s center, which registers around 68 to 72°C (155 to 161°F) when pulled from the oven, climbs to the final set temperature of around 76 to 80°C (169 to 176°F) during the pan rest. A cookie pulled when the center looks set has already reached that final temperature in the oven and will read 85°C or above when cooled, producing a cookie that’s firm throughout. Understanding this mechanism makes the “pull them early” instruction feel less like guesswork and more like a deliberate choice with a predictable outcome.
Old-fashioned rolled oats contribute to both the flavor and the structure of the cookie through their physical size and composition. At 4 to 5mm across, rolled oat flakes maintain their shape and individual identity in the baked cookie, providing the distinct chewy pockets and the visible oat texture across the surface. They also absorb a portion of the dough’s moisture during baking, contributing to the chew by creating a slightly drier, denser structure in the areas where the oats are concentrated. Quick oats, which are pre-cut to less than 2mm, absorb moisture faster and dissolve more completely into the dough during mixing and baking, producing a more uniform texture that lacks the distinct, chewy oat presence.
Frequently Asked Questions
Can I make oatmeal cookie dough ahead of time?
Yes, and it keeps well in two forms. The complete dough can be covered and refrigerated for up to 48 hours before portioning and baking; cold dough produces a slightly thicker cookie since the butter has solidified and the cookies spread more slowly in the oven. For longer storage, portion the dough into balls and freeze them solid on a baking sheet before transferring to a freezer bag; they keep for up to 3 months and bake directly from frozen with 2 to 3 extra minutes added to the standard bake time.
Why are my oatmeal cookies flat and greasy?
Flat, greasy cookies almost always mean the brown butter was still too hot when the sugar was mixed in. Hot butter begins to melt the sugar immediately and creates a dough with a different texture than intended; when this dough bakes, the excess liquid from the over-dissolved sugar causes the cookie to spread very thin before the structure can set. Let the brown butter cool for 8 to 10 minutes, until it’s warm but not hot to the touch, before adding any sugar. A warm kitchen can also cause problems; refrigerating the portioned dough balls for 15 minutes before baking helps significantly.
Can I substitute quick oats for old-fashioned rolled oats?
Technically yes, but the finished cookie will be noticeably different. Quick oats are pre-cut into smaller pieces and absorb moisture faster, which produces a softer, more uniform cookie with less of the distinct chewy texture that defines a good oatmeal cookie. The flavor is also slightly less pronounced. Old-fashioned rolled oats produce the right result. If quick oats are the only option available, reduce the bake time by 1 to 2 minutes since they absorb moisture faster and the dough will set slightly sooner.
How do I know when oatmeal cookies are done baking?
The correct visual cue is golden-brown edges with centers that still look slightly puffed and underbaked. When you press the center of a cookie gently with your fingertip, it should feel barely set and leave a very slight impression; it should not feel wet and raw, but it also should not feel firm and spring back completely. That soft-center stage is exactly when the oven door should open. The center finishes cooking from the pan’s residual heat during the 5-minute rest and will look set and matte when you transfer the cookies to the cooling rack.
Are oatmeal cookies gluten-free?
The standard recipe is not gluten-free. It contains all-purpose flour and, unless certified gluten-free oats are used, standard rolled oats that may have been processed in shared facilities with wheat. To make a fully gluten-free version, replace the flour with a certified gluten-free 1:1 baking flour blend and use certified gluten-free rolled oats. With both substitutions, the finished cookie is very close in texture and flavor to the standard version; the dough may be slightly stickier and benefit from a brief refrigeration before baking.
Can I make these without eggs?
Yes, with a texture trade-off. Replace the whole egg and the yolk with 3 tablespoons of aquafaba, which is the liquid from a can of chickpeas, whisked briefly until slightly foamy. The cookies will be a bit more crispy overall and slightly less chewy in the center, since the egg yolk’s fat and emulsifiers that produce the dense interior are not fully replicated by aquafaba. They still hold together well and taste very good; the texture is just slightly different from the standard version.
Why did my cookies come out hard instead of chewy?
Over-baking is the most common cause of hard oatmeal cookies, and it usually happens because the cookies were in the oven until they looked fully set. Remember that the center needs to look underbaked when the cookies come out. The second cause is the wrong oat type: quick oats or instant oats absorb moisture very differently from old-fashioned rolled oats and produce a drier, less chewy cookie. Third, too much flour from scooping rather than spooning the measure adds excess starch that makes the cookie stiff and dry.

Conclusion
Chewy Oatmeal cookies are one of those recipes that rewards small, deliberate decisions: browning the butter instead of just melting it, spooning the flour instead of scooping it, and pulling the tray when the centers look too soft rather than waiting until they look done. Each of those choices produces a specific, noticeable result in the finished cookie, and understanding why they matter makes the recipe more reliable every time you make it.
The base recipe here is strong enough to stand on its own, but it’s also designed to accept add-ins cleanly without requiring adjustments. Whether you fold in raisins, chocolate chips, or nothing at all, the underlying cookie is worth making.
If you loved this recipe, save it to your baking and easy cookie recipes Pinterest board so you can find it easily later! For more same recipes follow Thecookingvibes Pinterest account.
Chewy Oatmeal Cookies
Ingredients
Equipment
Method
- Brown the butter in a light-colored saucepan over medium heat, stirring frequently, until the milk solids turn amber and the butter smells nutty. Pour immediately into a heatproof bowl and cool 8 to 10 minutes.
- Preheat oven to 175°C (350°F). Line two baking sheets with parchment paper.
- Add both sugars to the cooled brown butter and whisk vigorously for 60 seconds. Add the egg, egg yolk, and vanilla extract and whisk for another 60 seconds until glossy.
- Add cinnamon, baking soda, and salt to the bowl; whisk briefly to distribute. Switch to a spatula and fold in the spooned-and-leveled flour until no dry patches remain.
- Fold in the rolled oats until evenly distributed. Fold in any optional add-ins at this stage.
- Portion the dough into 18 equal balls using a 1.5 tablespoon cookie scoop. Arrange on prepared baking sheets with 5cm between each.
- Bake one sheet at a time on the center rack for 11 to 13 minutes, until the edges are golden-brown and the centers still look slightly underbaked. Do not overbake.
- Cool on the pan for 5 minutes, then transfer to a wire rack to cool completely.
Notes
- Let the brown butter cool for the full 8 to 10 minutes before adding sugar; hot butter produces overly flat cookies.
- Measure flour by spooning into the cup, not scooping; scooping adds excess flour and produces dry, dense cookies.
- Pull cookies from the oven when the centers still look underbaked; carryover heat from the pan finishes them during the 5-minute rest.
- Unbaked portioned dough balls freeze for up to 3 months; bake directly from frozen, adding 2 to 3 minutes to the bake time.
This recipe has not been tested in a certified allergen-free kitchen and cannot be guaranteed safe for any specific allergy.