Easy Shrimp Scampi — Garlicky Butter Sauce, Ready in 20 Minutes
Heat butter and olive oil in a skillet until the butter stops foaming, add garlic, and within 30 seconds your kitchen smells like a coastal Italian restaurant. That smell is the signal that shrimp scampi is going to work: the garlic is toasting into the fat that will coat every shrimp, and the combination of butter richness and olive oil depth is already developing before the first shrimp touches the pan. The whole dish comes together in the time it takes a pot of pasta to boil.
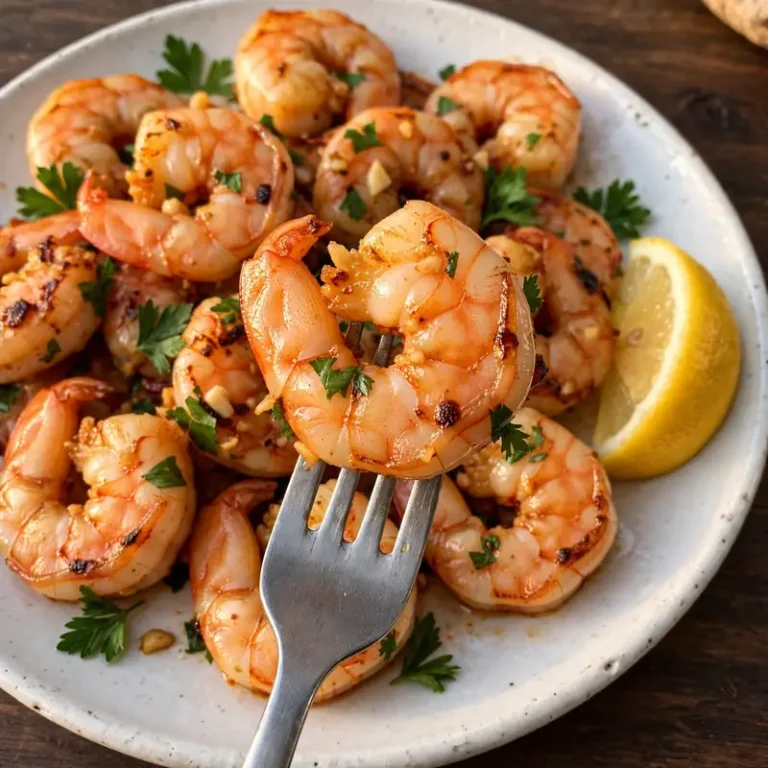
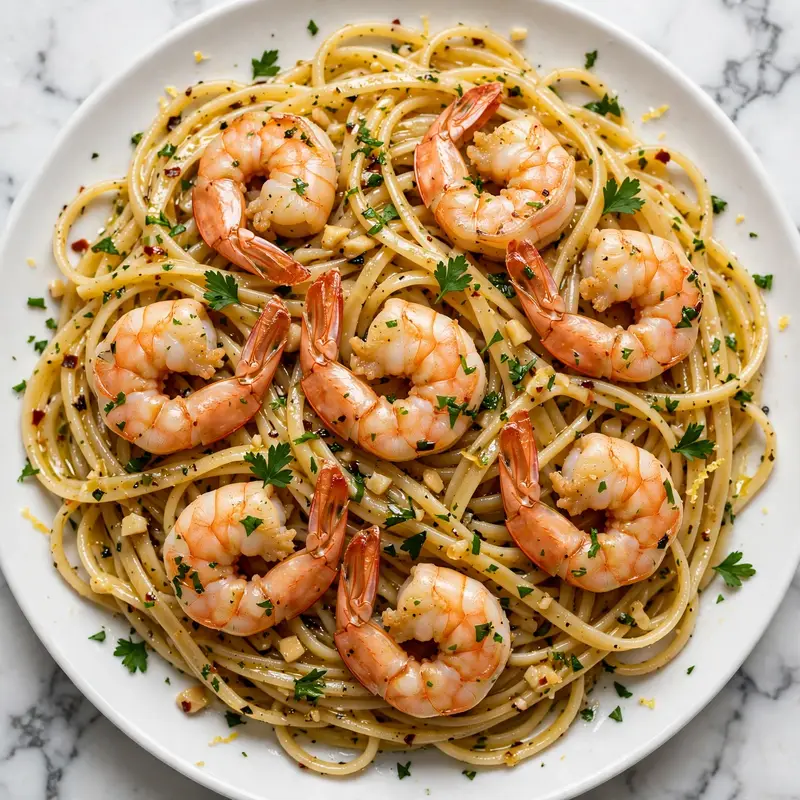
This shrimp scampi recipe uses jumbo shrimp sautéed in a garlic-butter base with a splash of low-sodium chicken broth for the sauce’s liquid volume, finished with fresh lemon juice, lemon zest, and flat-leaf parsley. The broth brings the sauce together with a savory depth that makes it cling to the pasta and the shrimp rather than sitting as a thin, separated liquid at the bottom of the pan. It serves 4 generously over linguine in under 20 minutes and works equally well as a weeknight dinner or a special occasion meal that looks far more involved than it actually is.

Why You’ll Love This Shrimp Scampi
- Restaurant-quality sauce at home. The combination of butter, olive oil, garlic, broth, and fresh lemon produces a glossy, emulsified sauce that coats every strand of pasta and every shrimp without separating into a greasy pool at the bottom of the bowl.
- Done in 20 minutes flat. The shrimp cook in 3 to 4 minutes total and the sauce builds in the same pan during the same window; there is no second step, no waiting, and no resting time.
- Shrimp that stay tender, never rubbery. Cooking shrimp quickly at medium-high heat and pulling them from the pan the moment they curl and turn pink produces a texture that’s firm and succulent rather than the tight, chewy rubber result of even 60 seconds of overcooking.
- Flexible serving options. Over linguine, over rice, with crusty bread to soak up the sauce, or served without any starch as a lighter main: the recipe adapts to whatever the table calls for without any changes to the base method.
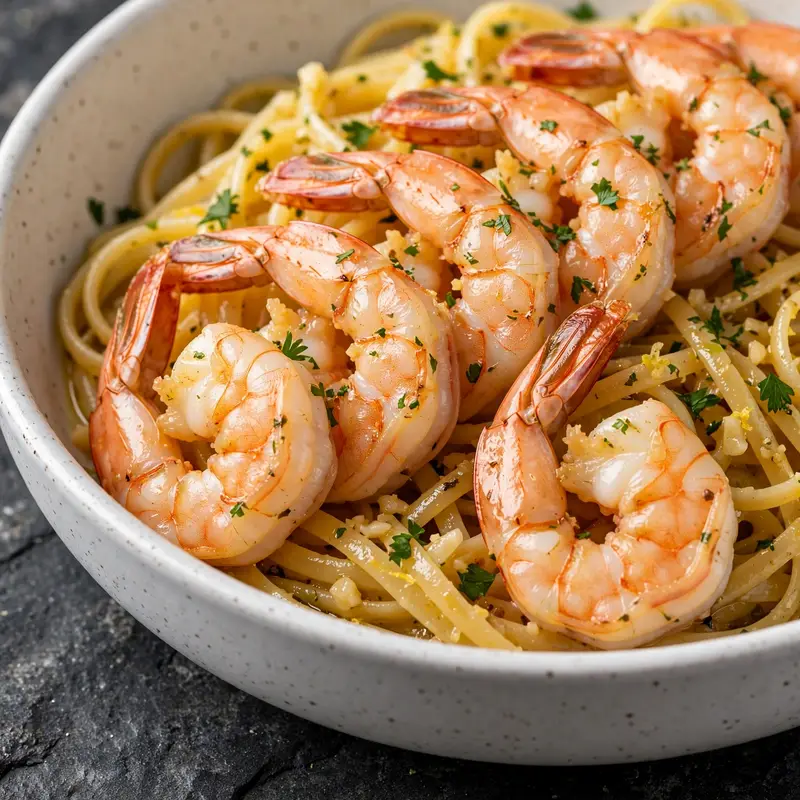
- Impressive enough for guests. Shrimp scampi looks and tastes like something that took considerably more effort than it did; the visual of plump pink shrimp in a glossy, herb-flecked butter sauce over pasta is hard to beat for a fast dinner that still feels special.
Ingredients You’ll Need
Recipe Timing
| Detail | Info |
|---|---|
| Servings | 4 |
| Difficulty | Easy |
| Course | Main Course |
| Cuisine | Italian-American |
| Prep Time | 10 minutes |
| Cook Time | 15 minutes |
| Rest Time | 0 minutes |
| Total Time | 25 minutes |
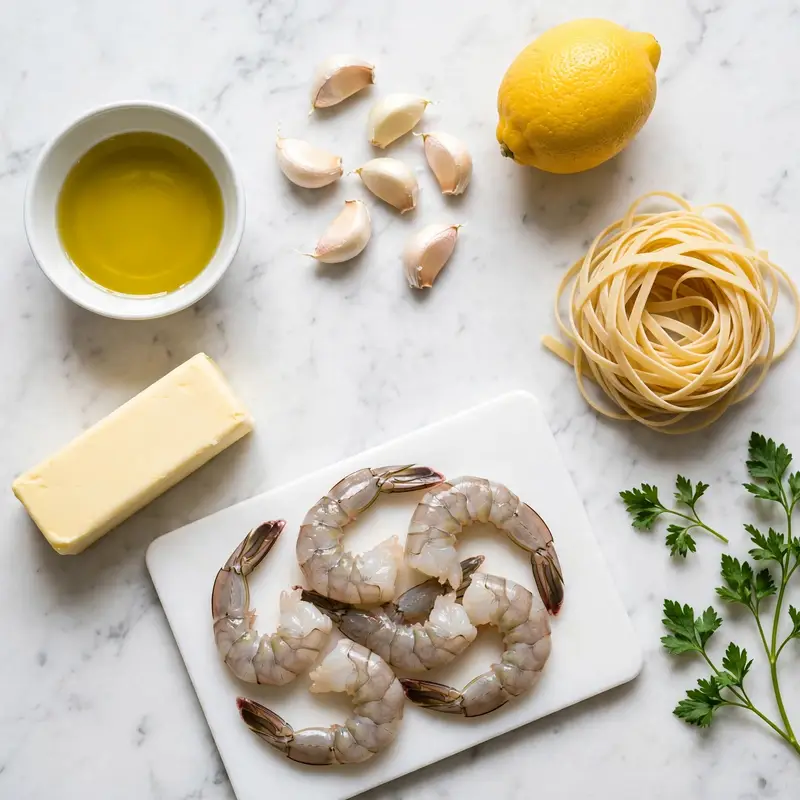
For the shrimp, size matters significantly here. Jumbo shrimp (16 to 20 count per pound) are the right choice for shrimp scampi because their larger surface area develops a better sear in the hot fat, they look substantial in the finished dish, and they have a wider window of doneness before they overcook compared to smaller shrimp. Smaller shrimp, such as medium or large count, cook through so quickly that the difference between perfectly cooked and overcooked is less than 30 seconds.
Buy shrimp that are already peeled and deveined to save 10 minutes of prep time; the quality difference between shell-on and pre-peeled shrimp is negligible in a dish where the shrimp cook for 3 to 4 minutes total. If buying fresh from a fishmonger, smell matters: properly fresh shrimp smell faintly of the ocean, clean and saline, not fishy or ammonia-like.
For the butter, a good unsalted butter with a visible golden color rather than a very pale white one contains a higher fat content and produces a richer, more emulsified sauce. The salt is added separately so you control the level precisely.
For the garlic, fresh cloves minced by hand produce the best result; pre-minced jarred garlic has a different flavor profile from oxidation during storage and is noticeably less vibrant in a dish where garlic is the primary aromatic.
- 500g (about 1 lb) jumbo shrimp, peeled and deveined, tails on or off — the primary protein; food safety note: shrimp must reach an internal temperature of 63°C (145°F) and turn opaque pink before consuming; tails-on looks more elegant but tails-off is easier to eat
- 340g (12 oz) linguine or spaghetti — the pasta base; linguine’s slightly flat shape catches more sauce per strand than spaghetti; angel hair is too delicate and overcooks in the time it takes to toss with the sauce
- 3 tablespoons unsalted butter, divided — 2 tablespoons for the sauce base, 1 tablespoon stirred in cold at the end to emulsify and thicken the sauce; cold finishing butter is the technique that produces the glossy, cohesive sauce
- 2 tablespoons good-quality olive oil — adds depth and raises the smoke point of the butter so the garlic can cook without burning; adds a faintly fruity, grassy note to the sauce
- 6 garlic cloves, finely minced — the dominant flavor; more than most recipes call for, but the 3 to 4-minute cook time in butter mellow the garlic considerably before the liquid goes in
- 1/2 cup (120ml) low-sodium chicken broth — the sauce’s liquid component; provides savory depth and the volume needed for the sauce to emulsify around the pasta; low-sodium gives full control over final seasoning
- Juice of 1 large lemon (about 3 tablespoons) — added off the heat; the acid brightens and sharpens all the flavors; fresh-squeezed only, never bottled
- Zest of 1 lemon — adds floral, aromatic citrus notes that the juice alone doesn’t provide; zest before juicing, always
- 1/4 teaspoon red chili flakes — adds a very mild background warmth; adjust up or down to taste; the standard scampi spice level
- 1/2 cup (about 15g) fresh flat-leaf parsley, roughly chopped — added at the very end; the fresh herb brightness rounds the rich butter sauce; curly parsley substitutes but has a slightly more bitter, less complex flavor
- Salt and freshly ground black pepper — season the shrimp before cooking and the sauce at the end
- Freshly grated Parmesan cheese — optional, for serving; a small amount over the top adds a savory, salty finish
Allergen and Dietary Disclosure
This shrimp scampi contains shellfish (shrimp), gluten (pasta, and potentially in the chicken broth), and dairy (butter). The dish is naturally egg-free.
For gluten-free: use certified gluten-free pasta and confirm the chicken broth label specifically states gluten-free, as some broths use barley or wheat-derived additives. The sauce itself is naturally gluten-free. The pasta cooking and tossing method stays identical; gluten-free pasta tends to be slightly stickier, so toss it with the sauce immediately after draining.
For dairy-free: replace the butter entirely with high-quality extra-virgin olive oil. Use 4 tablespoons total: 3 tablespoons for the base and 1 tablespoon swirled in at the end in place of the cold finishing butter. The sauce will be slightly less rich and cohesive but still very flavorful. The cold oil emulsification trick still works; add it off the heat and stir briskly.
For shellfish allergy: there is no substitute for shrimp in this recipe that produces the same result; the dish is defined by its protein. A very firm fish like large scallops or chunks of swordfish seared separately and finished in the sauce adapts the method to a non-shellfish seafood version.
This recipe has not been tested in a certified allergen-free kitchen and cannot be guaranteed safe for any specific allergy.
Equipment Needed
- Large skillet, 12-inch, stainless steel or cast iron — for both the shrimp sear and the sauce. A wide skillet is essential because it allows the shrimp to lay flat in a single layer for an even sear; a smaller pan forces the shrimp to overlap and steam rather than sear. Stainless steel allows for a fond to develop on the pan bottom that gets lifted by the broth, adding flavor to the sauce. Non-stick works for the cooking but doesn’t develop the same fond.
- Large pasta pot, 6 quart minimum — for cooking the linguine in generously salted water. A small pot produces pasta that cooks unevenly and sticks together during boiling; the linguine needs room to move freely in the water.
- Tongs — for handling the shrimp safely and efficiently in the hot pan and for tossing the pasta through the sauce. A spoon works for the sauce but lacks the control to flip individual shrimp and toss pasta simultaneously.
- Microplane zester or fine box grater — for zesting the lemon before juicing it. Zesting over the pan directly means the essential oils from the zest hit the hot sauce and volatilize immediately; always zest into a small bowl first and add it when specified in the recipe.
Step-by-Step Directions
Step 1: Boil and Salt the Pasta Water
Fill the large pot with water and bring it to a rolling boil over high heat. Add enough salt that the water tastes faintly of the sea, approximately 1 tablespoon of fine sea salt per 4 litres of water. This is the only opportunity to season the pasta itself; under-salted pasta water produces noodles that taste flat no matter how flavorful the sauce is. Add the linguine and cook according to the package instructions for al dente, typically 8 to 9 minutes for standard dried pasta. Reserve 1 cup of the pasta cooking water before draining; this starchy water adjusts the sauce consistency later if needed.

Chef’s Note: Timing the pasta and the shrimp to finish at the same time is the coordination that makes this recipe work seamlessly. Start the pasta first, then begin the shrimp when the linguine has about 5 minutes left. The shrimp take 3 to 4 minutes; by the time they’re done the pasta is ready to drain and toss directly into the sauce.
Step 2: Dry and Season the Shrimp
Pat the shrimp completely dry with paper towels on both sides before seasoning. Surface moisture on the shrimp creates steam when they hit the hot pan, which prevents direct contact caramelization and produces a pale, steamed exterior rather than the golden sear that adds flavor to the finished dish. Season both sides with a light pinch of salt and a crack of black pepper after drying.
Food safety note: Always wash hands and any surface or utensil that contacted raw shrimp before handling other ingredients. Keep raw shrimp refrigerated until the moment they go into the pan.
Step 3: Sear the Shrimp
Heat 1 tablespoon of butter and the olive oil together in the skillet over medium-high heat until the butter melts completely and the foam begins to subside. Add the shrimp in a single layer without any overlapping. Cook undisturbed for 90 seconds until the underside turns pink and a faint golden color develops at the contact points. Flip each shrimp with tongs and cook for 60 to 90 seconds more until the second side is pink and the shrimp has curled into a loose C-shape rather than a tight O-shape. Transfer immediately to a plate; do not leave them in the pan.
Chef’s Note: A shrimp curled into a loose C is perfectly cooked. A shrimp curled so tightly it forms an O has been overcooked and the muscle fibers have contracted beyond the point of tenderness. That transition from C to O takes less than 60 seconds at medium-high heat; watching the shape rather than the color is the most reliable doneness indicator for shrimp.

Step 4: Build the Garlic Butter Sauce
Reduce the heat to medium. Add the remaining tablespoon of butter to the same skillet and let it melt, then add the minced garlic and the red chili flakes. Stir continuously for 60 to 90 seconds, keeping the garlic moving so it toasts evenly without burning in the residual heat from the shrimp. The garlic should smell warm and faintly toasted, not sharp and raw; if it begins to brown faster than expected, lift the pan slightly off the burner while continuing to stir.
Chef’s Note: Using the same skillet that the shrimp cooked in for the sauce is the step most home cooks skip when they use a non-stick pan and transfer everything to a new dish. The browned bits and rendered fat left in a stainless steel pan after searing the shrimp carry the most concentrated shrimp and butter flavor in the recipe; the garlic picks those up as it cooks and carries them into the sauce.
Step 5: Deglaze and Reduce the Sauce
Pour the chicken broth into the garlicky pan in a steady stream while scraping the base with a wooden spoon to lift any browned bits. The liquid will bubble immediately and the browned bits will dissolve into the sauce within 30 seconds of steady stirring. Raise the heat slightly to bring the broth to a lively simmer and cook for 2 to 3 minutes until the liquid reduces by about one-third and the sauce smells more concentrated and less sharp from the raw broth.

Step 6: Emulsify and Finish the Sauce
Turn off the heat completely. Add the cold finishing tablespoon of butter, the lemon juice, and the lemon zest all at once. Stir briskly in a circular motion for 30 seconds while the cold butter melts into the hot sauce. The sauce should visibly thicken and turn slightly opaque as the cold butter emulsifies with the broth and pan fat. If it looks broken or greasy, stir more vigorously for another 15 seconds; the emulsification will come together.
Step 7: Combine and Serve
Return the seared shrimp to the pan along with all of their accumulated resting juices from the plate. Add the drained linguine directly to the pan. Toss everything together with tongs for 30 to 60 seconds, coating each strand of pasta and each shrimp with the glossy sauce. If the sauce looks too thick or clings in clumps, add pasta cooking water 2 tablespoons at a time and toss until the consistency flows smoothly. Add the chopped parsley and toss once more. Plate immediately into warmed bowls and serve with a lemon wedge alongside.
Common Mistakes and Troubleshooting
| Problem | Cause | Solution |
|---|---|---|
| Shrimp rubbery and overcooked | Left in the pan too long; O-shape instead of C-shape | Remove shrimp the moment they form a loose C; they continue cooking slightly from the residual heat of the sauce when returned |
| Sauce greasy and separated | Cold finishing butter not added after the heat was turned off, or not stirred vigorously enough | Always turn the heat off completely before the cold butter goes in; brisk circular stirring for 30 seconds forces the emulsification |
| Garlic burnt and bitter | Heat too high during garlic cooking, or garlic added before the butter foam subsided | Cook garlic at medium heat; keep it moving with constant stirring; lift the pan slightly if it’s browning too fast |
| Sauce too thin and watery | Broth not reduced enough, or too much pasta water added | Reduce the broth for the full 2 to 3 minutes before finishing; add pasta water in small increments, not all at once |
| Pasta bland despite flavorful sauce | Pasta water under-salted during boiling | Salt the pasta water generously before adding the pasta; the water should taste faintly saline |
| Shrimp pale rather than golden-seared | Shrimp were wet when they entered the pan, or heat was too low | Pat shrimp completely dry; make sure the butter-oil mixture is hot and the foam has subsided before adding shrimp |
Variations and Substitutions
- Shrimp scampi without pasta: Serve the sauced shrimp over toasted crusty bread, steamed rice, or cauliflower rice. The sauce quantity stays the same; reduce the pasta cooking water addition since there’s no pasta to absorb the sauce. Add an extra tablespoon of butter at the finish for a slightly richer sauce that pools around the bread or rice.
- Creamy shrimp scampi: After the broth has reduced but before the finishing butter goes in, stir in 3 tablespoons of heavy cream and let it reduce for 60 seconds over medium heat. Then turn off the heat and add the cold finishing butter, lemon juice, and zest as written. The cream produces a sauce that’s thicker, richer, and slightly more golden in color.
- Spicy garlic shrimp scampi: Double the red chili flakes to 1/2 teaspoon and add 1/4 teaspoon of smoked paprika to the garlic at the start of step 4. The smoked paprika adds a slightly warm depth to the heat rather than a clean, sharp spiciness. Finish with a squeeze of extra lemon at the table for anyone who wants more brightness against the heat.
- Shrimp scampi with cherry tomatoes: Add 1 cup of halved cherry tomatoes to the pan with the garlic and cook for 2 minutes until the tomatoes begin to blister and burst before adding the broth. The tomatoes add acidity, color, and a sweet, jammy element that turns the dish into something closer to a fra diavolo style without changing the fundamental method.
- Lemon herb version: Add 1 teaspoon of fresh thyme leaves and 1/2 teaspoon of fresh oregano alongside the parsley at the very end. The additional fresh herbs add an herbal complexity that works particularly well if you’re serving the shrimp scampi without pasta as a lighter main.
- Gluten-free shrimp scampi: Use certified gluten-free linguine or spaghetti and a certified gluten-free chicken broth. The rest of the recipe is naturally gluten-free; the method stays completely unchanged. Gluten-free pasta can be stickier after draining; toss immediately into the sauce rather than letting it sit.
Serving Suggestions
- Serve directly into wide, shallow warmed pasta bowls where the sauce can pool attractively around the pasta and shrimp. A rimmed bowl catches the sauce better than a flat plate; the sauce from the pan is worth spooning over the top at the table.
- A half loaf of crusty sourdough or ciabatta on the side is the most practical addition: the bread soaks up the garlic butter sauce at the bottom of the bowl and makes finishing the dish completely satisfying. Lightly toasted with a brush of olive oil is better than plain bread.
- A crisp green salad dressed with a sharp lemon vinaigrette alongside cuts through the richness of the butter sauce and provides a textural contrast to the soft pasta and tender shrimp. Arugula works particularly well because its slight bitterness complements the garlic.
- For a dinner party, serve the shrimp scampi as a primo, the first pasta course of an Italian-style meal, in smaller portions before a simple roasted protein as the main. The light, bright lemon-butter profile works well as a starter course rather than a heavy main.
- A small wedge of fresh lemon placed on the rim of each bowl gives guests the option to add extra brightness to their plate; many people find a squeeze of additional lemon at the table brings the whole dish into sharper focus.
- Pair with cold sparkling water with lemon or a chilled non-alcoholic sparkling grape juice. Both provide a refreshing, slightly acid contrast to the richness of the butter sauce without competing with the garlic and lemon in the dish.

Tips for the Best Results
- Pat the shrimp dry, and do it twice if the first pass leaves moisture. Wet shrimp in a hot pan produce a visible puff of steam the moment they make contact, and that steam layer insulates the shrimp from the pan surface and prevents any searing from occurring. The difference between a pale, steamed shrimp and a golden-seared one starts entirely with dryness before cooking.
- Use the C-shape test, not the color test, for doneness. Pink color appears on the outside of a shrimp before the center has fully cooked, and it also appears slightly before the muscle has contracted enough to tell you the texture is right. A shrimp curled into a loose C has reached the correct internal temperature with the right texture. A tight O means overcooked; get them out of the pan the moment the C forms.
- Turn the heat off before the finishing butter and lemon go in. This is the step that makes the difference between a glossy, emulsified scampi sauce and a broken, greasy one. Butter is an emulsion of fat and water; above about 70°C (158°F) the emulsion breaks and the fat separates from the liquid. Adding cold butter off the heat and stirring briskly keeps the temperature low enough for the emulsion to form and hold.
- Reserve pasta water before draining. The starchy pasta water is the sauce adjustment tool that no home cook should skip. If the sauce is too thick, 2 tablespoons of pasta water loosens it while maintaining its body because the starch in the water contributes to the sauce’s coating texture. Plain water would thin the sauce without adding to its consistency.
- Time the pasta and shrimp to finish together. Shrimp scampi is at its best when the pasta comes out of the pot and goes directly into the sauce rather than sitting and drying. Start the shrimp when the pasta has about 5 minutes left. The overlap period, where the sauce is building while the pasta finishes, is the rhythm this dish runs on.
Storage Tips
Refrigerator
Store leftover shrimp scampi in a sealed container in the refrigerator for up to 2 days. Shrimp deteriorate in texture faster than most proteins during refrigerator storage; the quality is noticeably better on day 1 than day 2. Store the pasta and shrimp together with all the sauce; the pasta absorbs the sauce during storage but rehydrates when gently reheated with a splash of broth or water. The flavor actually deepens slightly overnight as the garlic and lemon continue to penetrate the pasta.
Freezer
Shrimp scampi does not freeze well. Cooked shrimp develop a rubbery, watery texture after freezing and thawing that cannot be restored. If you want to meal prep this recipe, freeze only the uncooked raw shrimp (for up to 3 months in a sealed bag with as much air removed as possible) and cook the full dish fresh. The sauce components, including the broth and garlic, also don’t benefit from freezing; they’re fast enough to make fresh that advance preparation of the finished dish is rarely worth it.
Reheating
The stovetop is the only reliable method for reheating shrimp scampi. Place the leftover pasta and shrimp in a skillet over medium-low heat with 2 to 3 tablespoons of chicken broth or water added to the pan. Cover with a lid and heat for 3 to 4 minutes, stirring gently once or twice, until the sauce has loosened and everything is warmed through. Avoid high heat, which toughens the already-cooked shrimp rapidly. Microwave reheating at 50% power in 60-second intervals works for a single portion but produces a slightly less glossy sauce and softer shrimp texture than stovetop reheating.
Make-ahead note: The garlic butter sauce base, including the sautéed garlic, broth reduction, and finishing butter, can be made up to 2 hours ahead and held at room temperature in the pan. Reheat gently before adding the freshly cooked shrimp and pasta. This splits the recipe into a very fast final assembly of under 5 minutes.
Nutrition Information
Per serving, approximately one bowl (1/4 of the recipe) with pasta:
| Nutrient | Amount |
|---|---|
| Calories | 510 kcal |
| Protein | 32g |
| Total Carbohydrates | 58g |
| Dietary Fiber | 3g |
| Total Sugar | 2g |
| Total Fat | 16g |
| Saturated Fat | 7g |
| Cholesterol | 215mg |
| Sodium | 680mg |
| Vitamin C | 18mg |
| Calcium | 90mg |
| Iron | 3.2mg |
| Potassium | 440mg |
Nutrition values are approximate and may vary based on pasta brand, shrimp size, and portion sizes. Optional Parmesan not included.
Why This Recipe Works
The sauce in shrimp scampi is an emulsion, and understanding that changes how you approach every step of making it. An emulsion is a stable mixture of fat and water-based liquid, held together by an emulsifier that keeps the two phases from separating. In this recipe, the emulsifier is the milk proteins and lecithin in the butter. When cold butter is added to a hot but not boiling sauce and stirred briskly, those proteins surround small droplets of butter fat and hold them suspended in the broth-and-lemon liquid rather than allowing them to pool on the surface. The result is a sauce that looks opaque, slightly thickened, and glossy rather than clear and greasy. Adding the finishing butter to a sauce that is still boiling breaks the emulsion immediately because the high temperature prevents the protein network from forming; the fat pools visibly and the sauce looks broken and greasy. Turning off the heat before the finishing butter goes in is the single most important technical decision in the recipe.
The chicken broth produces a specific flavor contribution that water cannot. Broth contains dissolved glutamates and nucleotides from the collagen and proteins in the chicken, which act as natural flavor amplifiers. In a sauce where the primary flavors are garlic, butter, and lemon, those glutamate compounds make each flavoring agent taste more fully realized and integrated rather than competing separately. The broth also provides the sodium backbone that allows you to use less added salt overall. I’ve tested this recipe with water as the liquid component; the sauce is adequate but the flavor is noticeably flatter and the garlic tastes sharper and less integrated. A good low-sodium broth produces a sauce that reads as more complex without tasting of chicken.
The two-fat base of butter and olive oil is a deliberate combination rather than an aesthetic choice. Butter contributes its milk solids and water content, which browning produces flavor from, and its low smoke point fat that begins to produce aromatic compounds at around 150°C. Olive oil raises the effective smoke point of the combined fat because it dilutes the milk solid concentration, which means you can heat the mixture to a higher temperature before the milk solids scorch. In practice, this means the garlic can be added to a genuinely hot fat rather than a barely warm one, which produces a toasted, mellow garlic flavor rather than a raw, sharp one.
Shrimp cook through a protein denaturation process that progresses very rapidly at medium-high cooking temperatures. The myosin proteins in shrimp muscle begin to denature and contract at around 40°C (104°F) and complete their contraction fully by 60°C (140°F). The perceptible change, the curl of the shrimp’s body, is caused by the connective tissue on the outer curve of the shrimp’s body contracting faster than the tissue on the inner curve. A loose C represents a shrimp where the proteins have denaturated to the point of food safety (above 63°C, or 145°F internally) but have not yet contracted enough to force out significant moisture from the muscle fibers. An O-shaped shrimp has gone well past that temperature; the fibers have expelled their moisture, the texture is dense and chewy, and nothing in the cooking process can restore the lost liquid.
The lemon in this recipe is used in two forms intentionally. The juice, added off the heat, provides citric acid that sharpens and brightens the finished sauce by providing a contrast point against the fat and garlic. The zest, added at the same moment, provides limonene and other volatile terpene compounds from the lemon peel’s oil glands that contribute a floral, aromatic citrus dimension the juice alone cannot. Both forms together produce a lemon presence that’s bright and present through the whole dish rather than just a faint acidity at the finish.
Frequently Asked Questions
Can I make shrimp scampi ahead of time?
Shrimp scampi is best made fresh because shrimp deteriorate in texture quickly after cooking. The most practical make-ahead approach is to prepare the sauce base, including the garlic butter and reduced broth, up to 2 hours ahead and hold it at room temperature. Reheat the sauce gently just before serving, then cook the shrimp fresh and toss with freshly boiled pasta. The whole final assembly takes under 5 minutes this way. If you must store it fully cooked, refrigerate for up to 2 days and reheat gently on the stovetop with added broth.
Why are my shrimp rubbery?
Overcooking is almost always the cause of rubbery shrimp, and it happens very fast. The window between perfectly cooked and overcooked shrimp is less than 60 seconds at medium-high heat. The most reliable signal is the shape: a loose C means done; a tight O means overcooked. Remove the shrimp from the pan the moment you see the C form. Another cause is that the shrimp were not patted dry before cooking, which causes them to steam rather than sear and extends the time in the pan without developing the crust that signals proper cooking.
Can I use frozen shrimp?
Yes, and frozen shrimp are often fresher than fresh shrimp at the supermarket because they are typically frozen at sea within hours of being caught. Thaw frozen shrimp overnight in the refrigerator in a bowl, or place them sealed in a bag under cold running water for 10 to 15 minutes for a faster thaw. Never thaw shrimp in warm water or at room temperature; both methods compromise the texture and create food safety risks. Pat completely dry after thawing before cooking.
How do I know when the shrimp scampi sauce is ready?
The sauce is ready when it looks visibly opaque and slightly thickened rather than clear and watery, and when a spoon dragged through it leaves a trail that fills in slowly over 2 to 3 seconds. The cold finishing butter, stirred in off the heat, is what produces the opaque, glossy emulsification; if the sauce still looks thin after the butter goes in, stir more briskly for another 15 seconds. The sauce also has a right smell: warm, rich, and garlicky without any sharp raw-broth smell remaining from the broth reduction.
Is shrimp scampi gluten-free?
The shrimp and sauce in this recipe are naturally gluten-free. The sources of potential gluten are the pasta and the chicken broth; standard dried pasta contains wheat and standard chicken broths sometimes include gluten-containing additives. To make the full dish gluten-free, use certified gluten-free pasta and a certified gluten-free chicken broth. The cooking method and all other ingredients remain unchanged. Gluten-free pasta is stickier than regular pasta; toss it immediately into the sauce after draining rather than letting it sit in the colander.
Can I make this without butter?
Yes. Replace all the butter with high-quality extra-virgin olive oil at the same quantities: 1 tablespoon for the initial sear, 2 tablespoons for the garlic base, and 1 tablespoon swirled in cold at the end as the finishing fat. The sauce will be slightly less rich and the emulsification will be less pronounced because olive oil doesn’t contain the milk proteins that help bind butter emulsions, but the result is still a very flavorful, cohesive sauce. Stir the finishing olive oil vigorously off the heat exactly as you would the butter.
What pasta shape works best for shrimp scampi?
Linguine is the classic choice and works best because its slightly flat, wide shape catches more sauce per strand than round pasta like spaghetti. Spaghetti is a close second. Angel hair cooks too quickly and absorbs the sauce before it can distribute evenly; it also breaks down too easily when tossed. Thicker pasta like fettuccine or pappardelle overwhelm the delicate sauce. If you’re skipping pasta entirely, the sauce works very well over rice, crusty bread, or simple steamed couscous.
Conclusion
Shrimp scampi is the rare dish where understanding the technique produces results that look and taste far above the effort involved. The emulsification that makes the sauce glossy, the C-shape test that keeps the shrimp tender, and the cold butter added off the heat are each small decisions with immediate, visible outcomes. Master those three and the recipe is reliable every time.
The 20-minute timeline is real rather than aspirational, but only if the pasta and shrimp are timed to finish together. That coordination is the one skill this recipe builds, and once you have it, shrimp scampi becomes the kind of dish you make on a Wednesday evening without overthinking it.
If you loved this recipe, save it to your seafood dinners and easy Italian recipes Pinterest board so you can find it easily later! For more latest recipes don’t forget to visit thecookingvibes Pinterest account.
Easy Shrimp Scampi
Ingredients
Equipment
Method
- Bring a large pot of generously salted water to a boil. Cook linguine according to package directions for al dente. Reserve 1 cup pasta cooking water before draining.
- Pat shrimp completely dry with paper towels on both sides. Season lightly with salt and black pepper.
- Heat 1 tablespoon butter and olive oil in a large skillet over medium-high heat until the butter foam subsides. Add shrimp in a single layer. Cook 90 seconds undisturbed, flip, cook 60 seconds more. Remove shrimp to a plate.
- Reduce heat to medium. Add remaining 2 tablespoons butter to the same pan. Once melted, add garlic and chili flakes. Stir constantly for 60 to 90 seconds until fragrant and pale gold.
- Pour in chicken broth, scraping any browned bits from the pan base. Raise heat to bring to a simmer and reduce for 2 to 3 minutes until the liquid is reduced by roughly a third.
- Turn off heat entirely. Add the cold finishing butter, lemon juice, and lemon zest. Stir briskly in circles for 30 seconds until the sauce turns opaque and glossy.
- Return shrimp to the pan with all resting juices. Add drained linguine. Toss with tongs for 30 to 60 seconds, adding pasta water 2 tablespoons at a time if needed.
- Divide among warm bowls. Scatter parsley over each portion. Serve immediately with extra lemon wedges and Parmesan if using.
Notes
- Pat shrimp completely dry before cooking; surface moisture prevents searing and produces a pale, steamed result.
- Use the C-shape, not the color, to judge shrimp doneness; a tight O-shape means overcooked.
- Always turn off the heat before the finishing butter and lemon go in; hot sauce breaks the emulsification.
- Reserve pasta cooking water before draining; starchy water adjusts the sauce consistency without thinning the flavor.