Pink Cake (Strawberry Vanilla, Fluffy, Naturally Tinted)
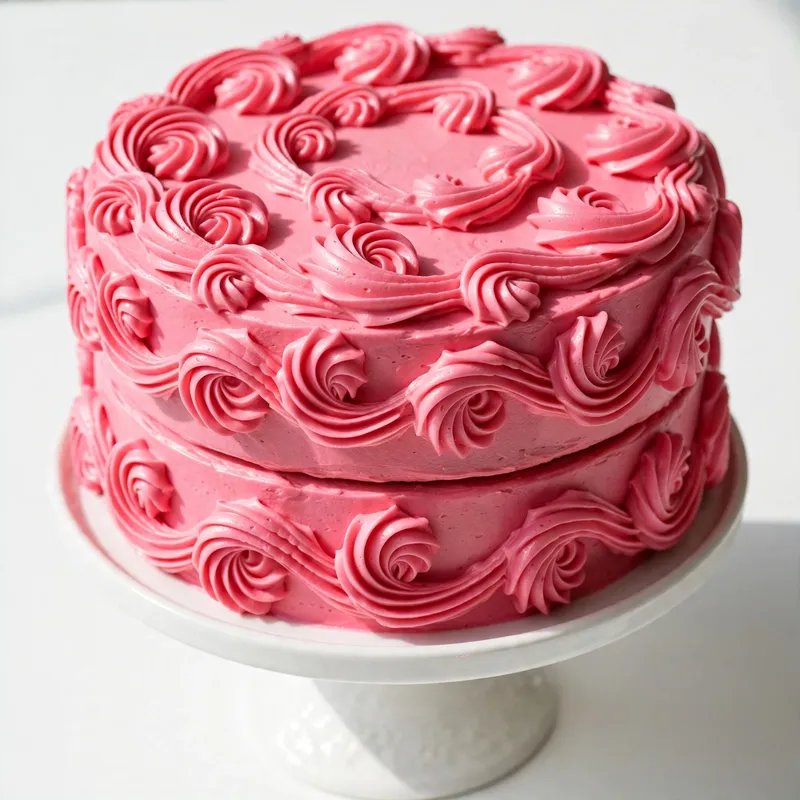
Cut into a pink cake at a birthday party, a baby shower, or a Saturday afternoon when you simply want something beautiful on the table, and the inside tells the whole story: pale blush sponge, soft crumb, a thin line of pink buttercream between the layers, and the smell of strawberry and vanilla that hits the moment the knife goes through. The color is not a trick. It comes from real strawberry puree worked directly into the batter and the frosting, which gives the cake its pink from the inside out.
This recipe builds a two-layer pink cake from a classic butter sponge base lightened with an extra egg white for a finer crumb and deepened with strawberry puree for flavor and natural color. The pink buttercream uses the same puree reduced to a thicker consistency so it tints the frosting without making it too soft to pipe or spread. The result is a cake that photographs beautifully, tastes like actual strawberry and vanilla rather than artificial flavoring, and holds its color without fading after a few hours at room temperature.
Why You’ll Love This Pink Cake
- Natural pink color from real strawberry. The blush color in both the sponge and the buttercream comes from strawberry puree, not artificial dye. The hue is softer and more genuine-looking than anything food coloring alone produces.
- Tender, fine crumb throughout. The combination of creamed butter, room-temperature eggs, and a small amount of extra egg white produces a sponge that is light without being airy or fragile, and holds clean slices without crumbling.
- The flavor matches the color. Strawberry and vanilla together throughout the batter and the frosting means every bite tastes like the cake looks. There is nothing generic or synthetic about it.
- Celebrates any occasion without effort. The aesthetic is naturally suited to birthdays, baby showers, Valentine’s Day, or any gathering where you want something that looks like it took more skill than it did.
- Customizable depth of pink. More puree for a deeper blush, a small amount of pink gel food coloring for a more vibrant, controlled pink. The recipe works both ways depending on the look you want.

Ingredients You’ll Need
Recipe Timing
| Detail | Info |
|---|---|
| Servings | 12 slices |
| Difficulty | Intermediate |
| Course | Dessert, Celebration Cake |
| Cuisine | American |
| Prep Time | 30 minutes |
| Cook Time | 30 minutes |
| Cooling Time | 45 minutes |
| Total Time | 1 hour 45 minutes |
The key ingredient decision in this recipe is the strawberry puree. Fresh ripe strawberries or thawed frozen strawberries both work, but the puree needs to be cooked down slightly before use. Raw pureed strawberries contain too much water, which throws off the moisture balance of the batter and produces a dense, gummy crumb. Cooking the puree for 8 to 10 minutes reduces it to a thicker, more concentrated paste that colors and flavors the batter without adding excess liquid. You will need about 350g of fresh or frozen strawberries to yield the 180ml (3/4 cup) of reduced puree this recipe uses across the batter and the frosting combined.
For the butter, both the cake batter and the frosting require it at genuine room temperature: soft enough to press an indent in easily, but not so warm it looks greasy or shiny. Cold butter in the batter causes the mixture to curdle. Cold butter in the frosting creates a lumpy, uneven texture that doesn’t recover fully no matter how long you beat it.
For the Pink Cake Layers:
- 2 1/2 cups (300g) all-purpose flour. Measured by the spoon-and-level method or by weight. Scooping directly from the bag packs extra flour in and produces a denser cake.
- 2 1/2 teaspoons baking powder. The primary leavening agent. Check the expiry date; old baking powder produces a flat cake regardless of technique.
- 1/2 teaspoon fine sea salt. Balances the sweetness and sharpens the strawberry flavor.
- 3/4 cup (170g) unsalted butter, at room temperature. Creamed with the sugar to build the light, airy base structure of the sponge.
- 1 3/4 cups (350g) granulated sugar. Creamed with the butter until pale and fluffy, which takes 3 to 4 minutes with a mixer and is the step most responsible for the cake’s texture.
- 3 large eggs + 1 large egg white, at room temperature. The whole eggs add richness and structure. The extra white adds lift and produces a finer, more delicate crumb without making the cake dry.
- 2 teaspoons pure vanilla extract. Deepens the flavor alongside the strawberry and rounds out the sweetness.
- 1/2 teaspoon strawberry extract (optional). Intensifies the strawberry flavor without adding more liquid. Available in most baking supply sections. Skip if unavailable; the reduced puree provides enough flavor on its own.
- 1/2 cup (120ml) reduced strawberry puree (for the batter). Made by blending and then cooking down fresh or frozen strawberries until thick. See Step 1 for full instructions. This is the primary source of color and flavor in the sponge.
- 3/4 cup (180ml) whole milk, at room temperature. Adds moisture and helps the batter come together smoothly. Full-fat milk keeps the crumb tender.
For the Pink Strawberry Buttercream:
- 1 cup (225g) unsalted butter, at room temperature. Beat alone first until pale and fluffy before any other ingredient goes in.
- 4 cups (480g) powdered sugar, sifted. Added in stages to prevent a sugar cloud and ensure even mixing. Sifting is essential for a smooth frosting.
- 3 to 4 tablespoons heavy cream. Added gradually to adjust consistency. More cream for a softer spreading frosting; less for a stiffer piping consistency.
- 1 teaspoon pure vanilla extract. Adds warmth and complexity to what would otherwise be a very sweet, one-note frosting.
- 3 tablespoons reduced strawberry puree (for the frosting). Tints the buttercream a natural blush pink and adds a subtle fruit flavor. If you want a more vivid, controlled pink, use 1 tablespoon of puree and 1 to 2 drops of pink gel food coloring alongside it.
- Pinch of fine sea salt. Cuts through the sweetness and makes the frosting taste complete rather than cloying.

Allergen and Dietary Disclosure
This recipe contains gluten (all-purpose flour), dairy (butter, heavy cream, whole milk), and eggs.
For a gluten-free version, use a 1:1 gluten-free baking flour blend that includes xanthan gum. The cake layers may be slightly more delicate when removing from the pans; let them cool completely in the tins before turning out.
For a dairy-free version, replace the butter with a good-quality cold plant-based butter block (not a soft spread) and use full-fat oat milk or coconut milk in place of whole milk. Use coconut cream in place of heavy cream in the frosting. The color and flavor will be very close to the original.
For an egg-free version, replace each egg with a commercial egg replacer formulated for cakes. The crumb will be slightly denser and the rise slightly lower, but the flavor is not significantly affected.
Free from nuts and soy as written. Not guaranteed safe for any specific allergy without checking all individual ingredient labels.
Equipment Needed
Two 9-inch (23cm) round cake pans. Light-colored aluminum pans distribute heat most evenly and produce the most even rise. Dark pans absorb more heat and can over-brown the exterior while the center is still baking.
Stand mixer or hand mixer. The 3 to 4 minute creaming stage for the butter and sugar cannot be done by hand and produce the same result. A stand mixer with the paddle attachment is the most efficient option. A hand mixer works equally well with a large bowl.
Fine mesh sieve. For sifting the dry ingredients together and for sifting the powdered sugar into the frosting. Both produce noticeably smoother results than skipping this step.
Offset palette knife. For spreading the buttercream between the layers and finishing the exterior. The angled blade allows you to apply even pressure without dragging and gives you more control over the surface finish than a straight butter knife.
Cake turntable (optional but helpful). Rotating the cake as you apply the frosting produces a more even coating than trying to work around a stationary cake. Even an inexpensive plastic turntable improves the final appearance noticeably.
Step-by-Step Directions
Step 1: Make the Reduced Strawberry Puree
This step needs to happen first because the puree needs to cool completely before going into the batter or frosting. Hull and roughly chop 350g of fresh strawberries (or measure 350g of thawed frozen strawberries). Blend until completely smooth with no chunks remaining. Pour the puree into a small saucepan and bring to a medium simmer over medium heat. Cook, stirring every 2 minutes, for 8 to 10 minutes until the volume reduces by about one-third and the puree thickens to a consistency similar to tomato paste. It should coat the back of a spoon and hold a line when you drag your finger through it. Transfer to a small bowl and leave to cool completely, at least 30 minutes.

Chef’s Note: Reducing the puree is not optional. Raw strawberry puree contains approximately 90% water. Adding that volume of water to a butter-based cake batter disrupts the fat-to-liquid ratio and produces a heavy, dense cake that doesn’t rise properly. The reduction concentrates both the color and the flavor, so the effort pays off twice.
Step 2: Prepare the Pans and Preheat
Position the oven rack in the center. Preheat to 175°C (350°F). Grease both 9-inch cake pans with butter, line the bases with parchment paper circles, and dust the sides lightly with flour, tapping out any excess. This combination of greasing, parchment, and flour gives you the best guarantee that the cakes release cleanly without pulling away any of the crumb.
Step 3: Cream Butter and Sugar Until Pale
Place the room-temperature butter in the stand mixer bowl and beat on medium speed for 1 minute until smooth. Add the granulated sugar all at once and increase the speed to medium-high. Beat for 3 to 4 minutes until the mixture turns noticeably paler in color, almost white, and the texture becomes light and airy. When you rub a small amount between two fingers, you should barely feel any sugar grains.
Chef’s Note: The color change is your guide here, not the clock. The butter-sugar mixture traps air between the fat molecules as you beat, and that trapped air is what gives the cake its lift. Under-creamed butter produces a dense, flat cake regardless of how much leavening is in the batter.

Step 4: Add Eggs and Flavorings
With the mixer on medium-low speed, add the eggs one at a time, waiting about 20 seconds between each addition for each one to fully incorporate before the next goes in. Add the egg white last. Add the vanilla extract and strawberry extract (if using) after the final egg. Scrape down the bowl and beat for 15 seconds more. The mixture may look slightly curdled at this stage, especially if the eggs were even slightly cool. That is normal and will resolve when the dry ingredients go in.
Step 5: Add Reduced Puree, Then Alternate Flour and Milk
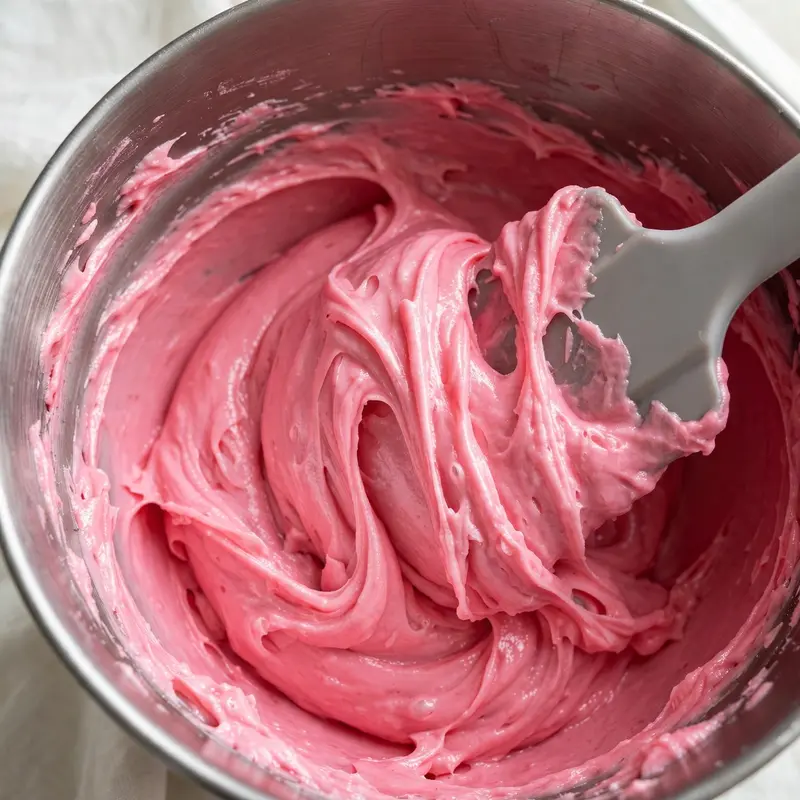
Add the cooled strawberry puree to the butter mixture and beat on low speed until just combined, about 20 seconds. The batter will turn a soft dusty pink at this point. In a separate bowl, whisk together the flour, baking powder, and salt. With the mixer on its lowest speed, add the flour mixture in three additions, alternating with the milk in two additions (flour, milk, flour, milk, flour). Begin and end with flour. Mix only until each addition disappears: the moment you can no longer see streaks of flour, stop the mixer. Over-mixing from here develops gluten and produces a tough, springy crumb instead of a tender one.
Chef’s Note: The alternating wet-dry method is used in almost all classic butter cakes for the same reason: adding all the flour at once forces the mixer to work harder and develop more gluten. Small additions mixed gently keep the gluten strands short and the crumb fine.
Step 6: Bake the Cake Layers
Divide the batter evenly between the two prepared pans. Smooth the surface of each with the back of a spoon or an offset spatula so the batter reaches the edges of the pan evenly. Give each pan two firm taps on the counter to release any large air pockets. Bake on the center rack for 28 to 32 minutes, until the tops are set and spring back firmly when pressed lightly in the center, the edges have pulled away from the pan sides by a few millimeters, and a toothpick inserted into the center of each layer comes out clean with no wet batter attached.
Step 7: Cool the Layers Completely
Leave the baked layers in their pans on a wire rack for exactly 15 minutes. Then run a butter knife around the inside edge of each pan to loosen the sides, invert the layers onto the rack, peel off the parchment, and leave them to cool top-side up for at least 30 more minutes. The layers must be completely cool before frosting: any residual warmth melts the butter in the frosting and causes it to slide and pool rather than hold its shape on the cake.
Step 8: Make the Pink Buttercream
Beat the room-temperature butter in a clean mixer bowl on medium-high speed for 2 full minutes until it turns very pale and fluffy. Reduce the speed to low and sift in the powdered sugar in three additions, mixing on low after each to avoid clouds of sugar, then increasing to medium briefly before the next addition. Add the vanilla, pinch of salt, 3 tablespoons of cooled reduced strawberry puree, and 2 tablespoons of heavy cream. Beat on medium-high for 60 to 90 seconds until the frosting is smooth, silky, and a uniform blush pink. Check the consistency: for spreading, add one more tablespoon of cream if it feels stiff. For piping, refrigerate the frosting for 15 minutes without adding extra cream.
Step 9: Assemble and Frost
Place one cooled cake layer on a cake board or directly on the serving plate. Spread a generous layer of pink buttercream across the top, going to the edges. Place the second layer directly on top, pressing down very gently to seat it. Apply a thin crumb coat of buttercream around the entire exterior of the cake using an offset palette knife: this thin, imperfect first coat traps any loose crumbs so they don’t show in the final layer. Refrigerate the crumb-coated cake for 15 minutes to firm the coating. Then apply the final, thicker layer of frosting to the top and sides, smoothing as you go.

Common Mistakes and Troubleshooting
| Problem | Cause | Solution |
|---|---|---|
| Cake layers are dense and heavy | Butter and sugar not creamed long enough, or over-mixed after flour was added | Cream 3 to 4 minutes until pale and fluffy; switch to lowest speed the moment flour goes in |
| Pink color too pale in the sponge | Puree not reduced enough or insufficient quantity used | Cook puree until it coats a spoon thickly; measure after reduction, not before |
| Buttercream is too soft and won’t hold shape | Butter too warm or too much cream added | Chill frosting 20 minutes in the fridge; add powdered sugar 1 tablespoon at a time |
| Cake layers domed unevenly | Batter not spread level before baking, or oven has hot spots | Level batter with an offset spatula before baking; rotate pans at the 15-minute mark |
| Frosting slides off the cake | Cake layers still warm when frosted, or no crumb coat applied | Cool layers completely; always apply a crumb coat and chill for 15 minutes before the final layer |
| Cake color fades or turns orange-brown after baking | Strawberry pigment reacts with baking powder during baking | This is normal and expected; the color deepens again in the frosting. Add 1 drop of pink gel coloring to the batter if a more vivid baked color is important to you |
| Frosting is gritty with sugar lumps | Powdered sugar not sifted, or added too quickly on high speed | Always sift; start the mixer on low after each addition before increasing speed |
Variations and Substitutions
Deeper Pink Version: Add 2 drops of pink or rose gel food coloring to both the batter and the frosting alongside the reduced puree. Gel coloring gives you a vivid, controlled pink that stays bright after baking and doesn’t fade over time. Use gel, not liquid coloring, as liquid adds water that affects the batter consistency.
Pink Lemonade Cake: Add 1 tablespoon of fresh lemon zest and 1 tablespoon of fresh lemon juice to the batter along with the vanilla. Replace 1 tablespoon of cream in the frosting with 1 tablespoon of fresh lemon juice. The citrus brightens the strawberry and gives the whole cake a more summery, tangy quality.
Three-Layer Pink Cake: Make 1.5 times the batter and bake in three 9-inch pans for 24 to 27 minutes. Make 1.5 times the frosting too. The taller cake looks more impressive at celebrations and gives you a better frosting-to-cake ratio in each slice.
Raspberry Pink Version: Replace the strawberry puree with an equal quantity of reduced raspberry puree (made the same way). Raspberry produces a slightly deeper, more magenta-toned pink than strawberry, and the flavor is more tart, which works especially well against the sweet buttercream.
Pink Funfetti Cake: Fold 1/3 cup of rainbow sprinkles into the finished batter just before it goes into the pans, using 3 to 4 gentle folds with a spatula. The sprinkles add visual surprise when the cake is sliced and make it feel more celebratory without changing the flavor.
Mini Pink Layer Cakes: Use the same batter to fill a 12-cup muffin tin lined with paper liners, filling each cup three-quarters full. Bake at 175°C (350°F) for 18 to 20 minutes. Once cooled, slice each cupcake in half horizontally, pipe a layer of pink buttercream between the halves, and stack them back together for miniature layer cakes.
Serving Suggestions
- With fresh strawberries on top. Arrange whole or halved fresh strawberries on the surface of the finished cake just before serving. The fresh fruit echoes the flavors inside and makes the presentation look instantly more polished.
- At a birthday celebration. The pink sponge reveal when the first slice is cut creates a genuinely satisfying moment at the table, especially for a birthday where the guest of honor knows the cake is pink but not that it goes all the way through.
- At a baby shower or bridal shower. Pink cake is the natural choice for a gathering where the aesthetic matters as much as the food. Pipe the frosting with a star tip in rosettes across the top for a more formal presentation.
- With a scoop of vanilla ice cream. A cold scoop beside a warm or room-temperature slice balances the richness of the buttercream and the sweetness of the sponge. Strawberry ice cream doubles the fruit flavor in the best possible way.
- With afternoon tea. A thin slice of pink cake paired with a pot of Earl Grey or a floral chamomile tea is a straightforward combination that doesn’t need justification.
- As individual portions for a party. Bake the same batter in a quarter-sheet pan (23x33cm), frost the top, and cut into neat squares for easy serving at a buffet or party where plates and forks need to stay minimal.

Tips for the Best Results
- Reduce the puree before anything else. Set it to cool while you prepare the pans and bring the butter and eggs to room temperature. By the time you are ready to mix the batter, the puree will be cool enough to use and you lose no time waiting.
- Room temperature everything, genuinely. Butter, eggs, and milk that are all at around 20°C (68°F) combine more smoothly than a mix of temperatures. Cold eggs added to creamed butter cause the mixture to curdle because the fat seizes around the cold protein. Warm eggs added to just-above-room-temperature butter can over-soften the mixture. Consistent room temperature is the practical shortcut to a smooth, well-combined batter.
- The crumb coat is not optional. Applying a thin, rough first layer of frosting and chilling it for 15 minutes before the final coat is the difference between a professional-looking cake and one with visible crumbs and tears in the frosting. Even an imperfect crumb coat dramatically improves the final appearance.
- Level the layers if they domed. If your cake layers baked with a dome in the center, use a serrated knife to slice it flat before assembling. A domed bottom layer makes the cake lean; a flat one gives you a stable, even stack.
- Chill before slicing for clean cuts. A 30-minute refrigeration before cutting the assembled cake firms the frosting and the sponge, which produces cleaner slices with defined layers. Use a sharp knife rinsed under hot water and wiped dry between cuts.
Storage Tips
Refrigerator
A frosted pink cake should be stored in the refrigerator because of the butter content of the frosting. Cover it with a cake dome or wrap loosely with plastic wrap, making sure the wrap doesn’t touch the surface of the frosting. It keeps in the fridge for up to 4 days. Remove the cake from the fridge 30 to 45 minutes before serving to allow the sponge to come back to its softest texture, as refrigeration firms both the crumb and the buttercream.
Freezer
Unfrosted cake layers freeze very well. Cool them completely, wrap each layer individually and tightly in two layers of plastic wrap, and freeze for up to 2 months. Thaw overnight in the refrigerator still wrapped, then bring to room temperature before frosting. Frosted assembled cakes can also be frozen: freeze uncovered until the frosting is solid (about 1 hour), then wrap carefully and freeze for up to 1 month. Thaw overnight in the refrigerator.
Reheating
Cake does not reheat in the traditional sense. If a refrigerated slice feels too firm, leave it at room temperature for 20 to 30 minutes and it returns to its intended texture. The microwave on 50% power for 10 to 15 seconds can soften a cold slice slightly, but it also softens the frosting significantly, which changes the experience. Room temperature rest is the better option when time allows.
Nutrition Information
Per serving (1 slice, approximately 1/12 of the full cake with frosting)
| Nutrient | Amount |
|---|---|
| Calories | 520 kcal |
| Protein | 5g |
| Carbohydrates | 72g |
| Fiber | 1g |
| Sugar | 54g |
| Total Fat | 24g |
| Saturated Fat | 15g |
| Cholesterol | 110mg |
| Sodium | 175mg |
| Vitamin C | 8mg |
| Calcium | 65mg |
| Iron | 1.2mg |
| Potassium | 115mg |
Nutrition values are approximate and may vary based on brands and portion sizes.
Why This Recipe Works
The structural decision to use creamed butter rather than melted butter or oil as the fat base is deliberate and consequential. Creaming butter with sugar traps air mechanically between the fat molecules as they expand and align with the sugar crystals during mixing. Those air bubbles expand in the oven when heat hits them and the leavening activates, which is what gives the cake its rise and its fine, even crumb. Oil-based cakes are moister and stay softer longer but have a denser, less delicate texture that doesn’t suit a celebration layer cake aesthetically or texturally.
The extra egg white is a technique borrowed from white cake recipes. Whole eggs add richness but the yolks also add yellow color and fat, which can muddy both the pink tint and the crumb texture. One whole extra white adds protein for structure and lift without additional fat or color interference, giving you a finer crumb and a cleaner pink hue in the baked layer.
Reducing the strawberry puree addresses a fundamental tension in fruit-based cakes: fruit adds flavor and color but also adds water, and water weakens the gluten structure and disrupts the fat-to-liquid ratio of a butter batter. A reduced puree delivers concentration (more flavor and color per tablespoon) with less moisture impact. The trade-off is 10 minutes of cooking time, which is a worthwhile exchange for a cake that rises properly and holds its shape.
The crumb coat technique in Step 9 serves a specific function beyond aesthetics. When you frost a cake directly without a crumb coat, the offset knife drags loose crumbs from the surface and mixes them into the frosting, creating a speckled, uneven exterior. A chilled crumb coat seals those loose crumbs under a thin layer of set frosting, giving the final application a clean surface to work on.
I’ve tested this recipe with both raw puree and reduced puree added directly to the batter. The raw puree version produced a noticeably heavier, less risen cake with a slightly gummy crumb and a pink that leaned dull after baking. The reduced version produced a lighter cake that rose an extra centimeter on average and held a more saturated color through the bake.
Frequently Asked Questions
Can I make pink cake ahead of time?
Yes. The unfrosted cake layers can be baked up to 2 days ahead and stored at room temperature, wrapped tightly in plastic wrap, or up to 2 months in the freezer. The pink buttercream can be made up to 5 days ahead and stored in a sealed container in the refrigerator; bring it to room temperature and beat briefly with a hand mixer before using. Assemble and frost the cake on the day of serving for the freshest appearance and best texture.
Why did the pink color fade or turn brownish after baking?
Strawberry’s natural pink pigment (anthocyanin) is sensitive to heat and to the alkaline environment created by baking powder. Some color shift after baking is normal and expected. The baked sponge will be a softer, more muted blush compared to the raw batter. The frosting, which is not baked, retains a more vivid pink. If you want a more consistent, vivid pink throughout the sponge, add 1 to 2 drops of pink gel food coloring to the batter alongside the reduced puree.
Can I use food coloring instead of strawberry puree?
You can use gel food coloring to achieve pink color, but the strawberry puree in this recipe does more than color the cake: it adds flavor, moisture, and a subtle fruit depth that food coloring alone cannot replicate. If you want to skip the puree entirely, replace it in the batter with an equal volume of plain whole milk and add 3 to 4 drops of pink gel food coloring. The cake will be pinker and more vivid but will taste like a plain vanilla cake rather than a strawberry vanilla one.
How do I get smooth frosting on the outside of the cake?
The crumb coat and chill sequence described in Step 9 is the key step. After chilling the crumb coat for 15 minutes, apply the final frosting in sections using an offset palette knife: top first, then sides. Hold the blade at a low angle against the side and rotate the turntable while keeping the knife steady. A bench scraper dragged around the cake side in one smooth motion after the initial frosting application gives the smoothest result without a turntable.
Can I make this pink cake without a stand mixer?
A hand mixer works equally well for every step in this recipe. The creaming stage takes the same 3 to 4 minutes either way, and the frosting comes together just as smoothly. The only step that feels less convenient with a hand mixer is the alternating flour-milk addition to the batter, since you need to hold the mixer in one hand while adding ingredients with the other. A folding spatula for the final few strokes of the dry ingredients is slightly easier at that stage.
Is this pink cake suitable for people with gluten intolerance?
As written, this recipe uses all-purpose wheat flour and is not gluten-free. A 1:1 gluten-free baking flour blend that includes xanthan gum substitutes directly in the same quantity. The layers will be slightly more delicate and may need an extra 2 to 3 minutes of baking time. Allow the gluten-free layers to cool completely in the pans before turning them out, as they are more prone to breaking while warm than a wheat-flour sponge.
How do I get more intense pink color in the frosting?
The most reliable method for a vivid, controlled pink frosting is to use both the reduced strawberry puree and 2 drops of pink gel food coloring together. The puree keeps the flavor genuine and provides a base tint; the gel coloring takes it from blush to a more saturated pink. Add gel coloring one drop at a time, stir thoroughly, and check the color before adding more. It is easier to deepen the color gradually than to dial it back once it is too intense.

Conclusion
Pink cake earns its place at the table because it delivers on two things simultaneously: it looks exactly as celebratory as you want it to, and it tastes genuinely good rather than just generically sweet. The strawberry puree that gives it its color also gives it its flavor, which means the cake is consistent from the outside in. Getting the color right requires one extra step (the reduction), and getting the texture right requires patience with the creaming and restraint when the flour goes in. Neither is difficult once you understand what each step is doing and why. Make this pink cake once and the technique becomes second nature.
If you loved this recipe, save it to your celebration cake recipes Pinterest board so you can find it easily later! For more recipes and daily food inspiration, follow TheCookingVibes on Pinterest.

Pink Cake (Strawberry Vanilla Layer Cake)
Ingredients
Equipment
Method
- Blend strawberries until smooth, then cook in a saucepan over medium heat for 8 to 10 minutes until reduced by one-third and thick enough to coat a spoon. Cool completely. Set aside 1/2 cup for the batter and 3 tablespoons for the frosting.
- Preheat oven to 175°C (350°F). Grease two 9-inch round cake pans, line the bases with parchment, and dust the sides with flour.
- Beat room-temperature butter and sugar together on medium-high for 3 to 4 minutes until pale, fluffy, and nearly doubled in volume.
- Add eggs one at a time on medium-low, waiting 20 seconds between each. Add the egg white last, then vanilla and strawberry extract. Scrape down the bowl.
- Add the 1/2 cup of cooled puree and mix briefly on low. Whisk flour, baking powder, and salt in a separate bowl. Add the flour mixture in three additions, alternating with the milk in two, mixing on low after each addition just until combined.
- Divide batter evenly between the prepared pans, smooth the tops, and tap twice on the counter. Bake 28 to 32 minutes until a toothpick comes out clean and the tops spring back when pressed.
- Cool in pans 15 minutes, then turn out onto a wire rack and cool completely, at least 30 more minutes.
- For the buttercream: beat butter alone for 2 minutes until pale. Sift in powdered sugar in three stages on low speed, then add the puree, vanilla, salt, and 2 tablespoons of cream. Beat on medium-high for 90 seconds until smooth and silky. Adjust with remaining cream for spreading consistency, or refrigerate 15 minutes for piping.
- Place one cooled layer on a plate. Spread with buttercream. Top with the second layer. Apply a thin crumb coat around the exterior, refrigerate 15 minutes, then apply the final layer of frosting.
Notes
- Reducing the strawberry puree before use is essential: raw puree has too much water and produces a dense, flat cake.
- Both cake layers and buttercream require ingredients at genuine room temperature for smooth results.
- Always apply a crumb coat and chill before the final frosting layer for a cleaner exterior.
- For a more vivid pink, add 1 to 2 drops of pink gel food coloring to both the batter and the frosting alongside the reduced puree.