Unicorn Cake (Rainbow Layers, Pastel Mane, Golden Horn)
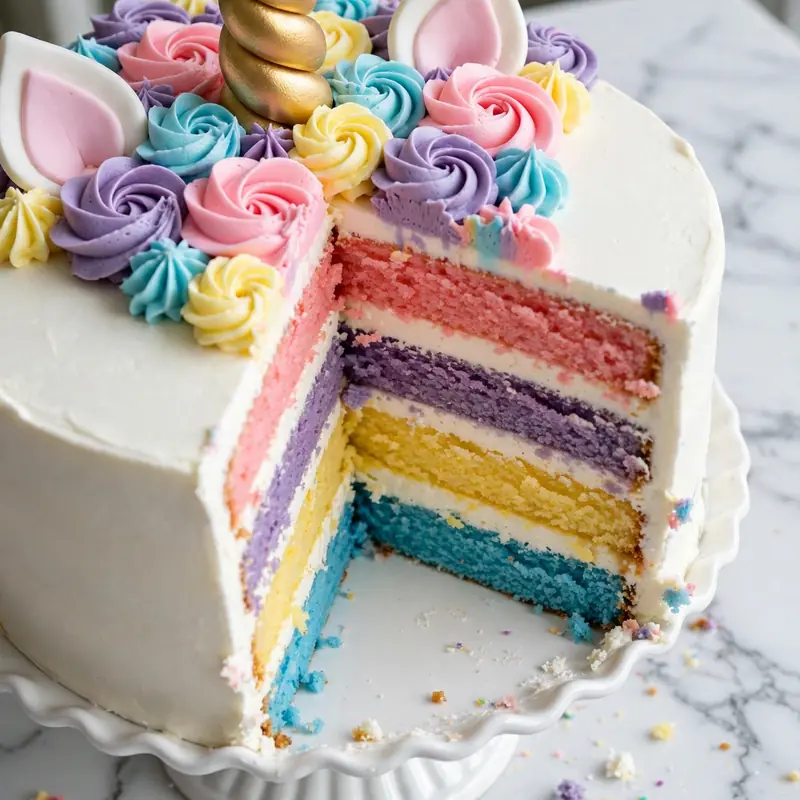
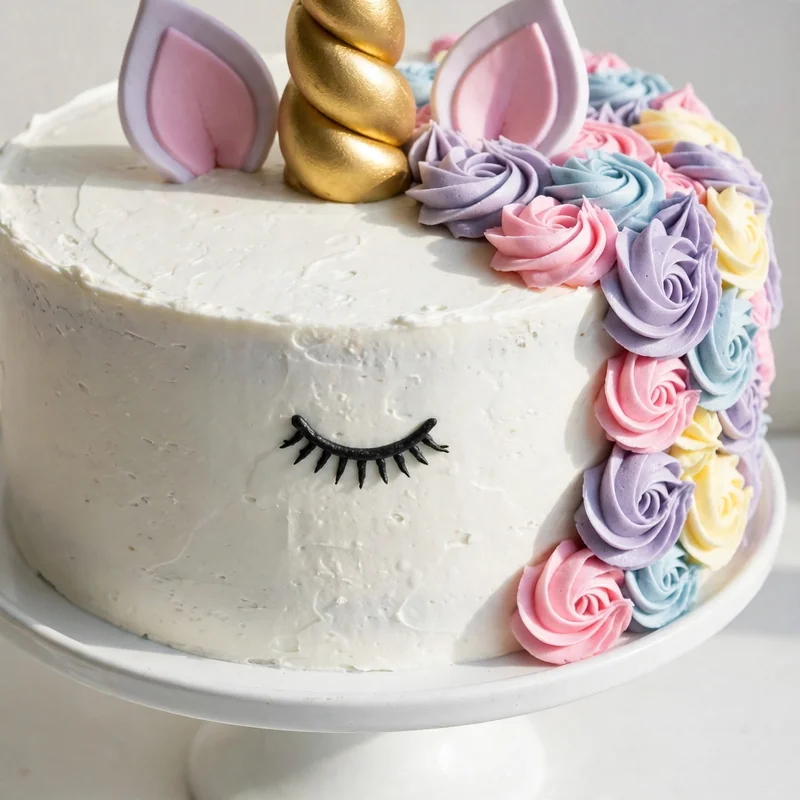
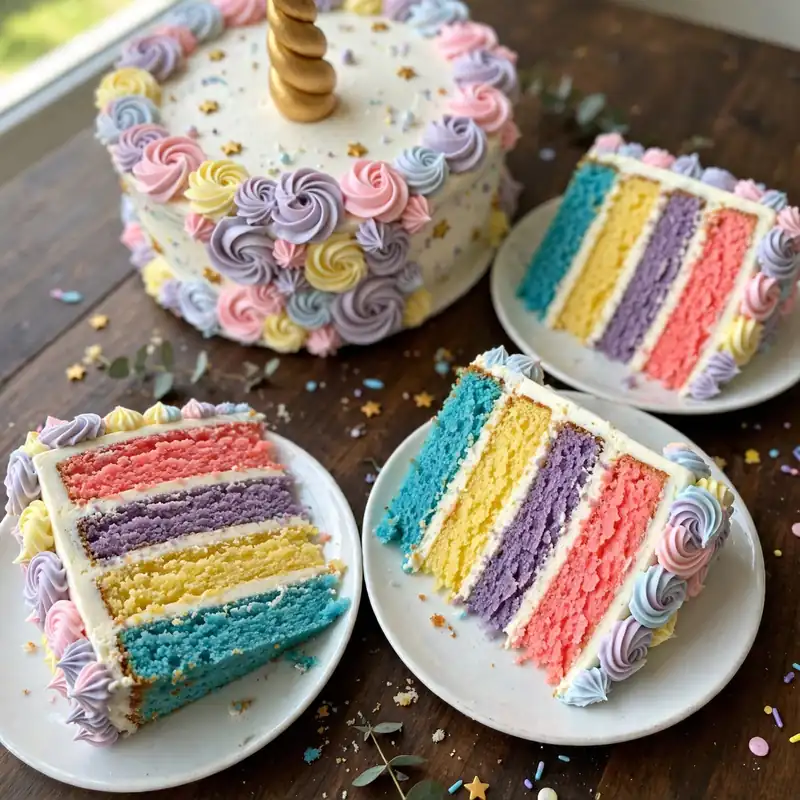
Cut into a unicorn cake at a birthday party and the moment the slice comes away, the whole table reacts: pastel purple, pink, yellow, and blue sponge layers stacked inside a cake that looked completely white from the outside. The buttercream mane cascades from the gold horn in pink, lavender, and sky blue swirls, the fondant eyes are closed with long lashes, and the whole thing looks like something that took three times the skill it actually did.
This unicorn cake recipe builds the whole project systematically: a classic vanilla sponge batter divided into four colors, stacked into two layers, covered in a smooth white buttercream base coat, and finished with a piped pastel mane and a handmade gold fondant horn. The horn and ears are made the day before so they are completely dry and sturdy when you need them. The cake itself bakes in 30 minutes. Decorating takes another 30 once the layers are cool. It is a two-day project in terms of planning but a manageable one in terms of actual time, and the result is genuinely one of the most celebrated things you can put on a birthday table.
Why You’ll Love This Unicorn Cake
- The rainbow surprise inside. The cake looks completely white from the outside until the moment it is sliced. The colored sponge layers underneath create a genuinely dramatic reveal that you cannot replicate with any other decoration technique.
- Manageable in stages. Making the horn and ears the day before means the decoration work on the day of the party is focused entirely on buttercream and assembly rather than trying to do everything at once.
- No specialist cake decorating skills required. The mane is piped with a star tip in a simple drop-swirl motion that looks impressive but takes about 15 minutes. Imperfect swirls add to the character rather than ruining it.
- Vanilla sponge that slices cleanly. The base sponge is firm enough to hold colored layers without the colors bleeding together, and the crumb is tender enough that a slice through all four layers doesn’t crumble at the cut.
- Completely customizable color story. Pink and gold, blue and silver, all pastels, neon bright: the color palette is entirely yours, and the technique stays the same no matter which combination you choose.

Ingredients You’ll Need
Recipe Timing
| Detail | Info |
|---|---|
| Servings | 12 to 16 slices |
| Difficulty | Intermediate |
| Course | Dessert, Celebration Cake |
| Cuisine | American |
| Prep Time | 30 minutes |
| Cook Time | 30 minutes |
| Cooling and Decorating Time | 75 minutes |
| Total Time | 2 hours 15 minutes |
Note: The unicorn horn and ears should be made the day before and left to dry overnight. This adds no active effort on the day but requires advance planning.
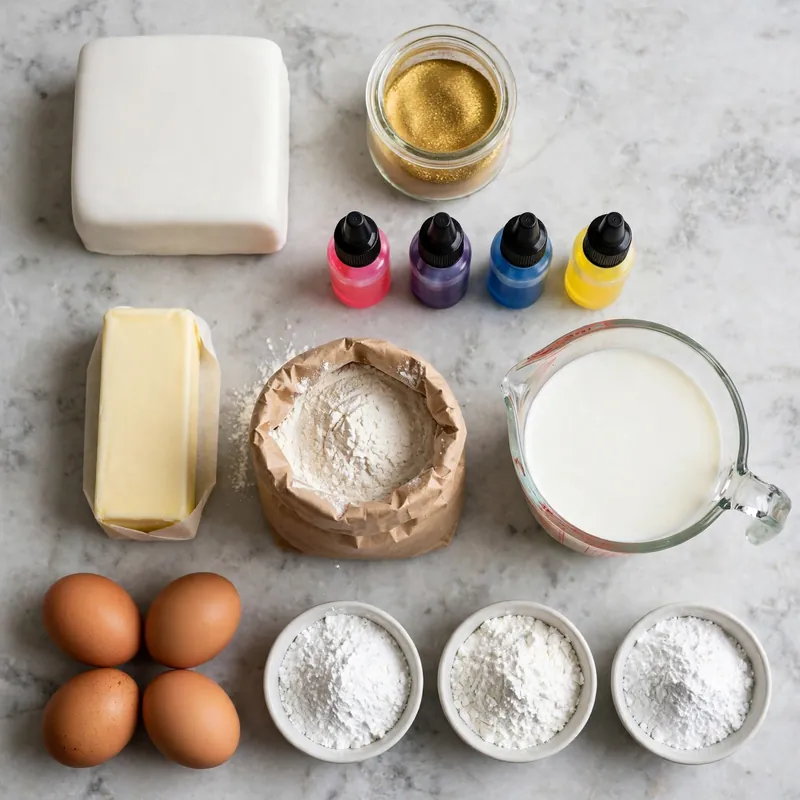
The most important decision for the sponge layers is gel food coloring, not liquid. Liquid food coloring adds water to the batter, which disrupts the fat-to-liquid balance and can produce a heavier, gummy crumb. Gel coloring is highly concentrated, adds barely any liquid, and produces vivid, true pastel tones with a small amount. A light touch of pastel gel gives you soft, pretty sponge colors; a heavier hand gives deeper, more saturated hues. Both are beautiful.
For the fondant horn, white ready-to-roll fondant (also called sugar paste) works perfectly. You need only about 100g, which is a small portion of any standard packet. Gold luster dust mixed with a few drops of clear vanilla extract creates an edible gold paint that gives the horn its signature metallic finish.
For the Vanilla Sponge Layers:
- 2 1/2 cups (300g) all-purpose flour. Measured by spoon-and-level or weight. This forms the structural base. Excess flour makes the colored layers dense and crumbly rather than tender.
- 2 1/2 teaspoons baking powder. The leavening agent. Check the expiry date before using.
- 1/2 teaspoon fine sea salt. Balances the sweetness and sharpens the vanilla flavor.
- 3/4 cup (170g) unsalted butter, at room temperature. Creamed with the sugar to build the light, airy sponge base.
- 1 3/4 cups (350g) granulated sugar. Creamed with the butter until pale and fluffy.
- 4 large eggs + 1 large egg white, at room temperature. The whole eggs add richness and structure; the extra white adds lift and produces a finer, cleaner crumb.
- 2 teaspoons pure vanilla extract. The primary flavor of the sponge.
- 1 cup (240ml) whole milk, at room temperature. Adds moisture and helps the batter come together smoothly.
- Gel food coloring in 4 colors: pink, purple, blue, and yellow. Each color goes into one quarter of the divided batter.
For the White Buttercream Base Coat:
- 1 cup (225g) unsalted butter, at room temperature. Beaten until very pale before any sugar goes in.
- 3 to 4 cups (360 to 480g) powdered sugar, sifted. Added in stages for a smooth, even consistency.
- 2 to 3 tablespoons heavy cream. For adjusting consistency.
- 1 teaspoon pure vanilla extract.
- Pinch of fine sea salt.
For the Pastel Mane Buttercream:
- 1 cup (225g) unsalted butter, at room temperature.
- 3 to 3.5 cups (360 to 420g) powdered sugar, sifted.
- 2 tablespoons heavy cream.
- 1 teaspoon pure vanilla extract.
- Gel food coloring in 4 to 5 pastel shades: pink, lavender, sky blue, pale yellow, and mint green. Divide the finished buttercream into 4 or 5 small bowls and tint each one separately.
For the Unicorn Horn and Ears:
- 100g white fondant (ready-to-roll sugar paste). For the horn. A small extra piece for the ear bases.
- 50g white fondant with a tiny amount of pink gel coloring kneaded in. For the inner ear detail.
- Gold luster dust or gold gel food coloring.
- 1/2 teaspoon clear vanilla extract. Mixed with the gold luster dust to create edible gold paint.
- 2 wooden skewers or bamboo skewers. For supporting the horn and inserting it into the cake without it tipping over.
For the Face Details:
- 1 black edible ink food marker. For drawing the closed unicorn eyes and lashes directly onto the buttercream. Alternatively, small pieces of black fondant rolled flat.
- Edible star sprinkles, pearl sprinkles, or edible glitter. Scattered through the mane for additional sparkle.
Allergen and Dietary Disclosure
This recipe contains gluten (all-purpose flour), dairy (butter, heavy cream, whole milk), and eggs.
For a gluten-free version, use a 1:1 gluten-free baking flour blend that includes xanthan gum. The sponge layers will be slightly more delicate; let each pan cool completely before turning out. The decoration technique is unchanged.
For a dairy-free version, replace all butter with a cold plant-based butter block (not a soft spread), use full-fat oat milk in place of whole milk, and substitute coconut cream for heavy cream in the buttercream. The colored layers bake with no significant difference. Dairy-free buttercream can be slightly softer than butter-based; chill it for 15 minutes before piping if it feels too loose.
For an egg-free version, use a commercial egg replacer designed for cakes. The crumb will be slightly denser and the rainbow layers may not hold as clean a division between colors.
Free from nuts and soy as written. Not guaranteed safe for any specific allergy without checking all individual ingredient labels, including gel food colorings, which vary by brand.
Equipment Needed
Two 9-inch (23cm) round cake pans. Light-colored aluminum pans distribute heat evenly and prevent the colored layers from over-browning at the edges before the center sets. Dark pans absorb more heat and can darken the sponge unevenly.
Stand mixer or hand mixer. The 3 to 4 minute creaming stage cannot be done by hand with the same result. A stand mixer with a paddle attachment handles the large quantity of batter most efficiently.
4 small bowls for dividing and coloring the batter. Use a kitchen scale if you have one: dividing the batter by weight (approximately 180 to 200g per color portion) produces more even layers than dividing by eye.
Piping bags and a large star tip (size 1M or 2D). The star tip creates the classic rosette and drop-swirl texture of the mane. You need one piping bag per color, or work through the colors one at a time, washing and refilling the bag.
Offset palette knife and a bench scraper. For the smooth white base coat. The palette knife applies the buttercream; the bench scraper dragged around the side in one motion smooths it.
Cake turntable. Not strictly required but makes the smoothing and piping stages significantly easier and faster. Even an inexpensive plastic turntable reduces decoration time noticeably.
Step-by-Step Directions
Step 1: Make the Horn and Ears (Day Before)
Horn: Roll 80g of white fondant into a long, smooth rope about 1cm thick and 15cm (6 inches) long. Taper one end to a point by rolling it between your palms with gradually lighter pressure as you work toward the tip. Insert a wooden skewer through the center lengthwise, leaving 5cm of skewer extending from the base (this will insert into the cake). Allow the horn to dry on a piece of parchment paper at room temperature for at least 8 hours, ideally overnight. Once firm, mix a small pinch of gold luster dust with 3 to 4 drops of clear vanilla extract to form a thin, paintable paste. Brush the gold paste all over the dried horn with a clean small paintbrush and allow to dry for 1 hour.
Ears: For each ear, pinch a small oval of white fondant (about 20g each) into a slightly pointed teardrop shape. Pinch a smaller, thinner oval of pink fondant and press it gently into the center of the white piece to create the inner ear detail. Shape the ear slightly curved so it looks three-dimensional rather than flat. Insert a short piece of toothpick into the base of each ear and leave to dry alongside the horn.

Chef’s Note: Drying the horn overnight is not optional. A freshly made fondant horn is too soft to support its own weight once inserted into the cake and will lean or fall over within the first hour. A fully dried horn holds its shape for the full day of the party.
Step 2: Prepare Pans, Preheat, and Cream Butter
Preheat the oven to 175°C (350°F). Grease both 9-inch cake pans with butter, line the bases with parchment circles, and dust the sides lightly with flour. Beat the room-temperature butter and granulated sugar together in a stand mixer on medium-high speed for 3 to 4 minutes until the mixture turns noticeably pale, almost white, and feels light and airy when you run a spoon through it.
Step 3: Add Eggs, Vanilla, Then Alternate Flour and Milk
With the mixer on medium-low, add the eggs one at a time, waiting 20 seconds between each addition before the next goes in. Add the egg white last, followed by the vanilla extract. Scrape down the bowl. In a separate bowl, whisk together the flour, baking powder, and salt. Add the flour mixture in three additions, alternating with the milk in two (flour, milk, flour, milk, flour), mixing on the lowest speed after each addition just until no dry streaks remain. Scrape the bowl once at the end and fold briefly with a spatula.
Chef’s Note: The alternating method keeps the batter smooth and prevents over-development of gluten. Mixing all the flour in at once creates a tighter, more elastic crumb. Going flour-first and flour-last ensures the batter has enough structure from the start and the finish.
Step 4: Divide and Color the Batter
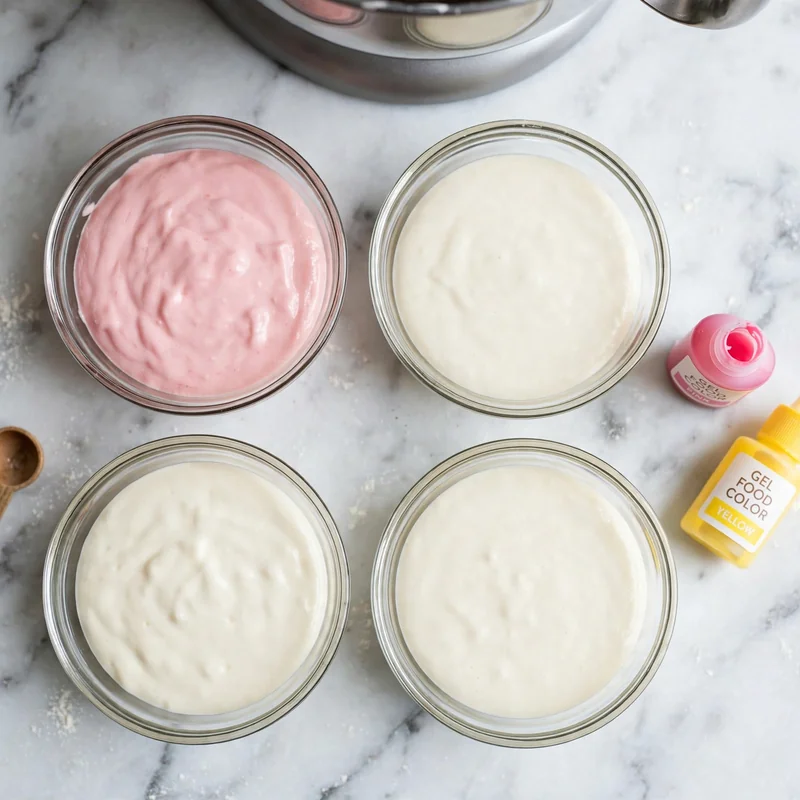
Divide the finished batter evenly among 4 small bowls, approximately 180 to 200g per bowl if you are weighing. Add a small amount of each gel color to its bowl: one drop to start, stir thoroughly, then add more if a deeper shade is wanted. Fold the color in gently rather than beating: over-stirring at this stage develops gluten and can make the colored layers slightly denser than the rest. You want soft, pastel shades rather than intensely saturated ones for the most attractive reveal.
Step 5: Layer the Colored Batters and Bake
Drop each colored batter into the prepared pans by large spoonfuls, alternating colors rather than spreading each one into a solid layer. This creates a more interesting, marbled-rainbow effect when sliced rather than strict horizontal bands. Divide each color as evenly as possible between both pans so both layers look the same inside. Smooth the surface of each pan gently with the back of a spoon without pressing the colors together too forcefully. Bake on the center rack for 28 to 32 minutes until a toothpick inserted into the center comes out clean, the tops spring back when lightly pressed, and the edges have pulled slightly away from the sides of the pan. Cool in the pans for 15 minutes, then turn out onto a wire rack and cool completely, at least 30 minutes.

Step 6: Make the White Buttercream Base and Pastel Mane Buttercream
Beat the first batch of room-temperature butter alone for 2 minutes until very pale. Sift in the powdered sugar in three stages on low speed first, then briefly on medium after each addition. Add vanilla, salt, and 2 tablespoons of cream. Beat on medium-high for 60 to 90 seconds until silky and smooth. This is the base coat buttercream.
For the mane buttercream, make a second batch the same way, then divide it into 4 to 5 small bowls. Add a small amount of different gel color to each: pink, lavender, sky blue, pale yellow, and mint if using five colors. Stir each bowl until the color is even. Spoon each colored buttercream into its own piping bag fitted with a large star tip. Twist the top of each bag closed and set aside.
Step 7: Crumb Coat, Chill, Then Final Base Coat
Place one cooled cake layer on a cake board or serving plate. Spread a generous layer of white buttercream across the top. Place the second layer directly on top and press down gently to seat it. Apply a thin crumb coat of white buttercream to the entire exterior using an offset palette knife: this rough, imperfect first layer traps loose crumbs so they don’t appear in the final coat. Refrigerate the crumb-coated cake for 15 minutes to firm the coating. Then apply the final, thicker layer of white buttercream to the top and sides. For a smooth finish, hold a bench scraper flat against the side of the cake and rotate the turntable slowly, keeping the scraper steady.
Chef’s Note: The smooth white base coat is what makes the colored mane pop visually. A rough or uneven white background competes with the pastel piping rather than setting it off cleanly. Take the 5 minutes to smooth it properly before any piping begins.
Step 8: Pipe the Mane and Assemble the Face
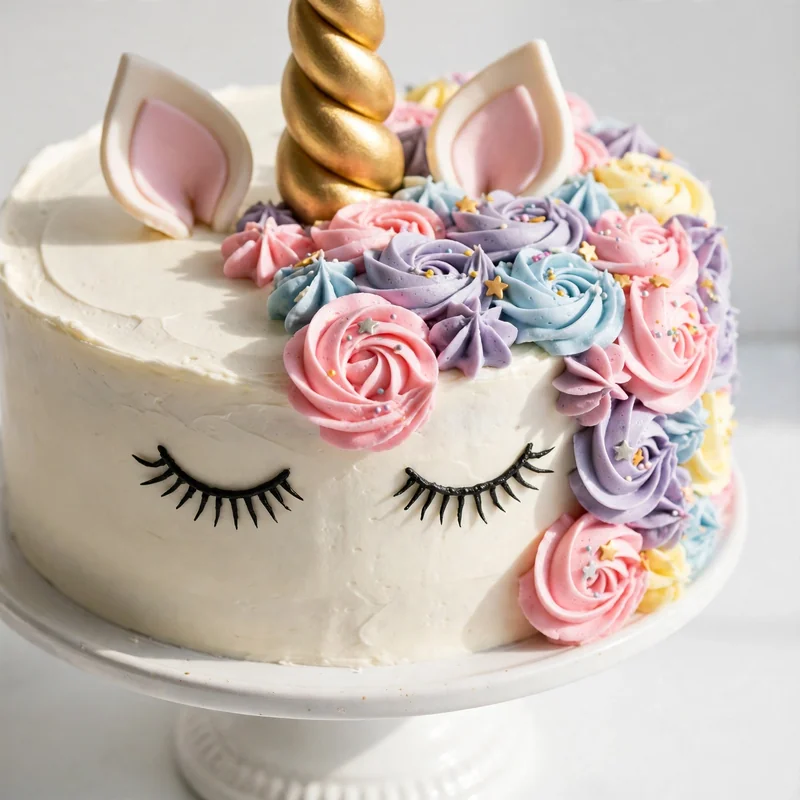
Insert the dried gold horn into the top center-right of the cake, pressing the skewer base in firmly until the horn base touches the buttercream surface. Position the two fondant ears beside the horn base, pressing each toothpick in gently. The horn and ears form the starting anchor point for the mane.
Pipe the buttercream mane by starting at the base of the horn and working down the right side of the cake in a cascading arc. Use a combination of rosettes (hold the tip steady, pipe a circle, lift quickly) and drop stars (hold the tip close to the surface, squeeze a burst, release and lift) in alternating colors as you work down. Fill the area from the horn base to about halfway down the right side of the cake, allowing some swirls to spill slightly over the top edge. Scatter edible star sprinkles and any glitter through the piped mane while the buttercream is still soft.
For the face, draw two closed semicircle eyes with long sweeping lashes on the front of the cake using a black edible ink marker, positioned roughly one-third of the way down from the top of the cake and spaced evenly. Alternatively, roll two thin black fondant strips into crescent shapes and press them gently onto the buttercream surface.
Common Mistakes and Troubleshooting
| Problem | Cause | Solution |
|---|---|---|
| Horn leaning or falling over | Horn not dried long enough before use | Always dry horn overnight; if it tips, prop it with a small fondant ball at the base until the buttercream sets around it |
| Colors bleeding into each other inside the cake | Batter portions mixed too vigorously after coloring | Fold gel color in gently; don’t over-stir once color is in the batter |
| White base coat pulling up crumbs | No crumb coat applied, or crumb coat not chilled | Always apply a crumb coat and refrigerate 15 minutes before the final layer |
| Piped mane swirls not holding shape | Buttercream too soft or room too warm | Refrigerate piping bags of colored buttercream for 10 minutes before piping; work in a cool kitchen |
| Cake layers domed unevenly | Batter not spread level, or oven has hot spots | Smooth batter surface before baking; rotate pans at the 15-minute mark |
| Rainbow colors dull or brownish after baking | Gel colorings affected by heat, or too little coloring used | Use good-quality gel coloring; the colors will always deepen slightly during baking, which is normal |
| Edible ink eyes smearing on buttercream | Buttercream surface still too soft when drawing | Chill the frosted cake for 10 minutes before using the edible ink marker |
Variations and Substitutions
All-Pastel Color Story: Replace the primary gel colors (pink, purple, blue, yellow) with pastel versions of the same shades for a softer, dreamier sponge reveal. The result is less dramatic but more cohesive in tone with the pastel mane on the outside.
Silver and Lavender Unicorn: Use lavender and silver gel coloring for the mane instead of a rainbow combination. Make the horn silver by mixing silver luster dust with vanilla extract instead of gold. The monochromatic color story is striking and sophisticated for an older child’s birthday.
Funfetti Unicorn Cake: Fold 1/3 cup of rainbow sprinkles into the finished white batter before dividing it into color portions. The sprinkles add extra visual confetti inside each slice alongside the colored layers.
Three-Layer Unicorn Cake: Make 1.5 times the batter and bake in three 9-inch pans for 24 to 27 minutes. The taller structure gives the mane more vertical space to cascade and makes the cake look more impressive at a larger party table.
Chocolate Base with Pastel Mane: Replace the vanilla sponge with a one-bowl chocolate cake (adding 1/3 cup cocoa powder and reducing flour by the same amount). Keep the white buttercream exterior and pastel mane unchanged. The contrast between the dark chocolate crumb and the white-and-pastel exterior is unexpected and genuinely striking.
Cupcake Unicorn Version: Bake the colored batter portions in a 24-cup muffin tin lined with paper liners, filling each cup two-thirds full with a small spoonful of each color stacked. Bake at 175°C (350°F) for 18 to 20 minutes. Pipe the mane on each cupcake with the colored buttercream, add a miniature horn made from a small fondant cone, and you have individual unicorn cupcakes that require no slicing at the party.
Serving Suggestions
- At a birthday celebration with the reveal moment planned. Have a cake server ready and make sure everyone is watching when the first slice comes out. The colored layers only have their full impact in that moment. The longer you wait before cutting, the more anticipation builds.
- With vanilla ice cream. A plain vanilla or strawberry scoop alongside keeps the plate simple and lets the cake stay as the visual centerpiece. Rich or strongly flavored ice cream competes with the buttercream aesthetically and in flavor.
- Cut into smaller slices for a larger group. This cake is rich from the buttercream, and most adults are satisfied with a thinner slice than you might cut for a standard layer cake. Cutting 16 thin slices rather than 12 generous ones means more people get the rainbow reveal experience.
- Displayed on an elevated cake stand. The height of a cake stand gives the mane and horn more visual presence in photos and at the table. Even a simple white ceramic pedestal makes the cake look more intentional and celebrated.
- Photographed before cutting, then served. The exterior decoration is at its most photogenic before the first slice. Take your photos before cutting, then serve immediately so the buttercream is at its best temperature.
- For children, skip the fork and give small paper plates. A unicorn cake served at a children’s party works better on small plates with napkins rather than at a formal place setting. The colored layers are the conversation, not the table arrangement.
Tips for the Best Results
- Make the horn and ears the day before, without exception. This is the single most important scheduling decision in the whole project. A same-day fondant horn is too soft to hold upright. A 12-hour or overnight dry means you go into decoration day with at least two elements already done, which reduces the decorating session to buttercream and piping only.
- Use a kitchen scale to divide the batter. Each color portion should weigh approximately 180 to 200g for even rainbow layers in the finished cake. Dividing by eye tends to produce one thick color and one thin one, which disrupts the visual balance when sliced.
- Pipe in alternating colors for a dynamic mane. Rather than piping all of one color first and then the next, work across the mane area in alternating shades: pink rosette, lavender drop star, blue rosette, yellow drop star. This creates a more natural, flowing mane than color blocks would.
- Chill the entire assembled cake for 20 minutes before adding the face details. A cold, firm buttercream surface is what makes the edible ink marker work without smearing. On a soft surface, the pen tip drags through the buttercream and produces wobbly, uneven lines.
- Keep piping bags in the fridge between uses. If you need to stop and start during the mane piping, keep the filled piping bags in the refrigerator. Warm buttercream in a bag that has been held in your hands for 15 minutes will be too soft to hold a sharp swirl shape when it comes out of the tip.
Storage Tips
Refrigerator
A fully decorated unicorn cake should be stored in the refrigerator because of the high butter content of the buttercream. Cake boxes or large cake domes work best; avoid pressing plastic wrap directly against the piped mane, which would flatten and damage the swirls. The cake keeps for up to 3 days refrigerated. Remove it 30 to 45 minutes before serving so the sponge and buttercream soften back to the right texture: refrigerated buttercream is noticeably firmer and less pleasant to eat than room-temperature buttercream.
Freezer
The unfrosted, undecorated cake layers freeze very well. Cool them completely, wrap each tightly in two layers of plastic wrap, and freeze for up to 2 months. Thaw overnight in the refrigerator still wrapped, then bring to room temperature before frosting and decorating. The decorated, assembled unicorn cake can also be frozen: freeze it uncovered on a board until the buttercream is completely solid (about 2 hours), then wrap carefully with plastic wrap and foil. Freeze for up to 1 month. Thaw overnight in the refrigerator, unwrap carefully, and allow to come to room temperature before serving.
Reheating
Unicorn cake is not reheated. If a refrigerated slice feels too firm, leave it at room temperature for 20 to 30 minutes and it returns to its optimal texture. The microwave on very low power (30%) for 10 seconds can soften a cold slice slightly, but it also softens the buttercream decoration significantly and is not recommended for slices with piped detail.
Nutrition Information
Per serving (1 slice, approximately 1/12 of the full cake with buttercream, excluding sprinkles)
| Nutrient | Amount |
|---|---|
| Calories | 580 kcal |
| Protein | 5g |
| Carbohydrates | 78g |
| Fiber | 0.5g |
| Sugar | 61g |
| Total Fat | 28g |
| Saturated Fat | 17g |
| Cholesterol | 120mg |
| Sodium | 185mg |
| Vitamin C | 0mg |
| Calcium | 70mg |
| Iron | 1mg |
| Potassium | 95mg |
Nutrition values are approximate and may vary based on brands and portion sizes. Values do not include sprinkles, edible glitter, or fondant decorations.
Why This Recipe Works
The vanilla sponge base for this recipe uses the same creamed butter method as any classic layer cake, but with an extra egg white that serves two specific functions in the context of a unicorn cake. First, it lightens the crumb texture, which means the colored batter portions bake into a finer, more even layer that shows the colors more cleanly in cross-section. Second, because the whole eggs add a yellow tint to the batter from the yolks, the extra white partially counteracts that yellow, giving the base batter a paler, more neutral tone that the gel colors can shift more accurately into their intended shades.
The decision to drop the colored batter portions in spoonfuls rather than spreading each one into a flat layer is visual rather than structural. Flat stacked layers produce clean horizontal bands when sliced, which looks impressive but requires precise, even layering and meticulous oven rotation to maintain evenness. The spoonful drop method creates a more organic, marbled rainbow result that is more forgiving in execution and arguably more dramatic in appearance because the colors blend slightly at the edges of each color zone.
Gel coloring over liquid coloring is a standard technique in cake decorating for one clear reason: concentration. Gel coloring contains the same pigments as liquid coloring but in a much denser suspension with less water. You achieve a vivid, true color with one or two drops where liquid coloring would require enough volume to noticeably affect the batter’s moisture content. The practical result is that gel coloring gives you brighter, more consistent colors in the baked sponge without any textural trade-off.
The two-stage buttercream approach (a plain white base coat plus separately tinted mane colors) is more work than a single batch of colored buttercream, but it is the detail that gives the finished cake its professional quality. The smooth white exterior is a blank canvas that makes the pastel mane colors read clearly and brightly. Piping a pastel mane directly onto an imperfect, crumb-filled white surface dulls the visual impact noticeably.
Frequently Asked Questions
Can I make a unicorn cake ahead of time?
Yes. The most practical approach is to bake and cool the cake layers up to 2 days before the party, wrap them tightly, and refrigerate. Make the horn and ears at least the night before. On the day of the party or the evening before, make the buttercream, assemble, frost, and decorate. A fully assembled unicorn cake can be refrigerated overnight and served the next day with no quality loss; just remember to take it out 30 to 45 minutes before serving.
Why does my fondant horn keep leaning or falling over?
The horn topples when it has not dried long enough before being inserted into the cake. Freshly made fondant is too pliable to support itself, especially when it warms in a room-temperature kitchen. Dry the horn for a minimum of 8 hours, ideally 12 to 16. If you are short on time, place the shaped horn on parchment in a warm oven (turned off, residual heat only) for 2 to 3 hours to accelerate the drying. A fully dry horn inserted with a skewer base into properly chilled buttercream will stand upright for the entire party.
Can I use store-bought fondant for the horn and ears?
Yes. Any ready-to-roll white fondant works well for both the horn and the ears. The brand matters less than the consistency: good-quality fondant should feel smooth and pliable when you knead it, not sticky or cracking. If the fondant feels dry, knead a very small amount of shortening into it to restore pliability. If it feels sticky, dust lightly with powdered sugar as you work.
How do I get the rainbow layers to stay distinct without blending?
Two things keep the colors defined: using gel coloring rather than liquid (which would make each portion too wet and prone to spreading), and spooning the colored batter into the pans without disturbing it after it lands. Once a spoonful of pink batter hits the pan, leave it. Don’t swirl, press, or spread it across the surface; just add the next color beside it. The batters will settle slightly in the oven but stay largely in their original positions if they were not disturbed before baking.
Can I make unicorn cupcakes with this same recipe?
Yes. Divide the four colored batter portions among 24 paper-lined muffin cups, adding a small spoonful of each color per cup. Bake at 175°C (350°F) for 18 to 20 minutes until a toothpick comes out clean. Make miniature horns from small pieces of fondant rolled into cones and dried overnight. Pipe a small pastel swirl mane on each cooled cupcake with a star tip, add the mini horn, and draw tiny closed eyes with an edible ink marker. Each cupcake becomes an individual unicorn.
What piping tip produces the best mane effect?
A large open star tip in size 1M or 2D produces the classic unicorn mane look: a circular rosette motion creates a full, textured swirl, and a brief squeeze-and-lift creates a drop star. Both look intentional even when slightly imperfect. Closed star tips produce a more ridged, stiffer swirl that also works. A petal tip can create a more layered, ruffled effect for a different aesthetic. The most important thing is consistency: pick one tip and use it across all the mane colors so the swirls read as part of the same decoration rather than a collection of different pipe experiments.
How far in advance can I make the colored buttercream?
The pastel mane buttercream can be made up to 3 days ahead and stored in airtight containers in the refrigerator. Bring it back to room temperature for 30 minutes, then beat briefly with a hand mixer on medium speed for 30 to 60 seconds to restore its smooth, pipeable texture. If it looks broken or slightly separated after refrigeration, add one teaspoon of heavy cream and beat again. The color intensity may deepen slightly in the fridge but returns to the piped color once the cream is beaten back in.
Conclusion
A unicorn cake rewards the planning it requires. The horn made the night before, the layers divided and colored carefully, the white base coat smoothed before any piping begins: each of these steps exists to make the next one easier and the finished result more impressive. The magic of it is that none of the steps are particularly difficult, but the sequence of them produces something that looks far more involved than the actual effort. Once someone sees the rainbow inside, the reaction is always the same: complete surprise, every time. That is what makes unicorn cake worth making for any occasion that deserves something genuinely special.
If you loved this recipe, save it to your birthday cake recipes Pinterest board so you can find it easily later. For more healthy recipes and daily food inspiration, follow TheCookingVibes on Pinterest.
Unicorn Cake
Ingredients
Equipment
Method
- The night before: roll 80g of white fondant into a tapering cone horn shape around a wooden skewer. Shape two fondant ears with pink centers. Dry all pieces overnight on parchment. Paint the dried horn gold with luster dust mixed into vanilla extract.
- On baking day: preheat oven to 175°C (350°F). Grease and line two 9-inch cake pans.
- Beat butter and sugar on medium-high for 3 to 4 minutes until very pale and fluffy. Add eggs one at a time on medium-low, then the egg white and vanilla.
- Whisk flour, baking powder, and salt together. Add to the batter in three additions, alternating with milk in two, mixing on lowest speed after each. Stop when just combined.
- Divide batter equally into 4 bowls (approximately 180g each). Tint each bowl a different gel color. Drop spoonfuls of each color alternately into both prepared pans. Bake 28 to 32 minutes until a toothpick comes out clean. Cool 15 minutes in pans, then fully on a wire rack.
- Make white buttercream: beat butter 2 minutes, sift in powdered sugar in three stages, add vanilla, salt, and cream. Beat until silky.
- Make pastel mane buttercream the same way, divide into 4 to 5 bowls, tint each a different pastel color. Spoon each into a piping bag fitted with a large star tip.
- Stack cooled layers with white buttercream between them. Apply a crumb coat, refrigerate 15 minutes, then apply the final smooth white coat.
- Insert the horn and ears. Pipe the pastel mane with alternating rosettes and drop stars from the horn base cascading down one side. Scatter edible sprinkles through the mane. Draw closed eyes with lashes on the front using the edible ink marker.
Notes
- Make the horn and ears the night before without exception: freshly made fondant is too soft to hold upright in the cake.
- Always use gel food coloring, not liquid, for both the batter and the mane buttercream.
- Apply a crumb coat and chill before the final white buttercream layer for a clean, smooth base.
- Chill the assembled cake for 10 minutes before drawing the face details with the edible ink marker.