Classic Chicken Pot Pie — Flaky Crust, Rich Creamy Filling
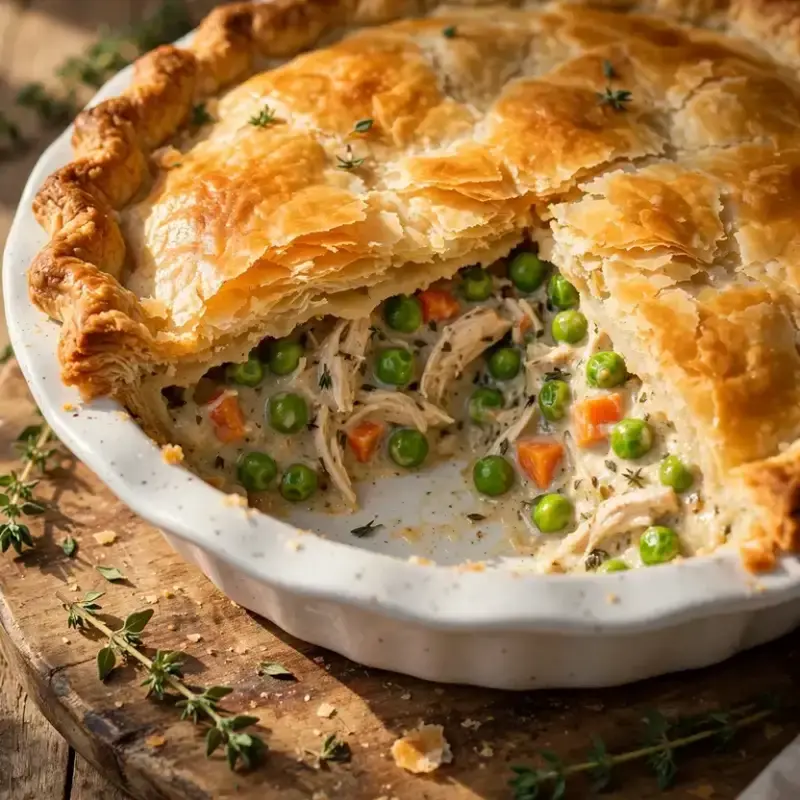
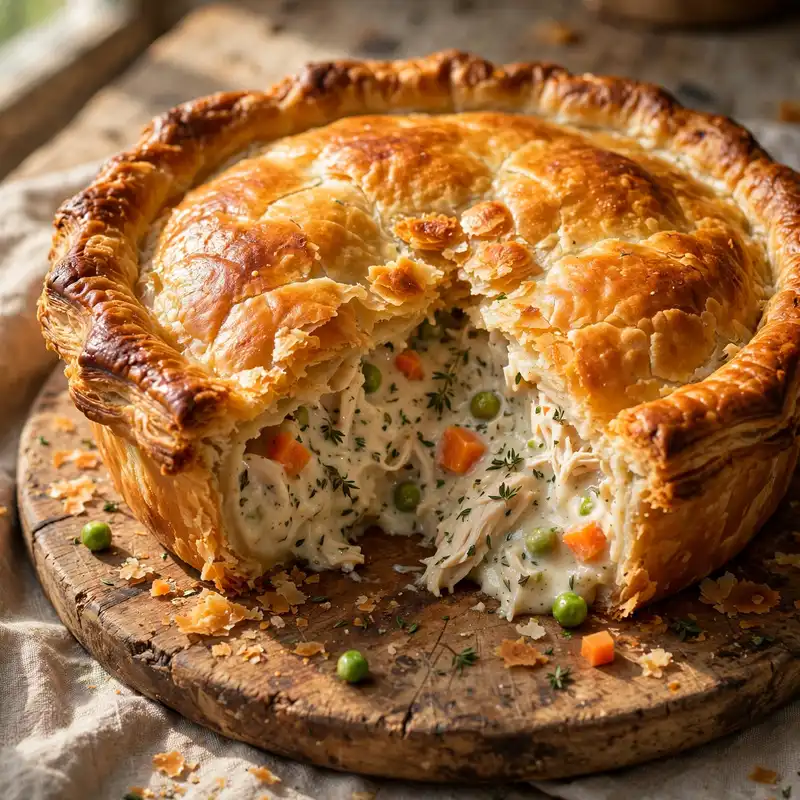
Pull a chicken pot pie from the oven and let it sit for five minutes before cutting into it. That wait is the hardest part of the entire recipe. The moment the knife breaks through the golden, butter-layered crust and the steam carries the smell of the cream-thickened filling into the kitchen, everything about why this dish has stayed on weeknight dinner tables for generations becomes immediately obvious. It’s one of those meals that tastes like significantly more effort than it required.
This chicken pot pie recipe builds a deeply savory filling from scratch using tender shredded chicken thighs, sautéed aromatics, fresh vegetables, and a butter-flour roux finished with chicken broth and heavy cream, all encased in a from-scratch all-butter pie crust that shatters into flakes at the first cut. It works for a weekend dinner when you have time to enjoy the process or a weeknight with a store-bought crust as a practical shortcut. The filling and the crust can each be made ahead, which makes assembly faster than most people expect.
Why You’ll Love This Chicken Pot Pie
- All-butter crust that actually flakes. The crust uses cold butter worked into flour by hand, which creates distinct layers of fat that turn to steam in the oven and push the pastry apart. The result shatters rather than crumbling.
- Filling that holds its shape when cut. A properly made roux-thickened filling sets firmly enough to slice cleanly rather than pouring out when the crust is broken. The ratio of flour to liquid in this recipe produces that clean cut every time.
- Chicken thighs for better texture and flavor. Bone-in thighs poached in the broth that becomes the filling base produce shredded chicken that stays moist through the 35-minute bake time, unlike breast meat which dries out.
- Make-ahead friendly in two separate stages. Both the filling and the pastry dough can be made up to 2 days ahead and refrigerated. Assembly takes about 20 minutes on the day you bake.
- One dish feeds a family. A 9-inch pie serves 6 comfortably and reheats the next day in a way that makes the leftovers something to look forward to.

Ingredients You’ll Need
Recipe Timing
| Detail | Info |
|---|---|
| Servings | 6 |
| Difficulty | Moderate |
| Course | Main Course |
| Cuisine | American |
| Prep Time | 35 minutes |
| Cook Time | 55 minutes |
| Rest Time | 10 minutes (after baking) |
| Total Time | 100 minutes |
For the chicken, bone-in skin-on thighs produce a richer, more flavorful poaching liquid that becomes the base of your filling broth. Poach them directly in the chicken broth you’ll use for the filling; every minute they simmer transfers flavor into both the liquid and the meat. Boneless skinless thighs work and save about 5 minutes on prep; boneless breasts also work but need to be watched carefully, as they reach their ideal shredding temperature faster and dry out quickly if left too long.
For the all-butter pie crust, the single most important rule is keeping everything cold. Cold butter, ice water, cold hands if possible. The butter needs to stay in distinct pieces rather than smearing into the flour; those pieces are what create the flaky layers during baking. If at any point the dough feels warm or the butter starts to look greasy rather than distinct, put the whole bowl in the freezer for 10 minutes before continuing.
For the vegetables, cut everything into a similar size, roughly 1 to 1.5cm cubes. Uniform pieces cook at the same rate and produce a filling where every spoonful contains a balanced amount of each ingredient rather than overcooked small pieces and undercooked large ones.
All-Butter Pie Crust (for top and bottom):
- 2 1/2 cups (315g) all-purpose flour — the structural base of the crust; spoon into the measuring cup rather than scooping to avoid a dense, crumbly result
- 1 teaspoon fine salt — seasons the pastry and strengthens the gluten structure
- 1 teaspoon granulated sugar — a small amount promotes browning without making the crust taste sweet
- 1 cup (225g) cold unsalted butter, cubed into 1cm pieces — the primary fat; must be cold throughout the entire mixing process to create distinct flaky layers
- 6 to 8 tablespoons ice water — added one tablespoon at a time; just enough to bring the dough together without developing too much gluten
Chicken Pot Pie Filling:
- 800g (about 1.75 lbs) bone-in skin-on chicken thighs — the primary protein; poached in the broth and shredded; food safety note: raw poultry must reach an internal temperature of 74°C (165°F) before consuming
- 4 cups (960ml) low-sodium chicken broth — both the poaching liquid for the chicken and the base of the filling sauce; low-sodium gives control over final seasoning
- 4 tablespoons (60g) unsalted butter — the fat for the roux and for sautéing the aromatics
- 1 large yellow onion, finely diced — the aromatic base; softens into the filling and adds savory sweetness
- 3 medium carrots, peeled and cut into 1cm cubes — adds color and natural sweetness; cut to uniform size for even cooking
- 3 celery stalks, sliced into 5mm pieces — adds herbal depth and slight bitterness that balances the rich cream sauce
- 3 garlic cloves, minced — deepens the savory base of the filling
- 1/3 cup (40g) all-purpose flour — the roux thickener; produces a filling that sets firmly enough to slice cleanly
- 1/2 cup (120ml) heavy cream — adds richness and produces the characteristic velvety texture of a well-made pot pie filling
- 1 cup (150g) frozen peas — added at the very end so they stay bright green rather than turning a dull olive color
- 1 teaspoon dried thyme — the dominant herb in this filling; adds warmth and an herbal background note
- 1/2 teaspoon dried rosemary, crumbled between your fingers — adds a piney, slightly resinous depth alongside the thyme
- Salt and freshly ground black pepper — to taste; season in layers throughout the cooking process
- 1 egg, beaten with 1 tablespoon water — the egg wash that produces the deep golden color and sheen on the baked crust

Allergen and Dietary Disclosure
This chicken pot pie contains gluten (all-purpose flour in both the crust and the filling roux), dairy (butter, heavy cream), and eggs (egg wash on the crust). The filling may thicken further based on the flour quantity; adjust as needed.
For gluten-free: replace the all-purpose flour in the crust with a 1:1 gluten-free baking flour blend with xanthan gum. The crust will be slightly less flaky and more crumbly than the wheat version but still holds together well for assembly. Replace the flour in the roux with an equal quantity of certified gluten-free cornstarch, adding it to the butter and stirring for 60 seconds before adding the broth. The cornstarch-thickened filling will be slightly glossier than the flour version.
For dairy-free: replace all butter in the crust with very cold refined coconut oil or a solid vegan butter stick, and use full-fat coconut cream in place of heavy cream. The crust will be shorter and slightly less layered, and the filling will carry a faint coconut note. For the egg wash, use a thin coating of oat milk with a small pinch of sugar for browning.
For egg-free: brush the crust with oat milk or full-fat plant milk instead of the egg wash. The browning will be slightly less deep and even but still attractive.
This recipe has not been tested in a certified allergen-free kitchen and cannot be guaranteed safe for any specific allergy.
Equipment Needed
- 9-inch (23cm) deep pie dish — the depth matters for a filling this substantial. A shallow pie dish doesn’t accommodate enough filling and the top crust ends up sitting too close to the surface. A ceramic or glass dish bakes more evenly than a dark metal one, which tends to brown the bottom crust faster than the top.
- Large Dutch oven or heavy-bottomed saucepan — for poaching the chicken and making the filling in the same vessel. Using the same pot means every drop of the poaching liquid goes directly into your filling sauce without transferring between vessels.
- Pastry cutter or box grater — for cutting the butter into the flour for the crust. Grating frozen butter on the large holes of a box grater directly into the flour is the fastest method and produces the most evenly distributed fat with minimal hand contact. A pastry cutter works equally well.
- Rolling pin — for rolling the crust to an even 3mm thickness. A heavy rolling pin produces the most consistent pressure; a wine bottle in a pinch works but produces less even results at the edges.
- Pastry brush — for applying the egg wash evenly over the top crust before baking. A brush produces a much more even coat than a spoon, which tends to pool the egg in the venting slits.
- Wire cooling rack — to rest the baked pie for the full 10 minutes before cutting. The rack allows air to circulate under the pie dish and prevents the bottom crust from steaming and softening from the trapped heat.
Step-by-Step Directions
Step 1: Make the Pie Crust Dough
Combine the flour, salt, and sugar in a large bowl and whisk briefly to distribute evenly. Add the cold cubed butter and work it into the flour using a pastry cutter or your fingertips, pressing each cube flat and then breaking it into smaller irregular pieces. Stop when the mixture looks like rough, uneven crumbs with some pea-sized butter pieces still distinctly visible throughout. Those visible pieces are essential. Add 6 tablespoons of ice water, one at a time, tossing with a fork after each addition. Add the seventh or eighth tablespoon only if the dough won’t hold together when a small handful is squeezed firmly. Turn out onto a lightly floured surface, divide into two equal portions, press each into a flat disk, wrap tightly in plastic wrap, and refrigerate for at least 30 minutes.

Chef’s Note: The dough at this stage should look rough and shaggy rather than smooth. Over-worked pie crust develops gluten and loses its flakiness; the final smoothing happens from the rolling pin, not from kneading. If your dough looks slightly crumbly when you divide it, that’s correct; it will come together fully when rolled.
Step 2: Poach the Chicken
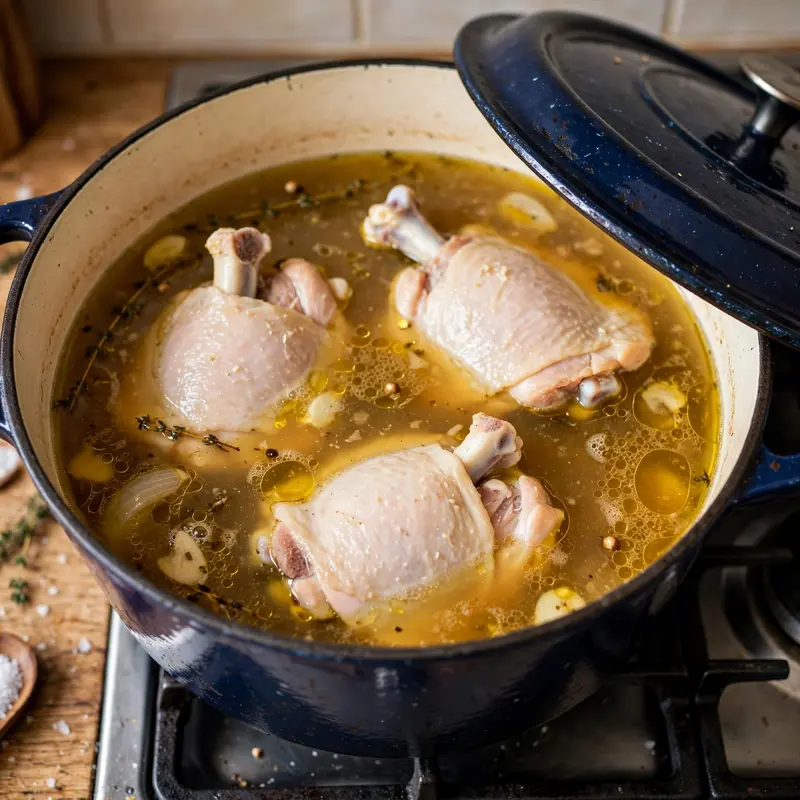
Place the chicken thighs skin-side down in a large Dutch oven. Pour the chicken broth over them and bring to a gentle simmer over medium heat. Maintain the simmer, partially covered, for 20 to 25 minutes until the thickest part of the largest piece registers 74°C (165°F) on an instant-read thermometer. Transfer the cooked thighs to a cutting board and set the broth aside in the pot. Once the chicken is cool enough to handle, about 5 minutes, remove and discard the skin and pull the meat from the bones in rough shreds. Discard the bones. The shredded chicken should look like generous, moist pieces rather than fine strings.
Food safety note: Raw poultry must reach an internal temperature of 74°C (165°F) throughout before it is safe to eat. Use a thermometer to confirm rather than relying on the color of the juices.
Chef’s Note: Poaching the chicken directly in the broth you’ll use for the filling is not a shortcut; it’s the step that gives the filling its depth. Every 20 minutes of gentle simmering deposits flavor from the chicken bones and skin directly into the liquid. The finished broth will be noticeably more golden and more flavorful than it was before the chicken went in.
Step 3: Sauté the Vegetables
Pour the reserved broth into a separate container. In the same Dutch oven, melt the butter over medium heat until the foam settles. Add the diced onion and cook, stirring occasionally, for 5 to 6 minutes until fully soft and translucent with a faint golden color at the edges. Add the carrots and celery and cook for 3 more minutes until the edges of the carrot pieces start to lose their raw opacity. Add the minced garlic and stir continuously for 60 seconds until fragrant. The vegetables should look glossy and softened but not mushy; the carrots in particular will finish cooking inside the pot pie during the oven time.
Step 4: Build the Roux and Filling
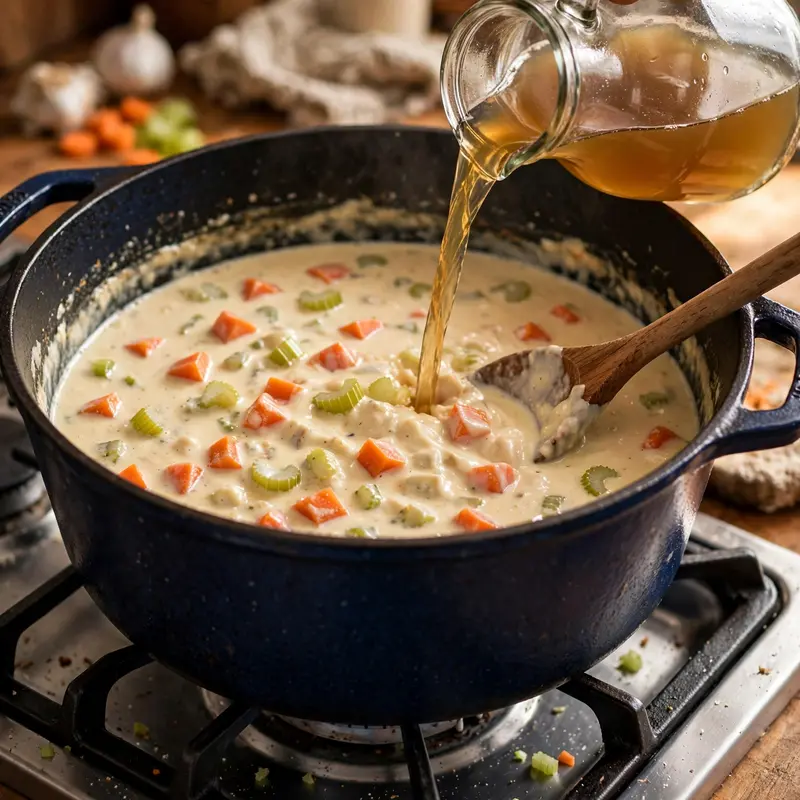
Sprinkle the flour directly over the sautéed vegetables in the pot. Stir everything together until the flour coats the vegetables evenly in a thin, dry layer. Cook this mixture for 90 seconds, stirring constantly, until the flour smell shifts from raw and starchy to faintly nutty. This brief cooking removes the raw flour taste that would otherwise come through in the finished filling. Pour the reserved poaching broth back into the pot in a slow, steady stream while stirring; adding liquid gradually prevents lumps from forming in the roux. Increase the heat to medium-high and bring to a gentle simmer, stirring frequently, for 4 to 5 minutes until the filling thickens to a consistency slightly looser than you want in the finished pie (it will thicken further as it bakes).
Chef’s Note: The finished filling should be thick enough that a spoon dragged across the surface leaves a clear trail that holds for 2 to 3 seconds before filling back in. If it looks thin, simmer for another 2 minutes. If it thickens too much, stir in 2 to 3 tablespoons of additional broth.
Step 5: Finish the Filling
Reduce the heat to low. Stir in the heavy cream, dried thyme, and crumbled rosemary. Return the shredded chicken to the pot. Add the frozen peas directly from the freezer and stir them through; they’ll thaw within 60 seconds from the heat of the filling. Taste the filling and season with salt and freshly ground black pepper, adjusting until the flavor is savory, slightly herby, and well-rounded. Pour the finished filling into a large bowl and allow it to cool to room temperature, about 20 minutes, before assembling the pie. Filling that’s too hot will melt the cold butter in the crust during assembly and produce a soggy bottom layer.
Step 6: Preheat and Roll the Crusts
Set the oven to 200°C (400°F). Remove one dough disk from the refrigerator and let it sit at room temperature for 5 minutes until it’s pliable enough to roll without cracking. On a lightly floured surface, roll it into a 30cm (12-inch) circle, working from the center outward in short strokes and rotating the dough quarter-turns between passes. Lay it into the pie dish, pressing gently into the base and sides without stretching it. Trim any excess to about 1cm overhang. Pour the cooled filling into the crust and spread it level. Roll the second dough disk to the same size and lay it carefully over the filling. Press the edges of the top and bottom crusts together, fold the overhang under itself, and crimp with a fork or your fingers.
Step 7: Apply Egg Wash and Vent
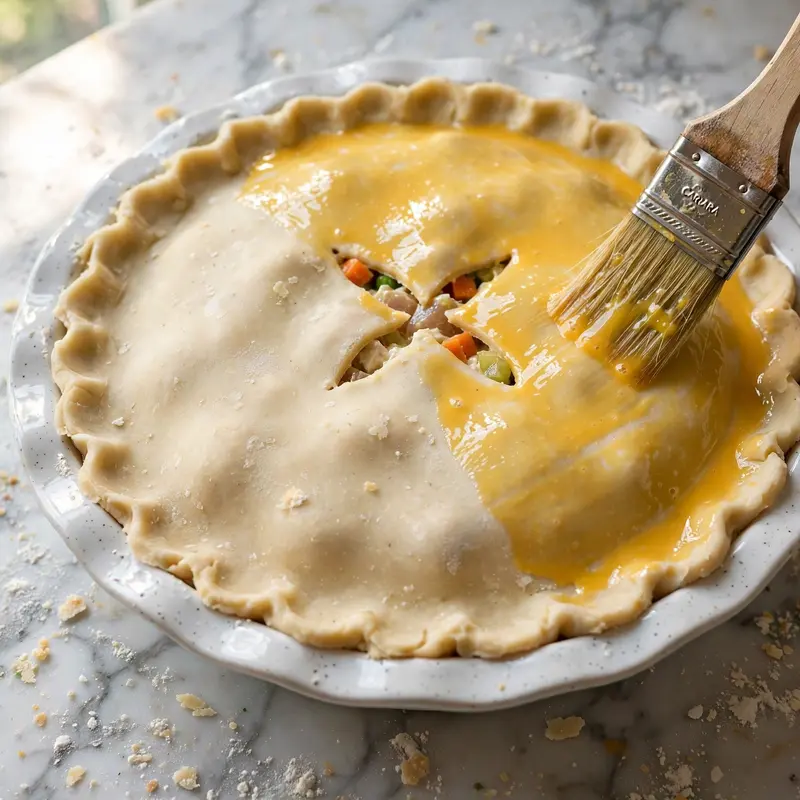
Brush the entire top crust surface and the crimped edges with the beaten egg and water mixture, covering every visible surface evenly. Cut 4 to 5 venting slits in the top crust, each about 3cm long, using the tip of a sharp knife. The slits allow steam from the hot filling to escape during baking; without them, the steam builds pressure under the crust and can cause large bubbles or even split the crust along the crimped edges.
Step 8: Bake Until Deep Golden and Bubbling
Place the pie on the center rack of the preheated oven. Bake at 200°C (400°F) for 30 to 35 minutes until the crust is a deep, even amber color with no pale patches remaining, and the filling is actively bubbling at the venting slits. If the edge of the crust starts to darken faster than the center during baking, cover the crimped edge loosely with a thin strip of foil from about the 20-minute mark onward. Remove the pie from the oven and transfer to a wire cooling rack. Rest for at least 10 minutes before cutting; the filling continues to set from the residual heat during this time and will hold its shape when sliced rather than flowing out across the plate.
Common Mistakes and Troubleshooting
| Problem | Cause | Solution |
|---|---|---|
| Bottom crust is soggy and uncooked | Filling added while still hot, or pie dish placed on a solid baking sheet that blocked heat | Always cool filling completely before assembling; bake on a wire rack inside the oven or directly on the oven rack |
| Crust shrinks away from the edges during baking | Dough stretched rather than pressed into the dish, or dough not chilled before baking | Ease the dough into the dish without pulling it; chill the assembled, unbaked pie for 15 minutes before putting it in the oven |
| Filling pours out when pie is cut | Filling was too thin before baking, or pie cut too soon after coming out of the oven | Simmer filling until it coats a spoon heavily; always rest the baked pie for the full 10 minutes before slicing |
| Crust is crumbly rather than flaky | Butter was too warm, or dough was overworked | Keep butter cold throughout; stop mixing the moment the dough holds together when squeezed |
| Filling tastes bland | Broth was not seasoned in layers, or rosemary and thyme were insufficient | Taste and season the filling after each addition of broth, cream, and chicken; don’t rely on final seasoning alone |
| Crust bubbles and cracks across the top | Venting slits were too small or not cut deeply enough | Cut slits at least 3cm long and press the knife cleanly through both layers of dough; don’t just score the surface |
Variations and Substitutions
- Rotisserie chicken shortcut: Skip steps 2 and the poaching entirely. Use 3 cups of shredded rotisserie chicken meat and substitute store-bought low-sodium chicken broth directly in the filling. The filling broth won’t be as deeply flavored as one made from poaching chicken thighs, but adding an extra 1/2 teaspoon of dried thyme and a tablespoon of butter to the roux compensates significantly. Active time drops by 25 minutes.
- Store-bought crust: Two sheets of refrigerated rolled pie crust are a completely practical substitution for the from-scratch version. Use one for the base and one for the top. The texture and flavor are different from an all-butter homemade crust, but the filling is the star of the dish and it still produces a genuinely good result.
- Vegetarian filling: Omit the chicken and broth entirely. Replace the broth with a good-quality vegetable broth and add 400g of quartered mushrooms sautéed until deeply golden before being added to the vegetable mixture. The umami from the caramelized mushrooms fills much of the savory depth that chicken contributes.
- Individual pot pies: Divide the filling between 6 individual oven-safe ramekins and top each with a round of pastry cut slightly larger than the ramekin rim, pressed and crimped at the edges. Bake at 200°C (400°F) for 22 to 25 minutes until the individual crusts are golden. These are easier to serve at a gathering and reheat more evenly than a single large pie.
- Puff pastry top only: Skip the bottom crust entirely and fill a buttered baking dish with the finished filling. Top with a sheet of ready-made puff pastry, tucked in at the edges. Bake at 200°C (400°F) for 25 to 30 minutes. The puff pastry rises in dramatic layers and produces a different but equally satisfying textural result without any pastry-making effort.
- Extra vegetables: Add 1 medium diced parsnip and 1 cup of quartered button mushrooms to the vegetable sauté stage. Both add depth and make the filling feel more substantial. Increase the flour in the roux by 1 tablespoon to compensate for the additional moisture the mushrooms release.
Serving Suggestions
- Serve directly from the pie dish at the table so the steam and the smell arrive together. Chicken pot pie is one of those dishes where the presentation moment, breaking through the crust at the table, is worth planning for.
- A simply dressed green salad with a sharp lemon vinaigrette alongside cuts through the richness of the cream-based filling and makes the overall meal feel balanced. The acid from the dressing works especially well against the buttery crust.
- For a cold-weather dinner, serve with a cup of hot broth or a simple vegetable soup as a starter. The pot pie is rich enough to be the centerpiece on its own without a starch on the side.
- Pair with steamed green beans or roasted broccoli for an easy vegetable side that requires minimal prep and doesn’t compete with the complex flavors of the filling.
- A warm corn bread or dinner roll alongside soaks up any filling that spills from the cut edges of the pie. It’s a pairing that makes every element on the plate feel considered.
- For guests, pair with a cold sparkling water with lemon or a non-alcoholic sparkling apple cider. The carbonation and mild sweetness of either cuts through the richness of a cream-filled pot pie in a way that still water doesn’t.

Tips for the Best Results
- Cool the filling completely before assembling. This is the instruction most people rush and regret. Hot filling placed inside cold butter-layered pastry melts the fat before the oven does, which produces a soggy bottom layer rather than a flaky one. Room temperature means room temperature: 20 to 25 minutes of cooling on the counter after the pot comes off the stove, not just a few minutes.
- Chill the assembled pie before baking. After the pie is assembled and egg-washed but before it goes in the oven, refrigerate it for 15 minutes. The cold temperature re-firms the butter in the pastry, which means the initial heat of the oven produces steam rather than just melting fat, and the crust lifts rather than spreading.
- Season the filling aggressively. The pastry, the cream, and the starchy thickener all dilute the seasoning of the filling significantly. What tastes well-seasoned in the pot will taste underseasoned after baking inside a crust. Taste the filling one final time right before it goes into the crust and season it until it tastes almost too seasoned; the crust absorbs some of that flavor and the final result will be balanced.
- Don’t skip the resting time after baking. A pot pie pulled from the oven and cut immediately pours its filling across the plate. The filling needs the 10-minute rest for its starches to finish setting from the residual heat. That same filling cut at 10 minutes holds a clean, scoopable shape. Set a timer and use those 10 minutes to get everything else to the table.
- Blind bake the bottom crust if making ahead. If you’re assembling the pie more than 2 hours before baking, line the bottom crust with parchment and pie weights or dry beans, bake the crust alone at 200°C (400°F) for 12 minutes, then remove the weights and cool before filling. This gives the bottom crust a head start that prevents sogginess from the filling’s moisture during a long refrigerated wait.
Storage Tips
Refrigerator
A fully baked chicken pot pie keeps in the refrigerator for up to 4 days, covered tightly with foil or in a sealed container. The crust softens after the first day due to moisture from the filling, but it still tastes very good. For best results, store the pie in its baking dish rather than transferring to another container. An unbaked assembled pie can be refrigerated for up to 24 hours before baking; add 5 minutes to the baking time to account for starting from cold.
Freezer
Chicken pot pie freezes well both baked and unbaked. For freezing unbaked: assemble the pie completely, wrap tightly in plastic wrap and then foil, and freeze for up to 3 months. Bake directly from frozen at 190°C (375°F) for 60 to 70 minutes, covering the edges with foil if they darken before the center is fully set. For freezing baked: cool completely, wrap tightly, and freeze for up to 2 months. Thaw overnight in the refrigerator before reheating.
Reheating
The oven is the only method that restores the crust’s crispness. Place leftover slices or the whole pie in an oven preheated to 175°C (350°F) and heat for 15 to 20 minutes for slices or 25 to 30 minutes for a whole pie, until the filling is steaming at the center and the crust edges have re-crisped. Cover the edges loosely with foil if they begin to darken before the filling is hot. Microwave reheating works for the filling but makes the crust soft and slightly rubbery; if using a microwave for a quick lunch, accept the crust texture trade-off or eat the filling and crust separately.
Make-ahead note: The filling can be made up to 2 days ahead and refrigerated. The pastry dough can be made up to 3 days ahead and refrigerated, or up to 2 months ahead and frozen. On the day of baking, assemble cold filling into the rolled crust, chill the assembled pie for 15 minutes, and bake as directed.
Nutrition Information
Per serving, approximately one slice (1/6 of the pie):
| Nutrient | Amount |
|---|---|
| Calories | 610 kcal |
| Protein | 28g |
| Total Carbohydrates | 48g |
| Dietary Fiber | 4g |
| Total Sugar | 6g |
| Total Fat | 35g |
| Saturated Fat | 20g |
| Cholesterol | 150mg |
| Sodium | 520mg |
| Vitamin C | 12mg |
| Calcium | 65mg |
| Iron | 3.2mg |
| Potassium | 480mg |
Nutrition values are approximate and may vary based on brands and portion sizes.
Why This Recipe Works
The texture of the filling in a properly made chicken pot pie depends on how the roux is built and how the liquid is added. When flour is cooked in fat for 90 seconds before any liquid is added, the starch granules in the flour partially swell and coat themselves in fat. This fat coating prevents the granules from absorbing liquid too quickly and clumping, producing a sauce that thickens evenly throughout rather than in patches. Adding the broth slowly while stirring gives those starch granules time to distribute through the liquid before they fully gelatinize, which produces a uniformly thick, smooth sauce rather than one with lumpy patches surrounded by thin liquid. That technique is why this filling holds its shape cleanly when sliced and doesn’t pour out across the plate.
The all-butter crust produces a distinctly flakier result than crusts made with shortening or a butter-shortening combination for a specific structural reason. Butter is approximately 80% fat and 20% water. When the butter pieces in the pastry hit the heat of the oven, the water in those pieces rapidly converts to steam. That steam has nowhere to go except outward, and it pushes against the layers of flour-coated dough around it, physically separating them. The result is the visible lift and layer separation that defines a flaky crust. Shortening is 100% fat and contains no water, so it produces a tender, crumbly crust without the steam-driven layering.
Using chicken thighs over breasts for the filling addresses the most common criticism of homemade pot pie: dry, stringy chicken. Thighs contain more intramuscular fat and more connective tissue than breasts. During a 35-minute oven bake at 200°C, that connective tissue gradually softens and the fat distributes through the shredded meat, keeping it moist even at the high internal temperature the pie reaches. Breast meat, with its lower fat and connective tissue content, dries out and becomes stringy under the same conditions. I’ve tested this recipe with both cuts at identical poaching and baking conditions. Thighs remain moist and tender; breasts require reducing the oven time by 5 minutes to maintain acceptable moisture, which sometimes means the crust isn’t fully done at the center.
Cooling the filling before assembly is not a convenience step; it directly determines whether the bottom crust bakes through or stays raw and gummy. When hot filling contacts cold butter-layered pastry, the butter melts immediately rather than staying in distinct solid pieces. The water in the butter disperses into the dough and partially hydrates the starch, and the fat distributes evenly through the flour matrix. The result is a dense, compressed pastry that bakes into a biscuit-like texture rather than a flaky one. Room-temperature filling placed into cold pastry keeps the butter solid until the oven’s heat converts it to steam all at once.
Frequently Asked Questions
Can I make chicken pot pie ahead of time?
Yes, and it’s one of the most practical dishes for advance preparation. Make the filling up to 2 days ahead and refrigerate it in a sealed container. Make the pastry dough up to 3 days ahead and refrigerate each disk wrapped tightly. On the day of serving, roll and assemble the pie with cold filling, chill the assembled unbaked pie for 15 minutes, and bake as directed. You can also assemble the complete unbaked pie the night before and refrigerate it; add about 5 minutes to the baking time since it starts from cold.
Why is the bottom crust of my pot pie always soggy?
Three causes account for nearly every soggy bottom: the filling was still warm when it went into the crust, the pie was baked on a solid baking sheet that blocked heat from the bottom, or the filling was too thin before baking and the excess liquid soaked into the pastry. Fix all three by cooling the filling fully before assembly, placing the pie dish directly on the oven rack or on a preheated baking sheet, and making sure the filling coats a spoon heavily before pouring it into the crust.
Can I use store-bought rotisserie chicken?
Yes, and it’s a very practical shortcut that doesn’t significantly compromise the quality of the finished pie. Use about 3 cups of shredded rotisserie chicken meat from the thighs and darker portions of the bird; the breast meat works but is drier. Since you’re skipping the poaching step, use a good-quality low-sodium chicken broth directly for the filling and compensate for the slightly less flavorful base by adding an extra tablespoon of butter to the roux and a pinch more of dried thyme.
How do I know when the pot pie is done baking?
The crust should be a deep, uniform amber color with no pale or grey patches remaining on the top or crimped edges. The filling should be actively bubbling and steaming through the venting slits; if the filling isn’t bubbling, the center hasn’t reached a high enough temperature even if the crust looks done. If the edges brown before the center bubbles, cover the crimped edge loosely with foil and continue baking until you see active bubbling at the vents.
Can I make individual chicken pot pies instead of one large one?
Yes. Divide the filling among 6 oven-safe ramekins of about 300ml capacity each. Cut the pastry into rounds slightly larger than the ramekin rim, drape each over the filled ramekin, and press the edges down around the outside to seal. Apply the egg wash and cut a small vent in each. Bake at 200°C (400°F) for 22 to 25 minutes until the pastry is deep golden and the filling bubbles around the edges. Individual pies bake faster and serve more cleanly than a single large one; they’re particularly practical for dinner parties.
Is this recipe gluten-free?
The standard recipe contains gluten in both the crust flour and the roux. To make a fully gluten-free version, replace the crust flour with a 1:1 gluten-free baking blend with xanthan gum and thicken the filling with cornstarch instead of flour; use the same quantity and cook the cornstarch in the butter for 60 seconds before adding liquid. The filling thickened with cornstarch will be slightly glossier and the crust will be more fragile to roll, but both components bake successfully and produce a recognizably good pot pie.
Can I freeze chicken pot pie before baking?
Yes, and freezing before baking produces a slightly better result than freezing after. Assemble the pie completely through the egg wash step, skip the venting slits until just before baking, wrap tightly in plastic wrap and then foil, and freeze for up to 3 months. When ready to bake, cut the venting slits through the frozen crust, brush with a fresh egg wash, and bake from frozen at 190°C (375°F) for 60 to 70 minutes. The lower temperature prevents the crust edges from burning before the center filling thaws and heats through.

Conclusion
Chicken pot pie earns its place as a classic because the technique behind it is genuinely sound. A properly built roux thickens the filling to the exact consistency that slices cleanly. Cold butter worked through flour creates the steam-driven lift that produces real flakiness. Poaching the chicken in the same broth used for the filling makes every component taste like part of the same dish rather than assembled separately and combined.
Once you’ve made this a couple of times, the process becomes intuitive. You’ll know what the filling should look like when it’s thick enough, how the dough should feel when there’s just enough water in it, and how long it actually needs to rest after baking. That confidence builds quickly, and the result is one of the most satisfying home-cooked meals you can put on a table. A well-made chicken pot pie doesn’t need anything alongside it to feel complete.
If you loved this recipe, save it to your comfort food and family dinner Pinterest board so you can find it easily later. For more recipes and daily food inspiration, follow TheCookingVibes on Pinterest.
Classic Chicken Pot Pie
Ingredients
Equipment
Method
- Whisk flour, salt, and sugar in a large bowl. Add cold cubed butter and work into the flour until rough crumbs form with pea-sized butter pieces visible. Add ice water one tablespoon at a time until dough holds together when squeezed. Divide into two disks, wrap in plastic, and refrigerate at least 30 minutes.
- Place chicken thighs in a Dutch oven and cover with broth. Bring to a gentle simmer over medium heat, partially covered, for 20 to 25 minutes until the thickest piece reaches 74°C (165°F). Remove chicken, reserve the broth. Discard skin and bones; shred meat into pieces.
- In the same Dutch oven, melt butter over medium heat. Add onion and cook 5 to 6 minutes until soft. Add carrots and celery for 3 minutes. Add garlic and stir 60 seconds.
- Sprinkle flour over the vegetables and stir to coat. Cook for 90 seconds until the raw flour smell fades. Pour reserved broth back in gradually while stirring. Simmer 4 to 5 minutes until the filling thickens to a heavy coating consistency.
- Stir in heavy cream, thyme, rosemary, shredded chicken, and frozen peas. Season with salt and pepper. Transfer filling to a bowl and cool completely to room temperature, about 20 minutes.
- Preheat oven to 200°C (400°F). Roll one pastry disk to a 30cm circle and press into the pie dish without stretching. Add cooled filling. Roll the second disk and lay over the filling. Seal and crimp the edges.
- Brush the top crust and crimped edges with egg wash. Cut 4 to 5 venting slits across the top. Chill the assembled pie 15 minutes in the refrigerator.
- Bake on the center rack for 30 to 35 minutes until the crust is deep amber and the filling bubbles at the vents. Rest on a wire rack for 10 minutes before slicing.
Notes
- Cool the filling completely before assembly; hot filling melts the butter in the crust and prevents flakiness.
- Chill the assembled unbaked pie for 15 minutes before baking to firm the butter back up.
- Rotisserie chicken can substitute for the poached thighs; use good-quality broth directly in the filling.
- Freeze unbaked assembled pie for up to 3 months; bake from frozen at 190°C (375°F) for 60 to 70 minutes.