Classic Banana Pudding — Creamy Custard, Layered, From Scratch
There’s a version of banana pudding that comes out of a box, gets mixed with cool whip, and sits in a disposable pan at a potluck. Then there’s this version: a silky, from-scratch vanilla custard poured warm over fresh banana slices and vanilla wafers, finished with real whipped cream that holds its shape for hours. The difference between the two isn’t subtle. The scratch version has a custard with genuine egg yolk richness, a banana flavor that comes from actual ripe fruit rather than artificial extract, and a texture that softens as it chills into something that feels genuinely layered rather than uniform and flat.
This banana pudding recipe makes a classic Southern-style layered dessert with a cooked vanilla custard, ripe sliced bananas, vanilla wafers, and freshly whipped heavy cream. It comes together in about 40 minutes of active work, then chills for at least 4 hours to let the layers meld into each other. The result is a dessert that holds well for up to 3 days in the refrigerator and actually improves after the first 12 hours once the wafers have absorbed the custard and softened into a cake-like layer.

Why You’ll Love This Banana Pudding
- From-scratch custard, not instant. The cooked egg-yolk custard has a richness and depth that instant pudding mixed with milk can’t produce. You can taste the difference in the first spoonful.
- Layers that actually meld. After 4 hours of chilling, the vanilla wafers absorb the custard and soften into something between a cookie and a cake layer. That texture is the defining characteristic of a properly made banana pudding.
- Make-ahead by design. This dessert is better the day after it’s made, which means you can prepare it a full day before serving with zero compromise in quality.
- Whipped cream that holds for days. Stabilizing the whipped cream with a small amount of powdered sugar keeps it from weeping or deflating even after 48 hours in the refrigerator.
- Scales for a crowd. Double the recipe, use a full 9×13-inch pan, and this feeds 20 people without changing a single technique.

Ingredients You’ll Need
Recipe Timing
| Detail | Info |
|---|---|
| Servings | 10 to 12 |
| Difficulty | Easy to Moderate |
| Course | Dessert |
| Cuisine | American Southern |
| Prep Time | 20 minutes |
| Cook Time | 20 minutes |
| Rest Time | 4 hours minimum (chilling, passive) |
| Total Time | 4 hours 40 minutes |
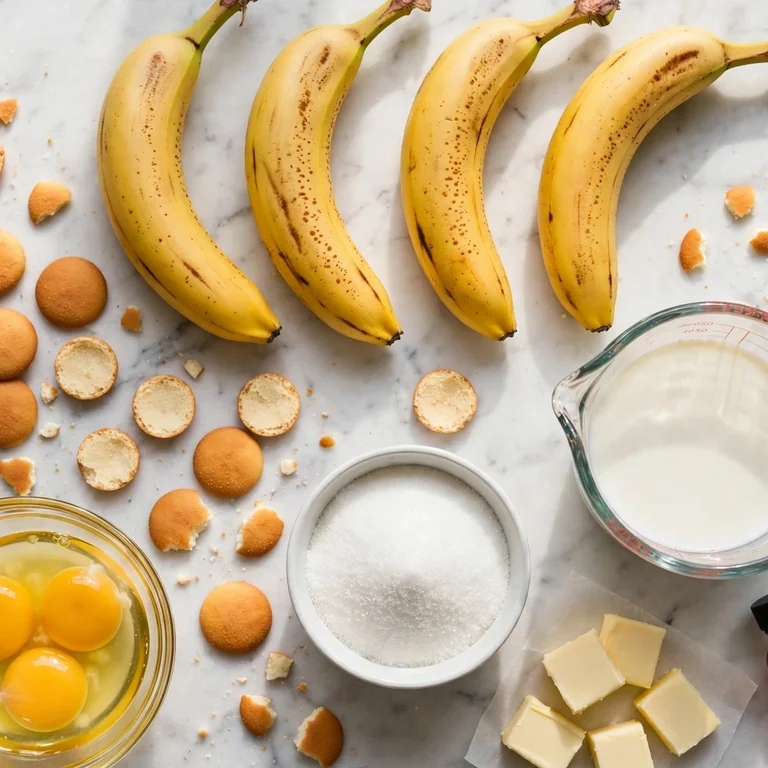
For the bananas, ripe fruit is essential but overripe bananas are not the goal here. A banana with bright yellow skin and just a few small brown freckles gives the best balance of sweetness and firm texture. Fully yellow bananas hold their shape cleanly when sliced and don’t oxidize and brown as quickly as very ripe ones. Overripe bananas turn mushy within hours of slicing and create wet, discolored pockets in the finished pudding. If your bananas are already very spotty, use them and plan to serve the pudding within 24 hours.
For the egg yolks, use large eggs at room temperature. Cold yolks incorporated into warm custard can cause slight curdling at the edges before they fully temper. Setting them out 20 to 30 minutes before you start costs nothing and produces a smoother result.
For the vanilla wafers, any standard brand works. Arrange them in an even layer without stacking; overlapping wafers in the same layer softens unevenly and creates pockets with wildly different textures in the finished dessert. If you want to use a thicker, more substantial cookie, graham crackers substitute cleanly and produce a slightly more pronounced crust-like layer.
The Custard:
- 3/4 cup (150g) granulated sugar — sweetens the custard; the quantity is calibrated to balance the neutral cream and the sweetness of the ripe bananas
- 1/3 cup (40g) all-purpose flour — the thickener; produces a custard that sets to a silky, spoonable consistency rather than a rigid gel; cornstarch can replace it at the same quantity for a glossier finish
- 1/4 teaspoon fine salt — sharpens and balances the sweetness
- 3 cups (720ml) whole milk — the liquid base of the custard; whole milk produces a richer result than lower-fat alternatives; the fat content matters for the final texture
- 4 large egg yolks, room temperature — the richness and binding element; more yolks produce a deeper yellow color and a silkier mouthfeel; the whites are not needed in this recipe
- 2 tablespoons unsalted butter — stirred in at the very end; adds a glossy sheen and a rounded, buttery finish that prevents the custard from tasting purely eggy
- 1 1/2 teaspoons pure vanilla extract — the primary flavor of the custard; pure extract is noticeably more complex than imitation
For Layering:
- One 11-oz (312g) package vanilla wafers — the structural layer that softens into a cake-like texture as the custard soaks in
- 4 medium ripe bananas, peeled and sliced into 5mm rounds — the fruit layer; slightly firm for best texture; slice just before assembling to minimize browning
Whipped Cream Topping:
- 2 cups (480ml) cold heavy whipping cream, minimum 35% fat — must be very cold for proper whipping; a warm bowl or warm cream won’t reach stable peaks
- 3 tablespoons powdered sugar — sweetens and stabilizes the whipped cream; powdered sugar contains a small amount of cornstarch that helps the cream hold its shape longer than granulated sugar would
- 1 teaspoon pure vanilla extract — adds warmth to the cream topping
Allergen and Dietary Disclosure
This banana pudding contains gluten (all-purpose flour in the custard and vanilla wafers), dairy (whole milk, butter, heavy cream), and eggs (egg yolks in the custard). The vanilla wafers may also be processed in facilities that handle tree nuts depending on the brand; check the package label if nut allergies are a concern.
For gluten-free: replace the all-purpose flour in the custard with an equal quantity of cornstarch and use a certified gluten-free vanilla wafer or gluten-free graham cracker. The cornstarch produces a slightly glossier custard than flour; the flavor difference is minimal.
For dairy-free: substitute full-fat canned coconut milk for the whole milk in the custard. The coconut flavor is present but mild and works reasonably well against the banana and vanilla. Replace the butter with a vegan butter alternative and use full-fat coconut cream for the whipped topping. Chilled coconut cream whips to a looser but serviceable consistency.
For egg-free: replace the egg yolks entirely by increasing the flour to 1/2 cup and whisking it directly into the cold milk before cooking. The custard will be paler and slightly less rich but still sets cleanly. Cook it until it reaches a thick, pudding-like consistency that coats a spoon heavily.
This recipe has not been tested in a certified allergen-free kitchen and cannot be guaranteed safe for any specific allergy.
Equipment Needed
- Medium saucepan, heavy-bottomed, 3 to 4 quart — the custard needs even, consistent heat across the base. A thin-bottomed pot creates hot spots that cause the egg yolks to scramble at the edges before the center thickens. A stainless steel or enameled heavy-bottomed saucepan distributes heat evenly and gives you more time to stir before the custard catches.
- Whisk — essential for two reasons: it incorporates the flour evenly into the cold milk before heating, and it breaks up any potential lumps as the custard thickens. A wooden spoon works for stirring but cannot break down lumps the way a whisk can once the custard starts to set.
- Fine-mesh strainer — for straining the finished custard before assembling the layers. Even a well-made custard can carry tiny cooked egg particles or flour lumps; straining takes 30 seconds and produces a noticeably smoother result.
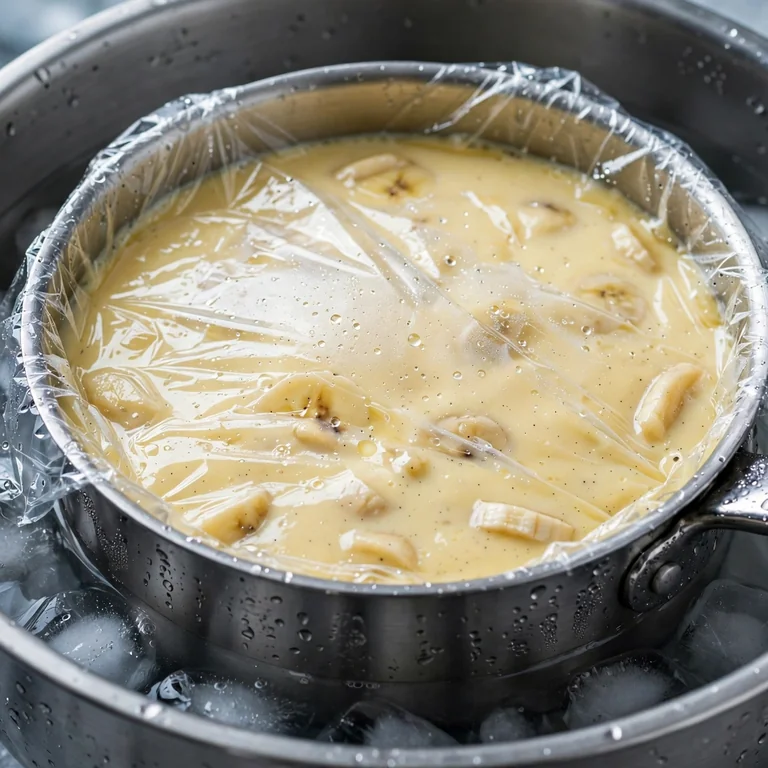
- Large mixing bowl with ice water bath — to cool the hot custard quickly before assembling. Pouring warm custard directly over the banana slices softens them too rapidly and speeds up browning. Setting the saucepan in a bowl of ice water and stirring for 2 minutes drops the custard temperature faster than refrigerating it does.
- Hand or stand mixer — for whipping the cream to stable peaks. A balloon whisk by hand produces the same result but takes 4 to 5 minutes of sustained effort and is genuinely tiring. A mixer is the practical choice.
- 8×8-inch or 9×9-inch baking dish, or a 2 to 3 quart trifle bowl — the serving vessel. A glass trifle bowl shows the layers through the sides, which is visually striking. A ceramic baking dish works just as well and is easier to serve from.
Step-by-Step Directions
Step 1: Make the Custard Base
Whisk together the sugar, flour, and salt in a heavy-bottomed saucepan until the dry ingredients are evenly blended with no visible flour clumps. Pour the whole milk in a slow, steady stream while whisking continuously, making sure the flour dissolves fully into the cold liquid before you start cooking. Undissolved flour in cold milk forms lumps that are difficult to remove once the custard heats up.
Step 2: Cook the Custard to a Simmer
Set the saucepan over medium heat. Cook, whisking constantly with a figure-eight motion that covers the entire base of the pan, for 8 to 10 minutes until the mixture begins to steam and thicken noticeably. When it reaches a gentle simmer with small bubbles forming at the edges and the custard looks as thick as a heavy pancake batter, reduce the heat immediately to medium-low.

Chef’s Note: The figure-eight whisking pattern is not decorative. It ensures that no part of the pan base sits still long enough for the custard to stick and scorch. The corners of a saucepan are the first places custard catches; pay extra attention to them as the mixture thickens.
Step 3: Temper and Add the Egg Yolks
Lightly whisk the room-temperature egg yolks in a small bowl until they’re loosened and slightly pale. Slowly ladle about half a cup of the hot custard into the yolks in a thin, steady stream while whisking the yolks continuously. This is tempering: it gradually raises the yolk temperature so they don’t scramble when they meet the full hot custard. Once the yolks look smooth and slightly warm, pour the entire yolk mixture back into the saucepan in a slow stream while whisking steadily.
Chef’s Note: Pouring cold egg yolks directly into a simmering custard without tempering first produces scrambled egg pieces dispersed through the pudding, which no amount of straining can fully fix. The tempering step takes about 60 seconds and eliminates this problem entirely.

Step 4: Cook Until Thick and Glossy
Return the saucepan to medium-low heat after adding the yolk mixture back. Stir continuously for another 3 to 4 minutes until the custard thickens to a consistency that falls in slow, heavy ribbons from the whisk and holds a visible trail across the surface for several seconds before settling. Remove the pan from the heat and stir in the cold butter pieces and vanilla extract until the butter is fully melted and the custard looks glossy and smooth.
Step 5: Cool the Custard Quickly
Set the saucepan into a larger bowl filled with ice water. Stir the custard continuously for 2 minutes, which drops its temperature from around 82°C (180°F) to roughly 50°C (120°F) in that time. Press a sheet of plastic wrap directly against the surface of the custard to prevent a skin from forming, then continue cooling at room temperature for 10 more minutes before assembling. The custard should be warm but not hot when it goes over the bananas.
Chef’s Note: Direct contact between the plastic wrap and the custard surface is the key detail here. A skin on custard forms when the surface proteins dry out from air exposure. Plastic pressed flat against the surface prevents any air contact and keeps the custard smooth all the way through.
Step 6: Assemble the Layers
Arrange a single, even layer of vanilla wafers across the base of your serving dish or trifle bowl, fitting them close together without overlapping. Lay the banana slices in a single, slightly overlapping layer directly over the wafers, covering them completely. Strain the warm custard through a fine-mesh strainer directly over the banana and wafer layer, spreading it gently with a spatula to fill every gap. Repeat the layers in the same order: wafers, bananas, custard, until the dish is full. The top layer should be custard, not wafers or bananas.
Step 7: Whip and Apply the Topping
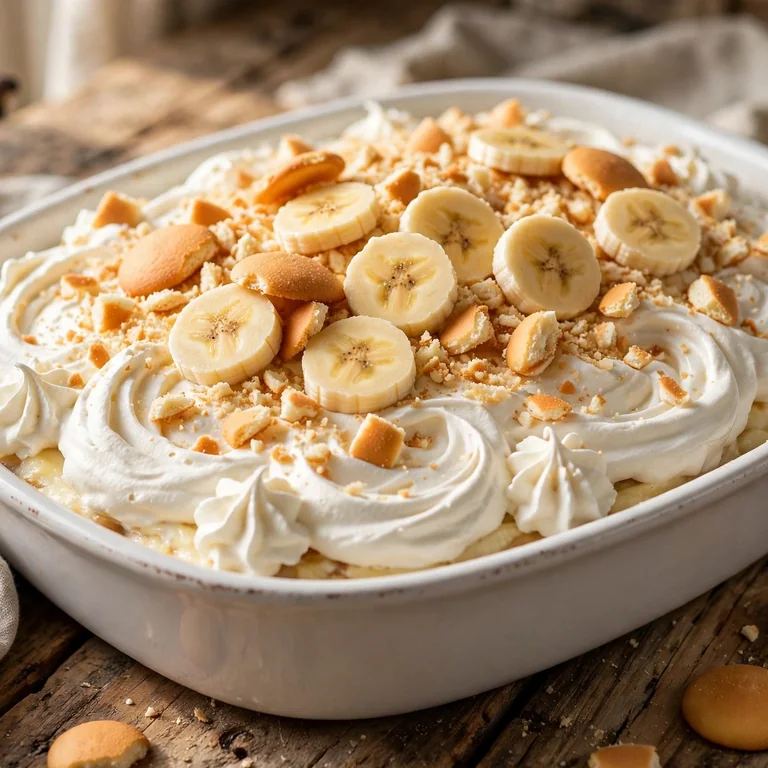
Pour the cold heavy cream into a chilled bowl. Whip on medium-high speed until the cream begins to thicken, then add the powdered sugar and vanilla extract. Continue whipping until the cream holds firm, stable peaks that stand straight when the beater is lifted rather than curling at the tip. Spread the whipped cream in an even layer over the top of the assembled pudding, or pipe it decoratively using a piping bag. Press a few whole vanilla wafers decoratively into the surface.
Step 8: Chill Before Serving
Cover the dish tightly with plastic wrap and refrigerate for a minimum of 4 hours. Overnight, specifically 8 to 12 hours, is the ideal rest time. During this period the wafer layers absorb the custard and soften completely, the banana slices infuse the surrounding custard with their flavor, and the whole dessert sets into a unified, sliceable consistency. The pudding served at the 4-hour mark is good; the pudding served the next morning is noticeably better.
Common Mistakes and Troubleshooting
| Problem | Cause | Solution |
|---|---|---|
| Custard has scrambled egg pieces in it | Yolks added without tempering, or heat too high | Always temper the yolks with hot custard first; keep heat at medium-low once yolks go in |
| Custard too thin after chilling | Flour measurement was short, or custard not cooked long enough | Cook until ribbons fall heavily from whisk; measure flour level with the measuring cup leveled off |
| Skin formed on top of the custard | Plastic wrap held above the custard surface rather than pressed against it | Press wrap directly on the custard surface with no air gap the moment it comes off the heat |
| Bananas turned brown and mushy | Overripe bananas used, or assembled too far in advance | Use firm, lightly spotted bananas; assemble no more than 24 hours before serving |
| Whipped cream weeping and collapsing | Cream wasn’t cold, or whipped past firm peaks to over-beaten | Use cream straight from the fridge; stop at firm peaks and refrigerate immediately |
| Pudding watery at the bottom of dish | Custard was too hot when assembled and cooked the bananas partially | Cool custard to warm (around 50°C) before assembly; never pour hot custard directly over bananas |
Variations and Substitutions
- Brûléed banana topping: Arrange banana slices on a sheet of foil and sprinkle each lightly with granulated sugar. Use a kitchen torch to caramelize the sugar until it turns amber and crackles. Place these brûléed slices on top of the whipped cream right before serving for a textural contrast that brings a slightly bitter caramel note to the sweet pudding.
- Peanut butter banana pudding: Whisk 3 tablespoons of smooth peanut butter into the custard base along with the butter and vanilla at the end of cooking. The peanut butter flavor is mild but present throughout the custard and pairs naturally with the banana layers. Top with crushed salted peanuts over the whipped cream.
- Chocolate banana pudding: Add 3 tablespoons of Dutch-process cocoa powder to the flour and sugar mixture at the start. The custard turns a rich brown and the chocolate-banana combination produces a noticeably more indulgent result. Replace the vanilla wafers with chocolate graham crackers for a fully chocolate base.
- Graham cracker layers: Substitute graham crackers for the vanilla wafers for a more substantial, slightly honeyed layer. Graham crackers absorb custard more quickly than wafers and produce a denser, more cake-like consistency even at the 4-hour mark. This version works particularly well for outdoor gatherings where the pudding will be served at or near room temperature.
- Mini individual cups: Assemble the pudding in small glass jars or individual serving cups rather than one large dish. Layer custard, then bananas, then a single wafer, then cream in each cup. These individual servings need only 2 hours of chilling since the layers are thinner, and they’re significantly easier to serve at gatherings.
- Lighter custard: Replace 1 cup of the whole milk with an equal amount of low-fat evaporated milk. The evaporated milk contributes more body and a subtle caramel note from the canning process, and the overall fat content of the custard drops meaningfully while the texture stays pleasantly smooth.
Serving Suggestions
- Serve directly from the refrigerator rather than at room temperature for the cleanest, most set slices. Banana pudding that warms up begins to loosen at the edges within 20 minutes and the layers start to blur into each other. Cold bowls from the fridge hold the layers more distinctly.
- A scoop of vanilla ice cream alongside an individual serving extends the dessert into something that feels considerably more assembled, particularly for a dinner party where the pudding is the final course.
- For a casual setting, spoon the pudding into individual bowls at the table and top each serving with an extra banana slice and a broken vanilla wafer pressed into the cream. The texture of the fresh wafer against the softened layers inside the pudding adds a satisfying crunch to the first bite.
- Serve after a lighter main course like grilled chicken or a simple pasta. Banana pudding is rich enough that following a heavy meal makes it feel overwhelming; following something lighter, the custard and cream land exactly right.
- Dust the whipped cream surface lightly with ground cinnamon or a small amount of freshly grated nutmeg just before serving. Both spices complement the banana and vanilla without competing with them and add a visual warmth to the finished dish.
- For a celebration presentation, use a clear glass trifle bowl and take it to the table whole. The visible cross-section of pale custard, golden wafer, and white cream layers is one of the most visually appealing presentations in classic American desserts.

Tips for the Best Results
- Slice the bananas immediately before assembling. Banana flesh starts oxidizing the moment it’s cut, and even 15 minutes of exposure to air causes noticeable browning at the cut surfaces. Have the custard cooled and ready to go before you peel and slice a single banana; the warm custard slows further oxidation once it’s in contact with the fruit.
- Strain the custard every time. Even a well-executed custard can carry microscopic egg particles or very small flour lumps that you can’t see until the pudding is chilled and served. A 30-second pass through a fine-mesh strainer produces a custard that’s visibly smoother and more uniform in every bite. Skip it once and you’ll notice the difference.
- Let it chill overnight rather than the minimum 4 hours. The 4-hour mark produces a pudding that’s technically set and ready to serve. The overnight version is something noticeably different: the wafers have absorbed the custard fully, the banana flavor has deepened throughout, and the layers have unified into a dessert that holds its shape when spooned rather than sliding across the bowl. If your schedule allows, make this the day before serving.
- Use cold equipment for the whipped cream. Place the mixing bowl and the beater attachments in the freezer for 10 to 15 minutes before whipping. Cold surfaces keep the cream below the temperature where fat globules lose their ability to trap air bubbles, which is what produces the volume and stability you want. In warm kitchens, this step is especially important.
- Cover tightly and don’t let the pudding absorb odors. A refrigerator full of savory leftovers transfers flavors to uncovered dairy-based desserts more easily than most people expect. Pressing plastic wrap directly against the cream surface and then covering the dish with a second layer of plastic before chilling keeps the pudding tasting purely of vanilla and banana rather than whatever else is on the refrigerator shelf.
Storage Tips
Refrigerator
Banana pudding keeps well in the refrigerator for up to 3 days, tightly covered with plastic wrap. The texture on day one is set but still slightly distinct in its layers. By day two, the layers meld together more completely and the wafers are fully softened. Day three is still very good but the bananas will have darkened noticeably and the custard may be slightly looser at the edges. The whipped cream topping holds for 48 hours with the powdered sugar stabilization; beyond that it may start to weep slightly at the base.
Freezer
Banana pudding does not freeze well in its assembled form. The custard separates and weeps during thawing, the bananas turn completely black and mushy, and the whipped cream collapses. The custard itself can be made and frozen without the other components; cool it completely, freeze in a sealed container for up to 1 month, and thaw overnight in the refrigerator before rewhisking to smooth out any separation and assembling the layers fresh.
Reheating
Banana pudding is served cold and doesn’t require reheating. If you’ve refrigerated it and want to take the chill off slightly for serving, let it sit at room temperature for 15 to 20 minutes before serving. Avoid microwaving assembled banana pudding; the uneven heat warms the custard unevenly, partially melts the whipped cream, and causes the banana slices to soften into the surrounding layers in a way that collapses the texture completely.
Make-ahead note: This dessert is specifically designed to be made ahead. The ideal timeline is to make it the evening before serving and chill overnight. The custard can be made up to 2 days in advance and stored with plastic pressed against its surface; assemble the layers fresh on the day before serving. Make the whipped cream and apply the topping no more than 12 hours before serving for the best presentation.
Nutrition Information
Per serving, approximately 1/10 of the assembled pudding:
| Nutrient | Amount |
|---|---|
| Calories | 390 kcal |
| Protein | 6g |
| Total Carbohydrates | 48g |
| Dietary Fiber | 1.5g |
| Total Sugar | 32g |
| Total Fat | 20g |
| Saturated Fat | 11g |
| Cholesterol | 115mg |
| Sodium | 190mg |
| Vitamin C | 5mg |
| Calcium | 110mg |
| Iron | 0.8mg |
| Potassium | 280mg |
Nutrition values are approximate and may vary based on brands and portion sizes.
Why This Recipe Works
The cooked flour-based custard in this recipe, rather than a cornstarch-only or instant pudding base, produces a specific texture that explains why scratch banana pudding tastes fundamentally different from the box version. Flour contains both starch and a small amount of protein. When flour is cooked in milk with egg yolks, the starch gelatinizes to thicken the custard while the protein from both the flour and the yolks creates a network of bonds that gives the custard a slightly elastic, silky quality. That texture holds up through chilling without becoming rubbery or stiff, and it absorbs the moisture from the banana slices and wafers gradually rather than breaking down immediately. Cornstarch produces a slightly glossier custard that can feel stiffer and more gelled at cold temperature; flour produces one that stays more like a traditional pudding even after 24 hours in the refrigerator.
Tempering the egg yolks is the step that most home cooks skip or rush, and it’s the one most directly responsible for a lumpy, granular custard. Egg proteins begin denaturing, meaning they tighten and coagulate, at around 65 to 70°C (150 to 160°F). If cold yolks are poured directly into a custard that’s at or near simmering temperature, around 85 to 90°C (185 to 195°F), the proteins on the outer surface of the yolk mass seize instantly before the heat has a chance to distribute gently through them. Tempering distributes the heat gradually across the yolk proteins by mixing them first with a measured amount of the hot liquid, bringing their temperature up incrementally so the proteins can set slowly and evenly rather than scrambling on contact.
The butter stirred in at the end of cooking serves three simultaneous purposes. It adds a small but perceptible richness to the finished custard’s flavor. It coats the starch molecules with fat, which prevents the custard from becoming rubbery as it chills, a phenomenon called starch retrogradation. And it contributes to the glossy sheen that distinguishes a well-finished custard from a matte, dull one. A tablespoon of cold butter stirred into a hot custard off the heat takes 20 seconds and improves the result in every visible and edible way.
Pressing plastic wrap directly against the custard surface, rather than draping it loosely over the top of the saucepan, is the only reliable way to prevent a skin from forming. A skin on custard is not just a texture problem; it becomes a flavor concentration point where the evaporating liquid leaves behind a slightly thicker, sometimes slightly overcooked layer. That layer, when stirred back into the custard, produces small lumps that were not there before. Direct contact with plastic eliminates evaporation entirely and keeps the surface identical in texture to the interior.
I’ve tested this recipe with both fully ripe (spotted) bananas and firm, lightly spotted ones at identical chilling times. Firm bananas hold their shape through the assembly process and remain distinct in the custard after 24 hours; they also oxidize more slowly. Spotted bananas produce a stronger banana flavor in the surrounding custard but turn brown and soft within 6 hours of assembly. For a pudding served the same day, spotted bananas are the better choice. For anything made the day before, firm bananas are the only practical option.
Frequently Asked Questions
Can I make banana pudding the day before?
Yes, and it genuinely improves with overnight chilling. Make the pudding through the whipped cream topping, cover tightly with plastic wrap, and refrigerate overnight. By morning the wafer layers will have absorbed the custard completely and softened into a cake-like texture, the banana flavor will have deepened throughout the custard, and the layers will hold their shape cleanly when served. This is one of the few desserts that benefits more from resting than from being made and served immediately.
Why did my custard turn out lumpy?
Lumpy custard almost always traces back to one of two causes. The egg yolks were added without proper tempering, causing them to scramble on contact with the hot custard, or the heat was too high throughout cooking and the mixture reached a hard boil rather than a gentle simmer. To fix an already lumpy custard, pass it through a fine-mesh strainer while it’s still hot; this removes the solid pieces and leaves a smooth liquid behind. To prevent it in future batches, temper the yolks carefully and keep the heat at medium to medium-low throughout.
Can I use instant pudding mix instead of making custard from scratch?
You can, and many people do for a quicker result. Two packages of instant vanilla pudding made with cold whole milk according to their package directions produce a workable substitute. The flavor is noticeably less rich and the texture is softer and more uniformly jellied rather than silky, but the assembly method, layering, and chilling time remain the same. The scratch custard in this recipe produces a visibly and tastefully superior result, but instant pudding is a reasonable shortcut when time is limited.
How do I keep the bananas from turning brown?
Use firm, lightly spotted bananas rather than very ripe ones. Slice them immediately before assembling, not in advance. Pouring the warm custard over the slices quickly creates a slight oxygen barrier that slows browning noticeably. Some people brush banana slices with a small amount of fresh lemon juice before layering; this works but adds a faint citrus note to the finished pudding that not everyone enjoys. Assembling no more than 24 hours before serving is the most reliable prevention.
Can I make banana pudding without eggs?
Yes. Omit the egg yolks entirely and increase the all-purpose flour to 1/2 cup to compensate for the lost thickening power the yolks would have provided. Cook the milk and flour mixture over medium heat, whisking continuously, until it reaches a thick, heavy consistency that falls from the whisk in slow ribbons. The finished custard will be paler, slightly less rich, and more starchy in texture than the egg-yolk version, but it sets properly and holds its layers through chilling. Increase the vanilla to 2 teaspoons to compensate for the flavor depth the yolks would have contributed.
How far in advance can I make banana pudding?
The fully assembled pudding is best within 48 hours of making. By 72 hours, the bananas have darkened considerably, the custard has begun to loosen slightly at the edges, and the whipped cream may show signs of weeping even with the powdered sugar stabilization. For the best result: make it the evening before serving and let it rest overnight. If you’re planning further ahead, make and freeze only the custard up to 1 month in advance, then assemble the layers fresh the day before serving.
My whipped cream won’t hold its shape. What went wrong?
Three causes cover most cases. The cream wasn’t cold enough; dairy fat needs to be below 7°C (45°F) to trap air bubbles properly. The bowl wasn’t cold, which warms the cream during whipping. Or the cream was whipped past firm peaks into over-beaten, slightly grainy butter. To recover slightly over-whipped cream, fold in 2 tablespoons of fresh cold cream with a spatula; it sometimes rescues the texture. For future batches, chill the bowl and beaters in the freezer for 15 minutes before starting and stop the moment the cream holds stiff, straight peaks.
Conclusion
Banana pudding made from scratch has a specific appeal that comes entirely from understanding what each component does. The cooked custard has a richness and texture that instant mix can’t replicate. The overnight rest produces layers that are genuinely better than the same pudding served at the 4-hour mark. The directly-pressed plastic wrap keeps the custard smooth and the stabilized whipped cream keeps the topping pristine for the full two days the dessert holds in the refrigerator.
None of these details are technically demanding. They just require following the process in the right sequence and giving the assembled dessert the time it needs. Once you’ve made banana pudding this way, it becomes the version you return to, not because it’s impressive, but because the result is consistently better than any shortcut version and the effort genuinely pays off in every bowl.
If you loved this recipe, save it to your desserts and Southern recipes Pinterest board so you can find it easily later! For more same recipes follow Thecookingvibes Pinterest account.
Classic Banana Pudding From Scratch
Ingredients
Equipment
Method
- In a heavy-bottomed saucepan whisk sugar, flour, salt. Pour in milk, whisk smooth. Cook over medium heat whisking constantly until steaming and bubbling at edges.
- Whisk egg yolks in separate bowl. Slowly ladle 1/2 cup hot custard in, whisking constantly to temper. Pour back into saucepan whisking vigorously.
- Reduce to medium-low, cook 3-4 min stirring constantly until custard falls in heavy ribbons. Remove from heat, stir in butter then vanilla. Strain through fine-mesh strainer.
- Set saucepan in ice water bath, stir 2 min, press plastic wrap on surface. Cool to warm before assembling.
- Layer vanilla wafers, banana slices, then one-third warm custard in dish. Repeat twice more, ending with custard.
- Whip cold cream until thickening, add powdered sugar and vanilla, whip to firm peaks. Spread over custard.
- Cover with plastic wrap on cream surface. Refrigerate minimum 4 hours, preferably overnight.
Notes
Press plastic wrap on custard surface immediately
Overnight chilling gives best texture
For gluten-free use cornstarch and GF wafers