No-Bake Biscoff Cheesecake (Creamy, Caramel, Crowd Favorite)
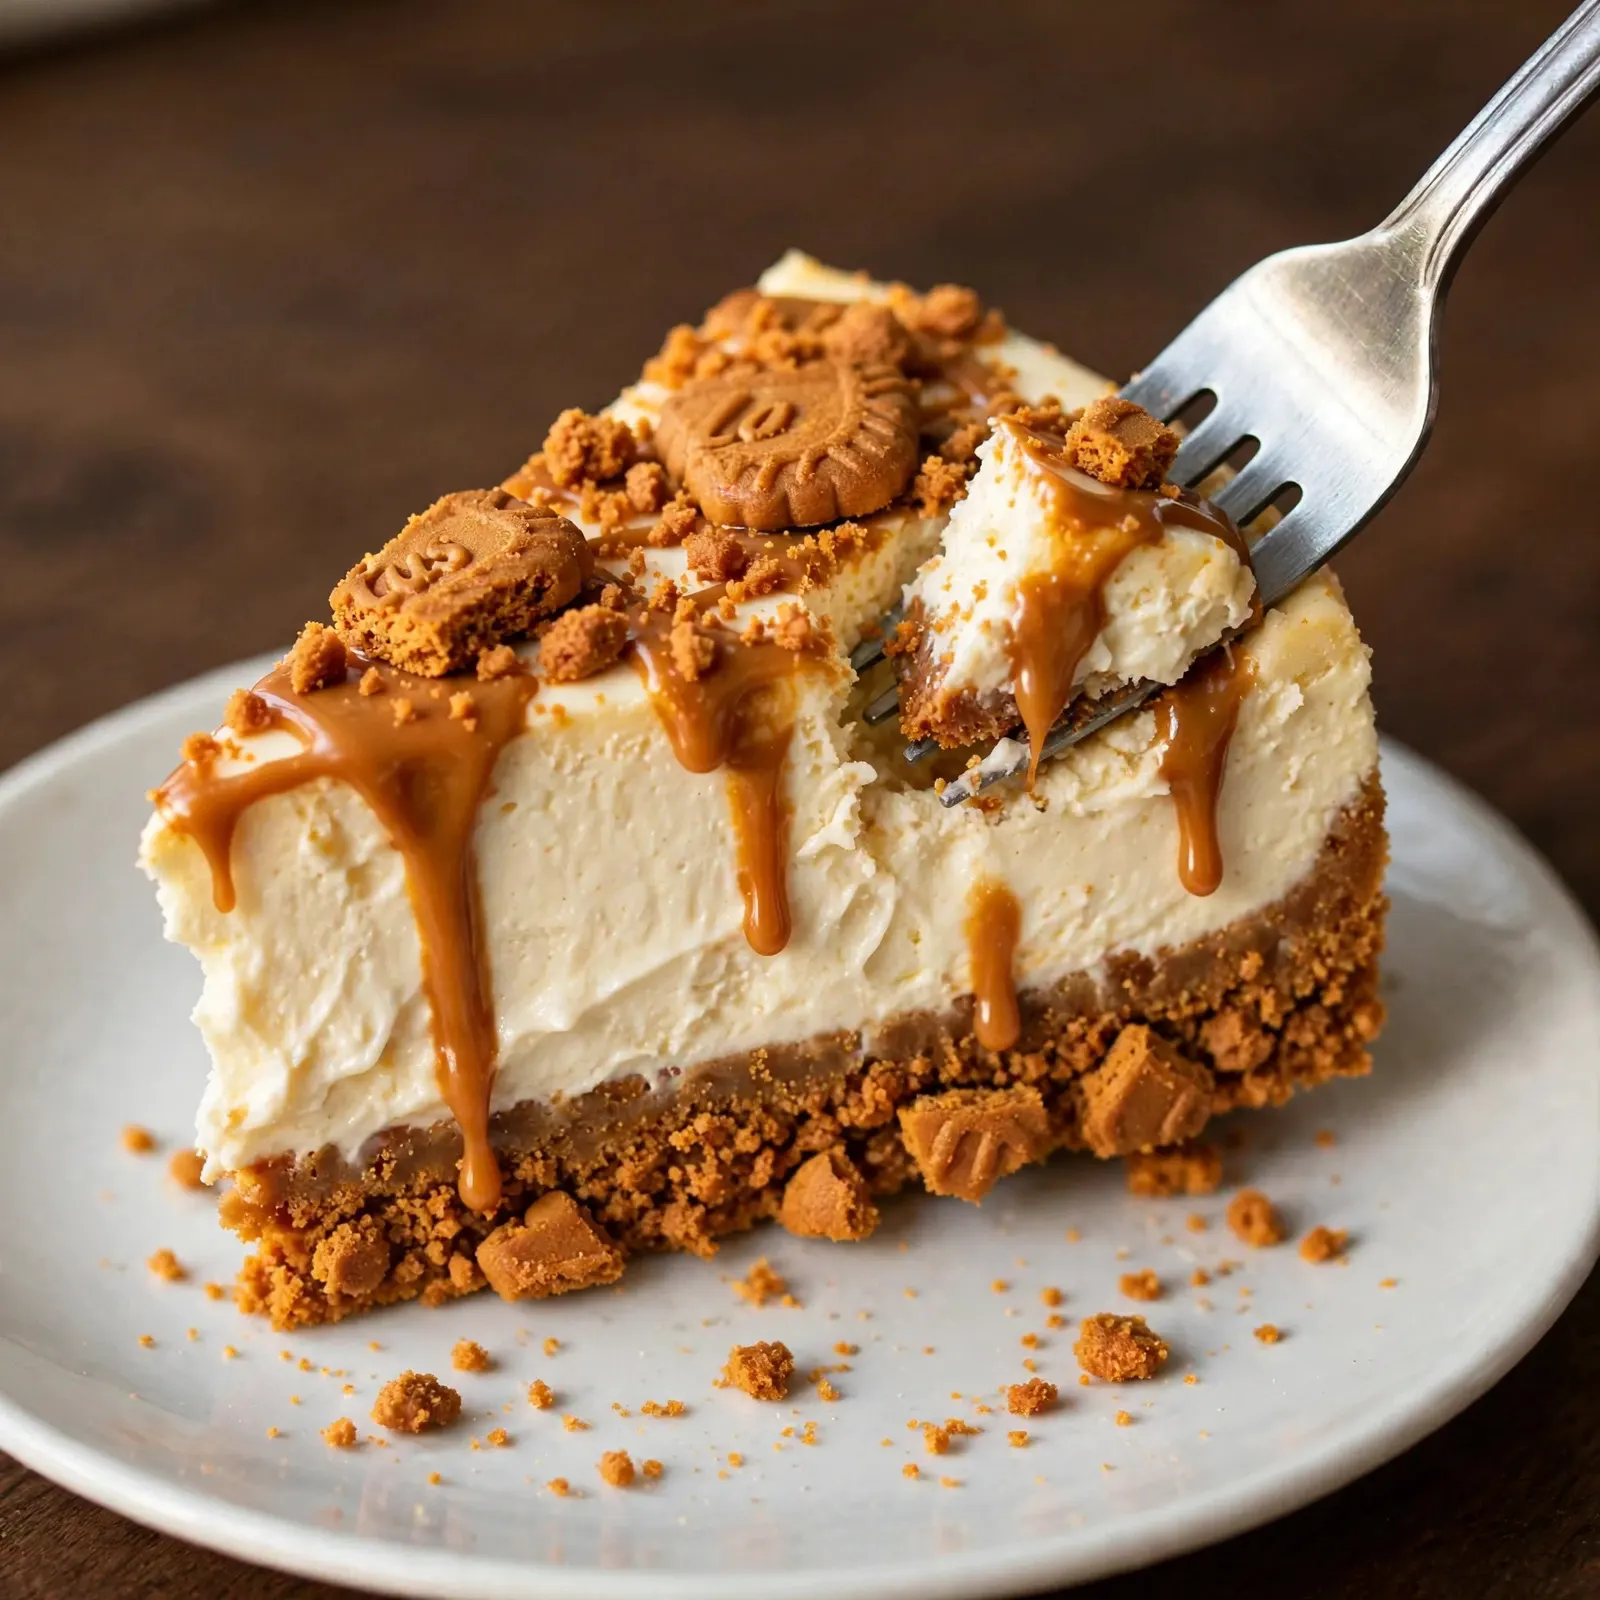
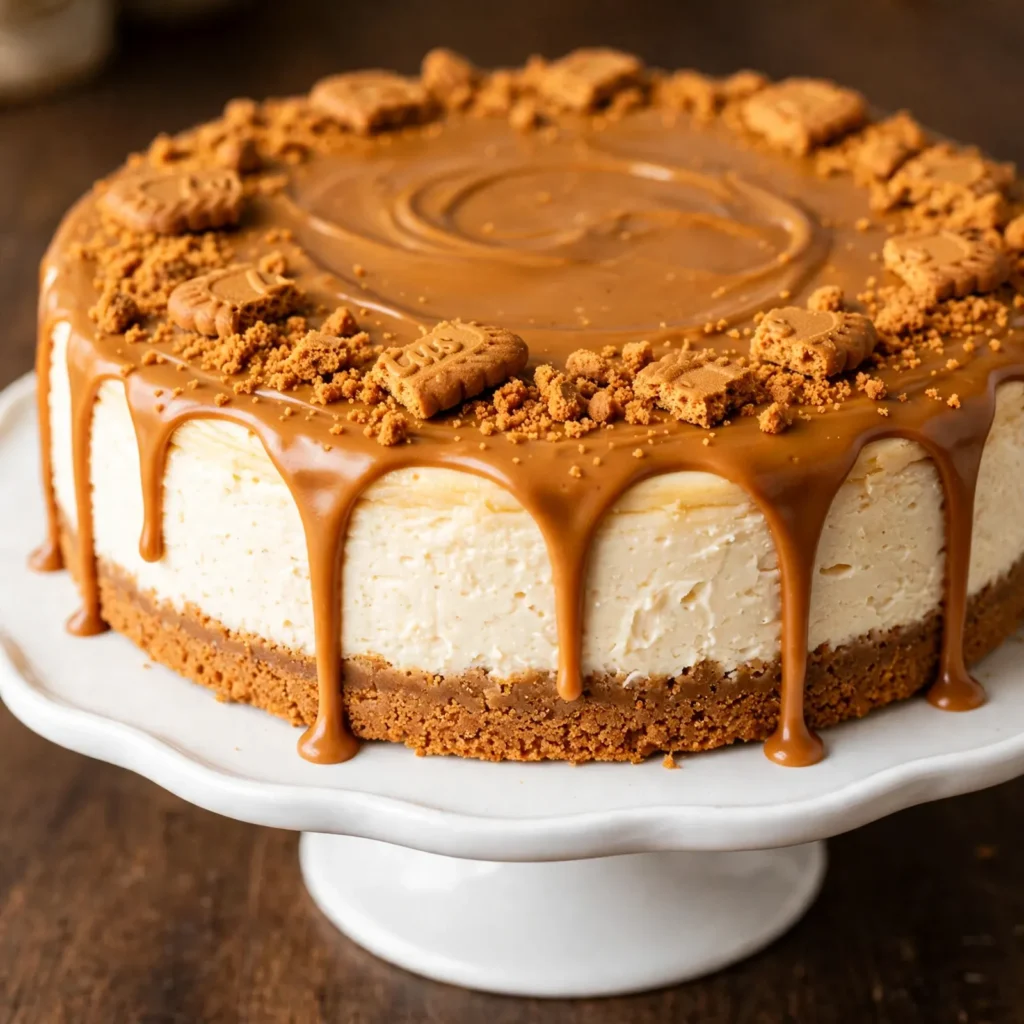
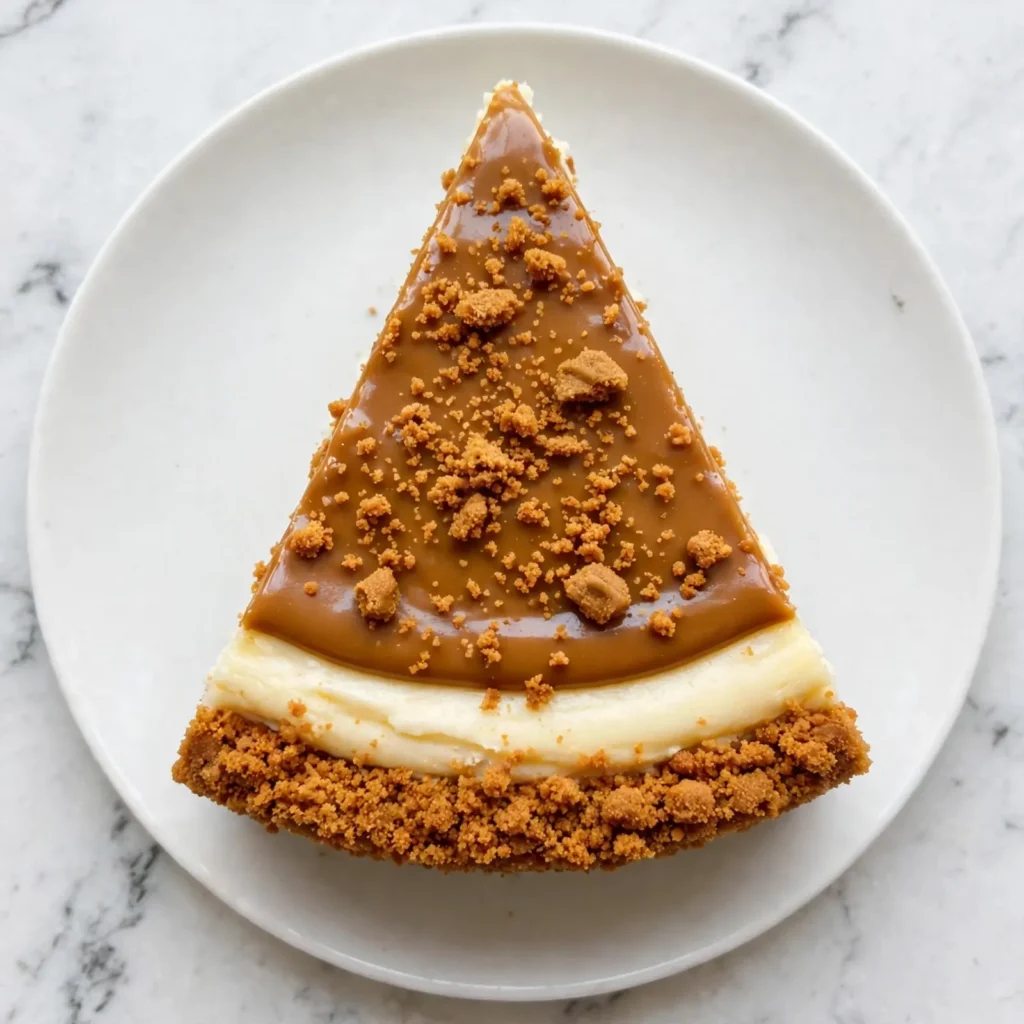
Run a warm knife through a set Biscoff cheesecake and the cross-section is one of the most satisfying things in no-bake dessert making: a compact, deeply golden cookie base, a thick layer of ivory cream cheese filling with a caramel warmth you can smell before you taste it, and a Biscoff spread drizzled across the top that sets into a glossy, slightly crackled layer at refrigerator temperature. The whole thing tastes like caramelized spice and cream in a ratio that feels deliberate rather than accidental.
This Biscoff cheesecake recipe is no-bake and sets in the refrigerator overnight. The base is crushed Biscoff cookies bound with melted butter, the filling is a combination of full-fat cream cheese, whipped double cream, and Biscoff spread, and the topping is a warm Biscoff spread drizzle that firms into a smooth, cuttable layer once chilled. It serves 12 and slices cleanly from a 23cm springform pan after a full night in the fridge. No eggs, no oven, and no water bath anxiety.
Why You’ll Love This Biscoff Cheesecake
- No oven and no eggs. The entire cheesecake comes together at room temperature with a hand mixer and a refrigerator. No baking, no water bath, and no worrying about cracks in the surface.
- The filling sets firmly enough to slice cleanly. A combination of full-fat cream cheese, stiffly whipped double cream, and Biscoff spread, given a full overnight chill, produces a filling that holds its shape when the springform is removed and cuts into clean, defined slices without crumbling.
- The Biscoff flavor runs through every layer. The base is made entirely from Biscoff cookies. The filling contains Biscoff spread. The topping is Biscoff spread again. Every component carries the same warm, caramelized spice character so no single bite is missing the flavor you came for.
- It looks impressive with almost no decoration skill required. A warm Biscoff drizzle poured over the set filling smooths itself flat. Crushed cookies scattered on top take 30 seconds. The result looks like a professional dessert without any piping or technique.
- Makes ahead with no quality loss. Biscoff cheesecake actually improves between day one and day two in the fridge as the filling firms further and the base softens very slightly into a texture that holds together without being too hard to cut.
Ingredients You’ll Need
Recipe Timing
| Detail | Info |
|---|---|
| Servings | 12 |
| Difficulty | Easy |
| Course | Dessert |
| Cuisine | European-Inspired |
| Prep Time | 25 minutes |
| Cook Time | 0 minutes |
| Setting Time (Refrigerator) | 8 hours (overnight) |
| Total Active Time | 25 minutes |
Note: The cheesecake requires a minimum of 8 hours in the refrigerator to set fully. Plan to make it the evening before serving.
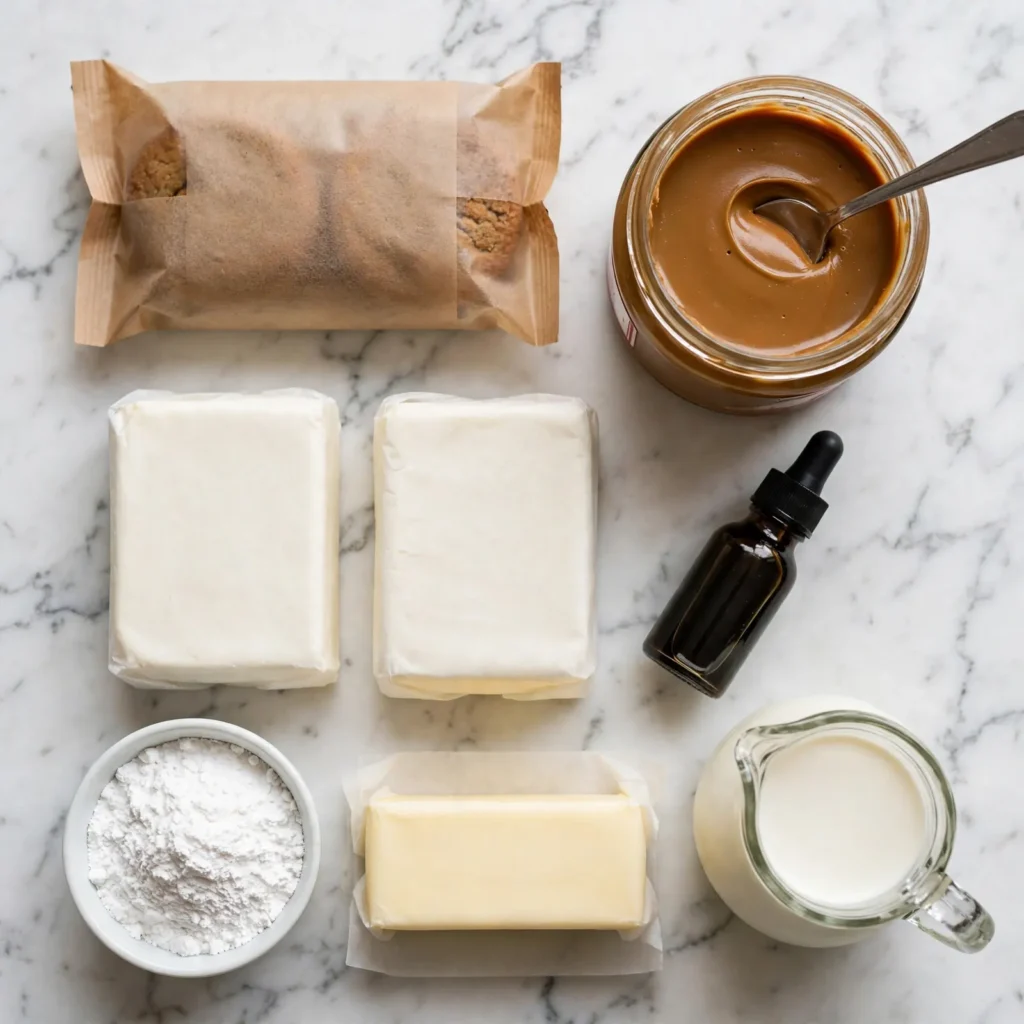
The most important ingredient decision in this recipe is the cream cheese. Use full-fat block cream cheese, not the spreadable tub variety. Block cream cheese has a lower water content than tub cream cheese, which is the physical difference that determines whether the filling sets firm enough to slice or remains too soft to hold its shape after the springform is removed. The brand matters less than the format: block, full-fat, every time.
For the double cream (heavy whipping cream), it must be cold and must have a fat content of at least 35%. Cold cream at the right fat content whips to stiff peaks in 2 to 3 minutes. Cream that is too warm or too low in fat will not hold a stiff peak, and the filling will be too soft to set correctly overnight.
For the Biscoff spread, use the smooth variety for both the filling and the topping. Crunchy Biscoff spread creates a slightly grainy texture in the filling that works against the silky consistency the recipe aims for. Keep a thin layer of smooth spread for the filling (to mix through) and warm a second portion slightly for the topping drizzle so it pours in a fluid, even layer.
For the Biscoff Cookie Base:
- 300g (about 30 cookies) Lotus Biscoff cookies, finely crushed. The sole base ingredient. Biscoff cookies are dry and firm enough to form a compact base when combined with butter, without requiring sugar or any other binder. Crush them in a food processor until they resemble fine breadcrumbs, or place in a sealed bag and roll with a rolling pin.
- 120g (8 tablespoons) unsalted butter, melted and slightly cooled. Binds the crushed cookies into a compact, sliceable base. Don’t use salted butter: the cookies already have a slight saltiness and additional salt in the base is unnecessary.
For the Biscoff Cream Cheese Filling:
- 600g (21 oz) full-fat block cream cheese, at room temperature. The primary structural ingredient. Must be fully at room temperature before mixing: cold cream cheese does not blend smoothly and leaves lumps that cannot be removed without over-beating.
- 150g (2/3 cup) smooth Biscoff spread. Folded into the filling to carry the characteristic caramelized spice flavor through the cream cheese base.
- 100g (3/4 cup) icing sugar (powdered sugar), sifted. Sweetens the filling without adding graininess. Sifting removes any lumps before mixing.
- 1 teaspoon pure vanilla extract.
- 300ml (1 1/4 cups) cold double cream or heavy whipping cream (35% fat minimum). Whipped separately to stiff peaks and folded into the cream cheese mixture to add volume and structural aeration.
For the Biscoff Topping:
- 120g (1/2 cup) smooth Biscoff spread. Warmed briefly in the microwave (15 to 20 seconds) until pourable but not hot, then drizzled over the surface of the set filling to form a smooth, cuttable layer.
- 50g (about 5 cookies) Biscoff cookies, roughly crushed. For scattering across the topping as garnish.
Allergen and Dietary Disclosure
This recipe contains gluten (Biscoff cookies contain wheat flour), dairy (cream cheese, butter, double cream), and soy (Biscoff spread contains soy lecithin as an emulsifier).
Biscoff cookies also contain wheat as their primary ingredient and are not suitable for anyone with celiac disease or a serious gluten sensitivity.
For a gluten-free base, use a certified gluten-free speculaas-style cookie or any plain gluten-free digestive biscuit. The filling is naturally gluten-free as long as the Biscoff spread label is checked: Biscoff spread itself does not contain wheat, though it is produced in facilities that handle wheat.
For a dairy-free version, use a dairy-free cream cheese block (cashew-based versions hold up best in a no-bake application), dairy-free butter for the base, and full-fat chilled coconut cream in place of double cream. Whip only the solid portion of the coconut cream after refrigerating the can overnight. Biscoff spread is naturally dairy-free.
Free from eggs and nuts as written. Not guaranteed safe for any specific allergy without checking all individual ingredient labels.
Equipment Needed
23cm (9-inch) springform pan. The removable base and side clip are what allow a no-bake cheesecake to be unmolded cleanly. A regular cake tin does not work here because the filling cannot be inverted. Line the base with a parchment paper circle for additional ease of removal.
Stand mixer or hand electric mixer. For whipping the double cream to stiff peaks and beating the cream cheese filling to a smooth, lump-free consistency. A hand whisk can achieve both tasks but requires significantly more effort and time, particularly for the cream.
Food processor or rolling pin and sealed bag. For crushing the Biscoff cookies into fine, even crumbs. A food processor produces the most uniform crumb in under 30 seconds. Uneven crumbs create a base with soft spots that don’t hold together when pressed.
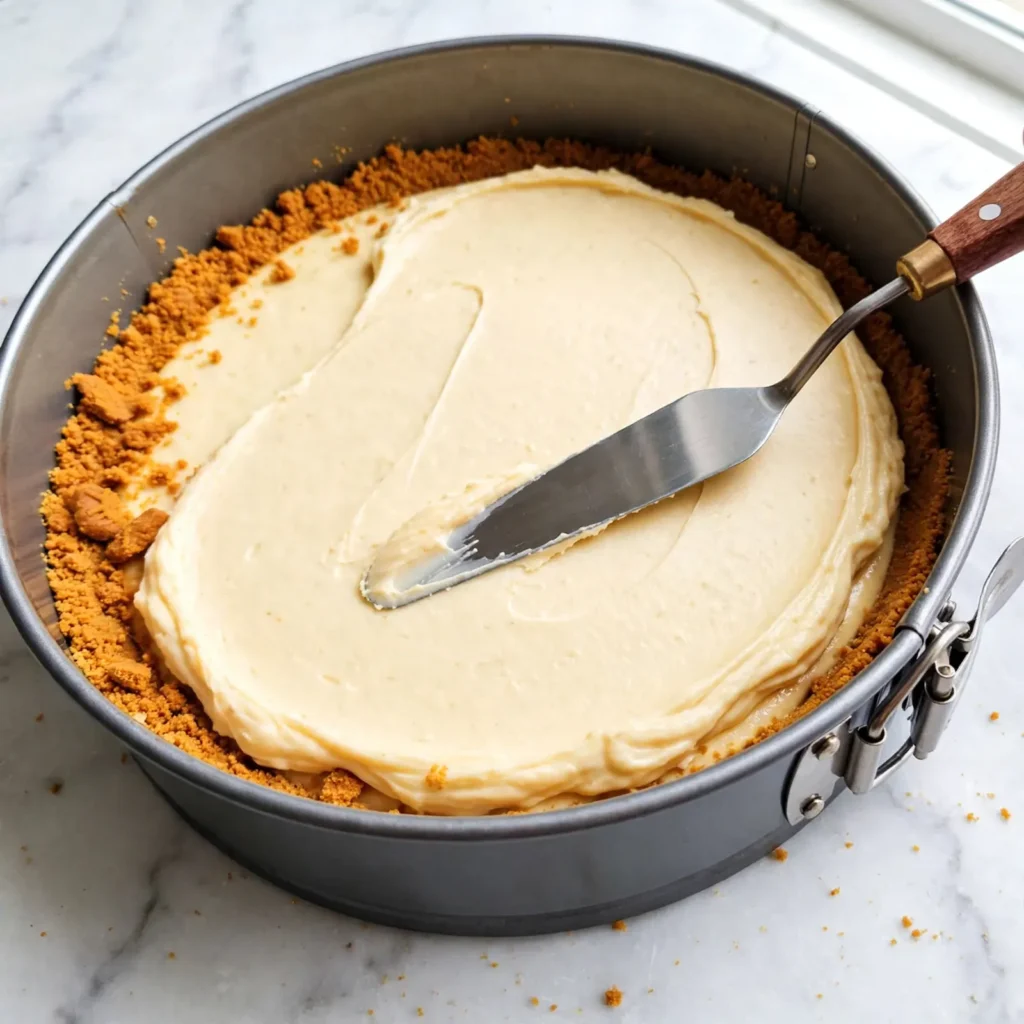
Offset palette knife or the back of a large spoon. For pressing the cookie base into an even, compact layer in the pan and smoothing the top of the filling before the Biscoff drizzle goes on.
Step-by-Step Directions
Step 1: Make the Biscoff Cookie Base
Process the Biscoff cookies in a food processor until they are uniform fine crumbs with no pieces larger than a small pea remaining. Transfer to a bowl and pour the melted, cooled butter over them. Stir with a fork until every crumb is coated and the mixture holds its shape when you press a small amount between your fingers. If it crumbles apart rather than clumping, add 1 extra teaspoon of melted butter at a time until it holds.
Tip the mixture into the lined 23cm springform pan. Press it firmly and evenly across the base using the flat base of a measuring cup or glass, working from the center outward. Press the edges down first, then press the center flat so the base is the same thickness throughout, approximately 1cm. Refrigerate the base for a minimum of 20 minutes while preparing the filling.
Chef’s Note: The 20-minute base chill is not optional. A warm, un-set base compresses and shifts when the filling is poured over it, which produces an uneven base thickness in the finished cheesecake. A chilled, set base holds firm under the weight of the filling.
Step 2: Beat the Cream Cheese Filling
Remove the cream cheese from the refrigerator at least 30 minutes before using so it reaches room temperature. Room-temperature cream cheese blends into a completely smooth, lump-free consistency. Cold cream cheese, even when beaten for several minutes, leaves small white lumps that don’t smooth out and give the filling a slightly grainy texture in the finished slice.
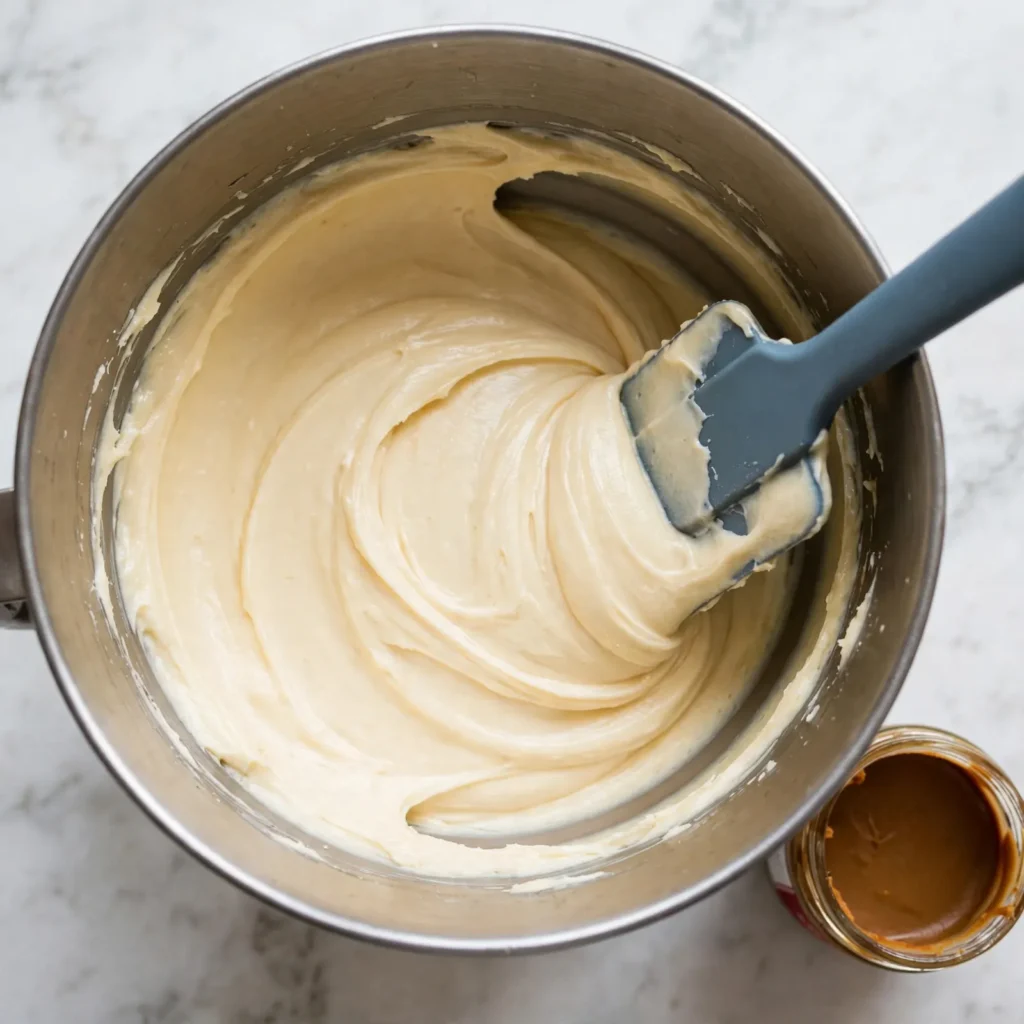
In a large bowl, beat the room-temperature cream cheese with a hand mixer or stand mixer on medium speed for 60 to 90 seconds until it is completely smooth and slightly lighter in appearance. Add the sifted icing sugar and vanilla extract, then beat again for 30 seconds until incorporated. Add the Biscoff spread and mix on medium until the filling is uniform in color: a pale caramel-ivory with no visible white streaks of plain cream cheese.
Chef’s Note: The Biscoff spread should be at room temperature, not warmed, when it goes into the cream cheese. Warm spread is more liquid and can make the filling too soft to achieve firm peaks when the cream is folded in. Room-temperature spread blends smoothly into the cream cheese at the right consistency.
Step 3: Whip the Double Cream to Stiff Peaks
Pour the cold double cream into a clean, separate bowl. Whip on medium-high speed until the cream holds stiff, glossy peaks: when you lift the beater, the peak should stand up straight without curling over at the tip. This takes 2 to 3 minutes with cold cream in a cold bowl. Watch the cream closely after soft peaks form. Over-beaten cream turns grainy and butter-like within 30 to 60 seconds of reaching stiff peaks: pull the mixer the moment the peaks hold firm and stop moving.
Step 4: Fold the Cream Into the Filling
Add the stiffly whipped cream to the Biscoff cream cheese mixture in two additions. For the first addition, use a rubber spatula to fold the cream in gently with a circular scooping motion, working around the edge of the bowl and cutting through the center. The goal is to incorporate the cream without deflating the air you just whipped into it. Fold until just combined: a few faint white streaks are fine at this stage. Add the second half of the cream and fold again until the filling is completely uniform, smooth, and slightly airy, with no visible cream streaks.
Chef’s Note: The two-addition fold method distributes the cream more evenly without collapsing the structure. Adding all the cream at once and stirring deflates it faster than folding in stages and produces a denser, heavier filling. The air folded in here is what gives the finished cheesecake its light, mousse-like quality despite the richness of its ingredients.
Step 5: Fill and Smooth the Cheesecake
Remove the chilled base from the refrigerator. Pour the Biscoff cream filling over the set cookie base in one motion, then use an offset palette knife or the back of a large spoon to spread it evenly to the edges of the pan. Smooth the top surface as flat as you can: a flat top produces a more even Biscoff drizzle layer and cleaner slices. Run the palette knife in one direction rather than back and forth to avoid disturbing the filling below. Gently tap the base of the pan on the counter two or three times to release any large air bubbles trapped in the filling.
Step 6: Refrigerate Overnight
Cover the filled springform pan with plastic wrap, taking care not to let the wrap touch the surface of the filling. Place in the refrigerator and leave undisturbed for a minimum of 8 hours. Overnight is the ideal setting time: anything less than 6 hours risks a filling that is too soft at the center to hold its shape when the springform is removed.
Step 7: Add the Biscoff Topping and Unmold
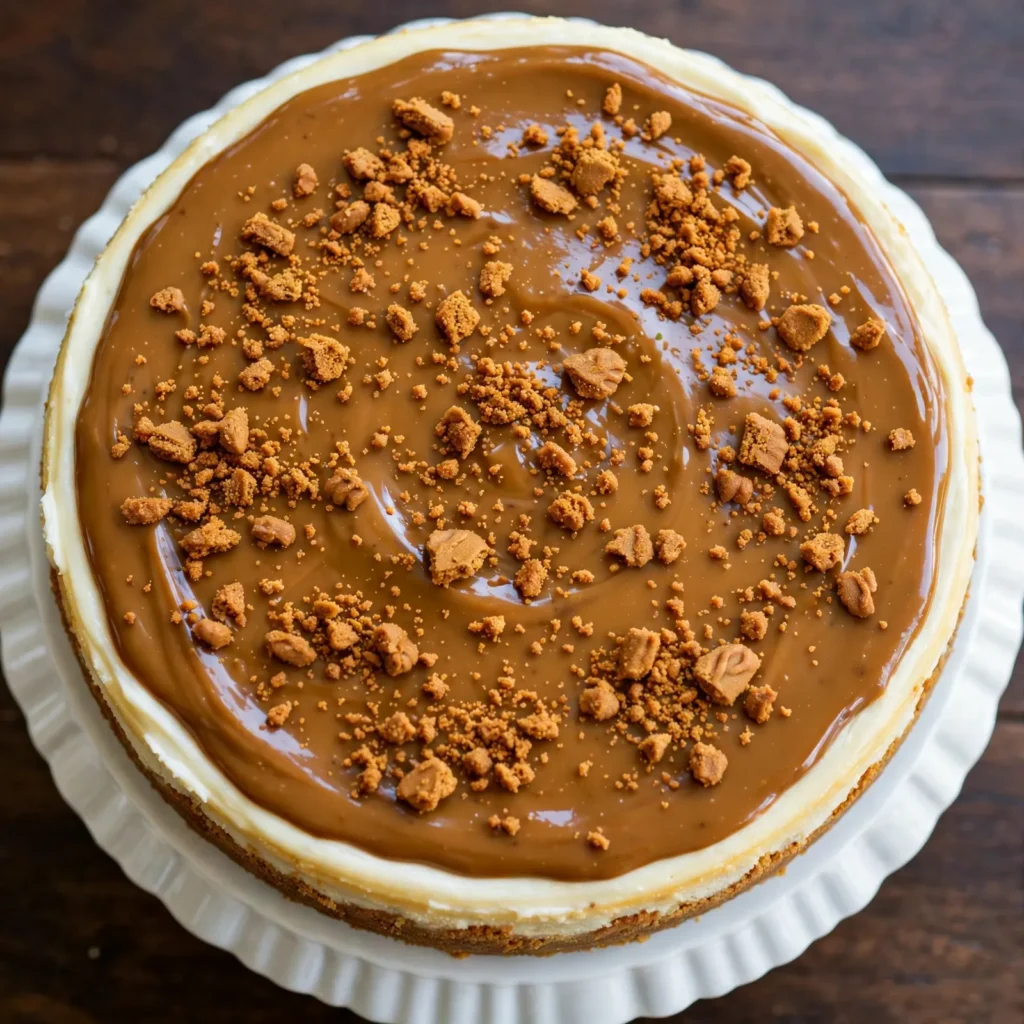
The following day, microwave the 120g of smooth Biscoff spread in a small microwave-safe bowl for 15 to 20 seconds until it is pourable but not bubbling or hot. Stir it once, then pour it immediately and evenly over the chilled surface of the set cheesecake. Tilt the pan gently so the spread flows to the edges, or guide it with the back of a spoon. Work quickly: the Biscoff spread starts to set against the cold filling within 60 to 90 seconds.
Once the spread is evenly distributed, scatter the roughly crushed Biscoff cookie pieces across the surface while the topping is still slightly tacky so they adhere. Return the cheesecake to the refrigerator for 20 to 30 minutes until the topping is fully set and no longer tacky to the touch.
To unmold: run a thin knife around the inside edge of the springform between the pan side and the cheesecake filling, then unclip the springform ring and lift it away. Use a wide flat spatula to slide the cheesecake off the parchment-lined base and onto a serving plate or cake board.
Common Mistakes and Troubleshooting
| Problem | Cause | Solution |
|---|---|---|
| Filling too soft to slice after overnight chilling | Tub cream cheese used instead of block; cream not whipped to full stiff peaks | Always use full-fat block cream cheese; whip cream until peaks stand completely straight before folding |
| Lumpy cream cheese filling | Cream cheese was cold when beaten | Always bring cream cheese to full room temperature (30 minutes minimum) before beating |
| Cookie base crumbling when sliced | Too little butter used; base not chilled long enough before filling | Add enough butter so crumbs clump when pressed together; chill base at least 20 minutes before filling |
| Biscoff topping too thick and uneven | Spread not warmed enough before pouring; poured while too cool | Warm spread for 15 to 20 seconds until pourable; pour immediately and tilt pan quickly before it starts to set |
| Filling collapsed when springform removed | Setting time too short; cream over-folded and deflated | Set for at least 8 hours, preferably overnight; fold cream with a spatula in circular motions, not with a mixer |
| Cream turned grainy during whipping | Over-beaten past stiff peaks | Stop the mixer the moment peaks hold straight; if cream turns grainy it has begun converting to butter and must be started again fresh |
Variations and Substitutions
Biscoff and Chocolate Swirl: Before smoothing the top of the filling, drizzle 3 tablespoons of melted dark chocolate over the surface and use a toothpick or skewer to drag it through in long, looping strokes for a marbled effect. The bitterness of the dark chocolate cuts through the sweetness of the Biscoff spread and gives the finished slice a more complex, layered flavor.
Mini Individual Biscoff Cheesecakes: Press the cookie base into 12 individual paper-lined muffin tin cups or ramekins using the base of a small jar. Divide the filling equally and top each with a small drizzle of warmed Biscoff spread. Set overnight in the fridge. These serve cleanly as individual desserts for a gathering without any cutting required.
Biscoff Cheesecake Bars: Press the cookie base into a lined 23x33cm (9×13 inch) baking pan, add the filling, and top with the Biscoff drizzle. Once set, cut into 24 rectangular bars with a warm knife. The base-to-filling ratio is slightly different from the round cake but the flavor is identical and the bars are more practical for a large group or a packed lunch box dessert.
Extra Chocolate Layer: Spread a thin layer of dark chocolate ganache (100g dark chocolate melted into 80ml warm cream, stirred smooth and cooled to spreadable) directly onto the chilled cookie base before the cream cheese filling goes in. The ganache provides a thin, slightly bitter chocolate barrier that complements the sweet Biscoff flavor and prevents the base from softening as quickly against the wet filling.
Salted Biscoff Cheesecake: Add 1/4 teaspoon of flaky sea salt to the Biscoff spread warmed for the topping, and scatter a small pinch over the finished cheesecake alongside the crushed cookies. The salt sharpens the caramelized flavor of the spread and adds an intentional contrast that makes the overall dessert taste less sweet and more complex.
Layered Biscoff Banana Cheesecake: After adding the cookie base and before the filling, arrange a single layer of thinly sliced firm banana across the base. The banana adds a fruity freshness that cuts through the richness of the cream and pairs naturally with the caramelized spice character of the Biscoff. Serve within 24 hours as the banana does not hold beyond that.
Serving Suggestions
- Served cold and straight from the fridge. The filling is at its most cohesive, the topping at its most defined, and the cookie base at its firmest when the cheesecake comes directly from the refrigerator. Remove it 5 minutes before serving so the filling softens just enough to cut smoothly but not so much that the slices lose their shape.
- With a warm drizzle of Biscoff spread at the table. An extra spoonful of gently warmed Biscoff spread drizzled over individual slices just before serving adds a warm, soft contrast against the cold filling that makes the dessert feel considerably more indulgent.
- With fresh sliced banana on the side. The natural sweetness and soft texture of ripe banana alongside a cold slice provides a light, fruity contrast without competing with the Biscoff flavor. A few slices per plate is all it needs.
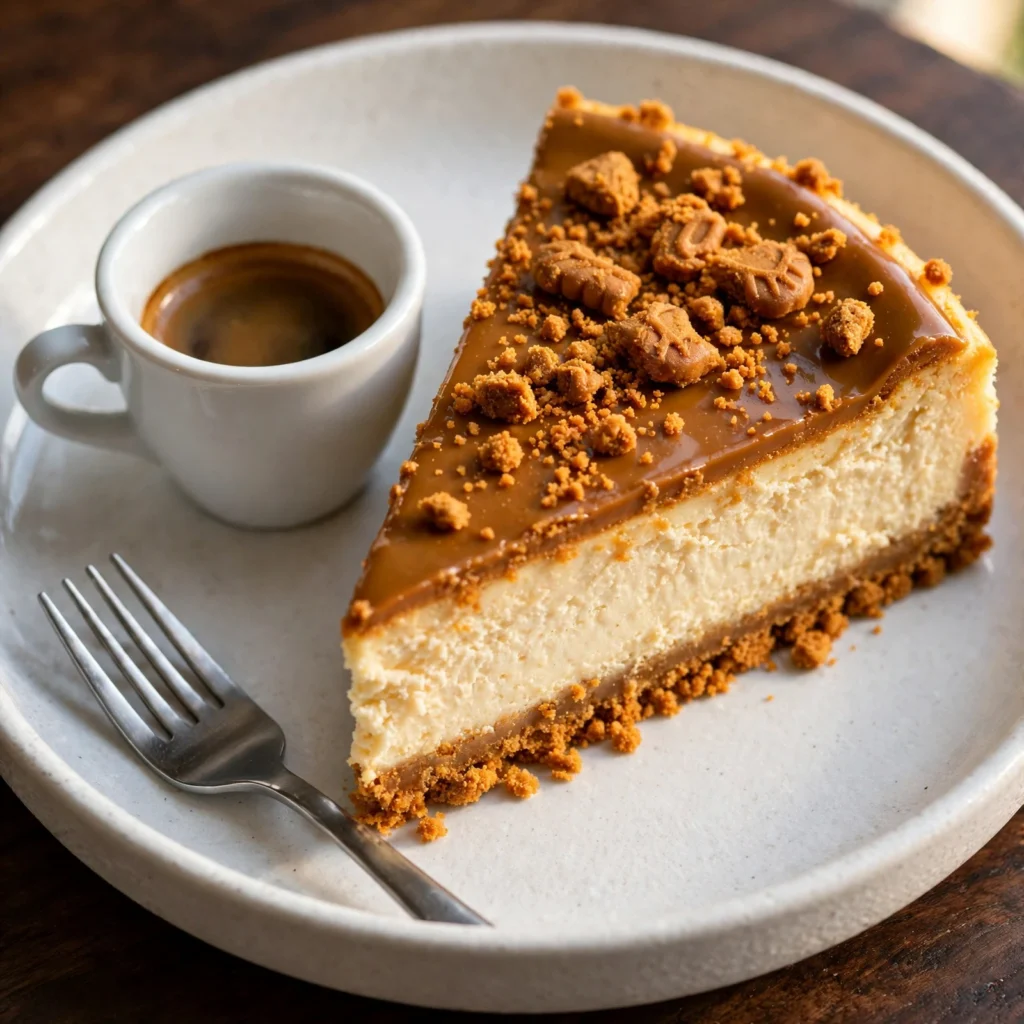
- With a strong espresso or black coffee. The caramelized, spiced character of Biscoff pairs exceptionally well with bitter black coffee. Serving a small espresso alongside the cheesecake mirrors the flavor relationship that Biscoff cookies were originally designed around, being a coffee biscuit.
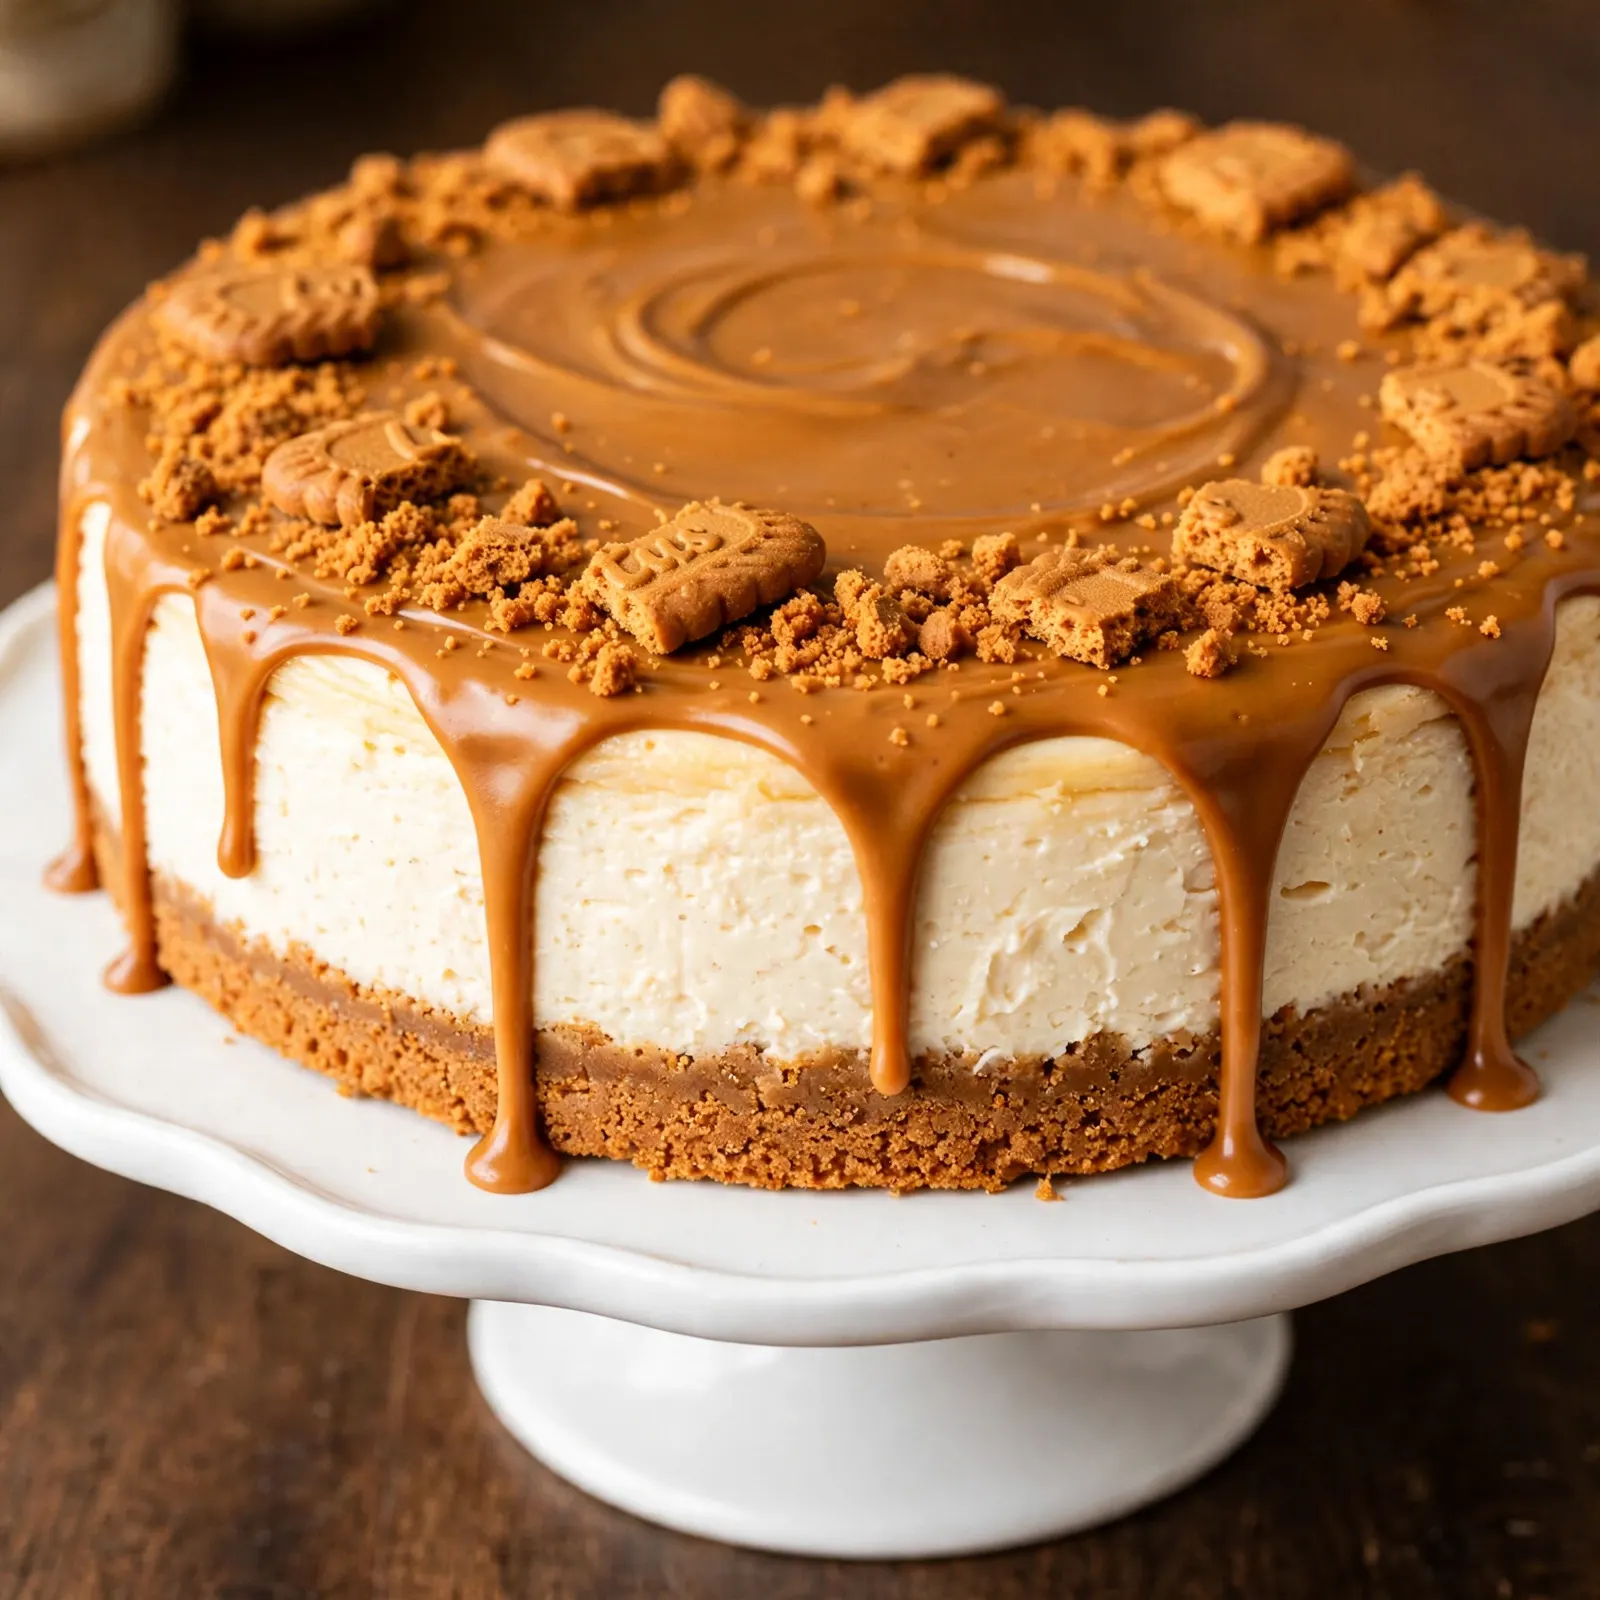
- As part of a celebration dessert table. The cheesecake holds its shape at room temperature for up to an hour, which makes it practical for buffet-style serving. Keep it on a stand for visual height and let guests cut their own slices.
- The day after making, chilled in individual slices. Stored in individual airtight containers in the refrigerator, slices are a practical make-ahead dessert that holds quality for 4 days without the filling deteriorating.
Tips for the Best Results
- Block cream cheese at room temperature, always. This is the single most important variable in the finished texture. Cold block cream cheese produces a lumpy, grainy filling no matter how long you beat it. Room temperature cream cheese blends into a perfectly smooth base in under 90 seconds. Set it on the counter 30 to 45 minutes before you plan to start.
- Whip the cream separately, not with the filling. Adding unwhipped cream to the cream cheese and attempting to whip everything together produces an over-beaten, slightly greasy filling rather than a light, airy one. Whip the cream to stiff peaks first, in a separate bowl, and fold it in last. The two-stage process is the reason the filling has its characteristic texture.
- Set for the full 8 hours minimum. A 4-hour or 6-hour set produces a filling that is edible but too soft at the center to hold a clean slice after the springform is removed. Overnight setting allows the fat in the cream cheese and double cream to re-solidify around the aeration, creating the firm-yet-creamy texture the recipe is known for.
- Warm the Biscoff topping carefully. The topping spread needs to be warm enough to pour in a thin, even layer but not so hot that it starts to melt into the cold filling surface before you can spread it. Fifteen to twenty seconds in the microwave, stirred once, and poured immediately is the right sequence. If it firms before you finish spreading, 5 more seconds in the microwave and another stir brings it back.
- Use a warm knife for slicing. Run a long knife under hot tap water, dry it, and cut one portion. Rinse and dry between each slice. The warm blade glides through the cold filling and the Biscoff topping without dragging or cracking either layer, which is what produces the clean cross-section in every slice.
Storage Tips
Refrigerator
Store the cheesecake covered with a cake dome or loosely wrapped with plastic wrap (not touching the topping surface) in the refrigerator for up to 4 days. The first two days are when the texture is at its best: the filling is at maximum firmness and the cookie base has softened to exactly the right texture. From day three onward the base softens further and the filling becomes slightly denser, though the flavor remains good throughout. Individual slices stored in sealed containers last up to 4 days without quality loss.
Freezer
Biscoff cheesecake freezes well. Freeze either the whole cheesecake or individual slices. For the whole cheesecake, freeze uncovered until the topping and filling are completely solid (2 to 3 hours), then wrap tightly in two layers of plastic wrap and a layer of foil. Freeze for up to 2 months. For individual slices, wrap each in plastic wrap and store in a sealed freezer bag. Thaw overnight in the refrigerator, never at room temperature, and add any garnishes fresh after thawing.
Reheating
This cheesecake is served cold and is not reheated. If the topping spread has firmed too hard after extended refrigeration, the 5 minutes at room temperature before serving is sufficient to soften it slightly. If individual slices have been frozen, thaw in the fridge overnight and serve directly from cold without any additional warming.
Nutrition Information
Per serving (1 slice, approximately 1/12 of the full cheesecake)
| Nutrient | Amount |
|---|---|
| Calories | 545 kcal |
| Protein | 6g |
| Carbohydrates | 46g |
| Fiber | 1g |
| Sugar | 32g |
| Total Fat | 37g |
| Saturated Fat | 20g |
| Cholesterol | 85mg |
| Sodium | 260mg |
| Vitamin C | 0mg |
| Calcium | 85mg |
| Iron | 1.5mg |
| Potassium | 130mg |
Nutrition values are approximate and may vary based on brands and portion sizes.
Why This Recipe Works
The structural logic of a no-bake cheesecake depends entirely on fat re-solidification at refrigerator temperature. A baked cheesecake is set by egg protein coagulating around the cream cheese through heat. A no-bake cheesecake has no eggs and no heat, which means the only setting mechanism is the fat in the cream cheese and the fat in the whipped double cream re-solidifying once the temperature drops below approximately 4°C (40°F). This is why block cream cheese is non-negotiable: its higher fat content and lower water content mean it firms significantly when chilled. Tub cream cheese contains more added water and emulsifiers that prevent it from setting in the same way, which is why no-bake cheesecakes made with tub cream cheese are often too soft to slice cleanly.
Whipping the double cream separately and folding it into the cream cheese mixture rather than combining everything and whipping together serves a specific structural purpose. When you whip cream, you are incorporating air into the fat globules and creating a foam structure. If you then fold that foam into a denser mixture gently, the air cells remain largely intact and the finished filling has a light, slightly airy quality. If you add liquid or unwhipped cream to the cream cheese and then attempt to whip everything together, the fat globules in the cream have to compete with the cream cheese mass for the air, and the result is a denser, less aerated filling that still sets but has a noticeably heavier mouthfeel.
The Biscoff spread in the filling does more than add flavor. Biscoff spread is made primarily from Lotus Biscoff cookies, which are high in vegetable fat and sugar. When the spread is incorporated into the cream cheese mixture and the whole thing is chilled overnight, the vegetable fat in the spread solidifies alongside the cream cheese fat, which contributes additional firmness to the filling beyond what cream cheese and whipped cream alone provide. This is why Biscoff cheesecake sets more reliably than a plain cream cheese cheesecake made with the same quantities.
The 20-minute base chill before filling is a practical technique rather than an arbitrary step. A freshly made Biscoff cookie base is warm from the melted butter and slightly soft in texture. If the cold cream cheese filling is poured onto a warm base, the temperature differential causes the butter in the base to partially re-melt against the filling, which softens the base and can cause it to break apart when the cheesecake is sliced. A pre-chilled base is already at refrigerator temperature, the butter is re-set, and the base holds its compact structure when the filling goes in.
The two-stage Biscoff topping, where the spread is warmed and poured over the already-set filling rather than being part of the filling itself, creates a distinct textural layer that adds interest to each bite. The topping sets firm at refrigerator temperature into a thin, glossy layer that contrasts with the softer filling beneath it, which is why the cross-section of a properly made Biscoff cheesecake has three visually and texturally distinct components in every slice.
Frequently Asked Questions
Can I make Biscoff cheesecake ahead of time?
Yes, and making it the day before is actually the best approach. The filling sets more firmly after 12 to 18 hours in the refrigerator than after the minimum 8 hours, which produces cleaner slices and a more cohesive texture at the center. Make the full cheesecake, add the topping and garnish, cover, and refrigerate overnight. Slice and serve directly from the refrigerator the following day. It holds its quality for up to 4 days chilled.
Why is my Biscoff cheesecake not setting properly?
A Biscoff cheesecake that is too soft to slice usually has one of two causes: tub cream cheese was used instead of block cream cheese, or the double cream was not whipped to full stiff peaks before folding in. Tub cream cheese contains more water and emulsifiers that prevent firm setting. Cream folded in at soft peak stage does not provide enough structural aeration. Both issues are prevented by using full-fat block cream cheese at room temperature and whipping the cream to full stiff peaks in a separate bowl before folding.
Can I substitute the double cream with something else?
Full-fat double cream or heavy whipping cream at 35% fat or above is required for this recipe. Lower-fat creams don’t whip to stiff peaks and the filling will be too soft. For a dairy-free version, full-fat coconut cream refrigerated overnight (solid portion only, discarding the liquid layer) whips to a stable consistency and works well in place of dairy cream. Evaporated milk, single cream, and half-and-half are all too low in fat and won’t work as substitutes.
How do I know when the Biscoff cheesecake is fully set?
After the minimum 8-hour refrigeration, gently press the center of the cheesecake surface with one fingertip. It should feel firm and spring back without leaving an indentation. If the center still feels soft or moves like a gel, it needs more time. Return it to the refrigerator for 2 to 3 more hours. A properly set no-bake cheesecake is also visibly stable when you unclip the springform: the sides hold their shape immediately without sliding or slumping.
Is Biscoff cheesecake suitable for people with gluten intolerance?
As written, no. Lotus Biscoff cookies contain wheat flour as their main ingredient, making both the base and the garnish unsuitable for anyone with celiac disease or a serious gluten intolerance. The cream cheese filling itself contains no gluten, and Biscoff spread does not list wheat as an ingredient, though it is produced in a facility that handles wheat. For a gluten-free version, use a certified gluten-free speculaas-style cookie or gluten-free digestive biscuit for the base and garnish.
Can I use crunchy Biscoff spread instead of smooth?
Crunchy Biscoff spread works in the filling but changes the texture slightly: you will notice small cookie pieces distributed throughout the cream cheese base, which some people enjoy and others find out of place in a smooth cheesecake. For the topping drizzle, use smooth spread only. Crunchy spread poured over the chilled filling does not level out into a smooth, even layer and the cookie pieces create an uneven surface that does not set as neatly.
How do I get clean slices from a no-bake cheesecake?
Three things produce clean Biscoff cheesecake slices: the cheesecake must be completely cold from the refrigerator (not sitting at room temperature for more than 5 minutes), the knife must be warm and wiped dry between each cut, and you should press down firmly and smoothly rather than sawing back and forth. Run the knife under hot water, dry it with a clean cloth, press straight down through the filling and base in one motion, lift the knife clean, then rinse and dry before the next cut.
Conclusion
Biscoff cheesecake works because it commits fully to one flavor profile rather than hedging with unrelated additions. Every layer, from the crushed cookie base to the spiced cream filling to the warm drizzle on top, speaks the same caramelized, warmly spiced language. The no-bake approach makes it genuinely accessible without requiring any compromise on texture or appearance: it slices cleanly, looks striking on a stand, and tastes rich enough to feel like a proper occasion dessert even when made on a Wednesday evening for no particular reason. Make this Biscoff cheesecake once and you will find yourself returning to it whenever you need a dessert that is reliably impressive with minimal active effort.
If you loved this recipe, save it to your no-bake desserts Pinterest board so you can find it easily later. For more same recipes follow Thecookingvibes Pinterest account.
No-Bake Biscoff Cheesecake
Ingredients
Equipment
Method
- Crush Biscoff cookies to fine crumbs in a food processor. Add melted butter and stir until every crumb is coated and mixture clumps when pressed. Press firmly and evenly into the base of a lined 23cm springform pan. Refrigerate 20 minutes.
- Beat room-temperature cream cheese with a mixer on medium speed for 60 to 90 seconds until completely smooth. Add sifted icing sugar and vanilla, beat 30 seconds. Add Biscoff spread and beat until the filling is uniform pale caramel in color with no white streaks.
- In a separate bowl, whip cold double cream on medium-high until stiff, straight-standing peaks form. Fold into cream cheese mixture in two additions using a rubber spatula with gentle circular motions until completely combined and smooth.
- Pour filling over the chilled base and smooth the top flat with an offset palette knife. Cover and refrigerate for a minimum of 8 hours, ideally overnight.
- The next day, microwave the topping Biscoff spread for 15 to 20 seconds until pourable. Stir once and immediately pour over the chilled filling surface, tilting the pan to spread evenly. Scatter crushed Biscoff cookies across the surface while the topping is still tacky. Refrigerate 20 to 30 minutes until the topping is fully set.
- Run a thin knife around the inside edge of the springform, unclip the ring, and transfer the cheesecake to a serving plate. Slice with a warm, dry knife for clean edges.
Notes
- Use full-fat block cream cheese only, not spreadable tub cream cheese: tub cream cheese has too much water and the filling will not set firm enough to slice.
- Bring cream cheese to full room temperature before mixing to prevent a lumpy filling.
- Whip the double cream separately to stiff peaks before folding into the filling, never together.
- Use a warm knife wiped dry between each cut for the cleanest slices.