Classic Apple Pie — Buttery Crust, Perfectly Spiced Filling
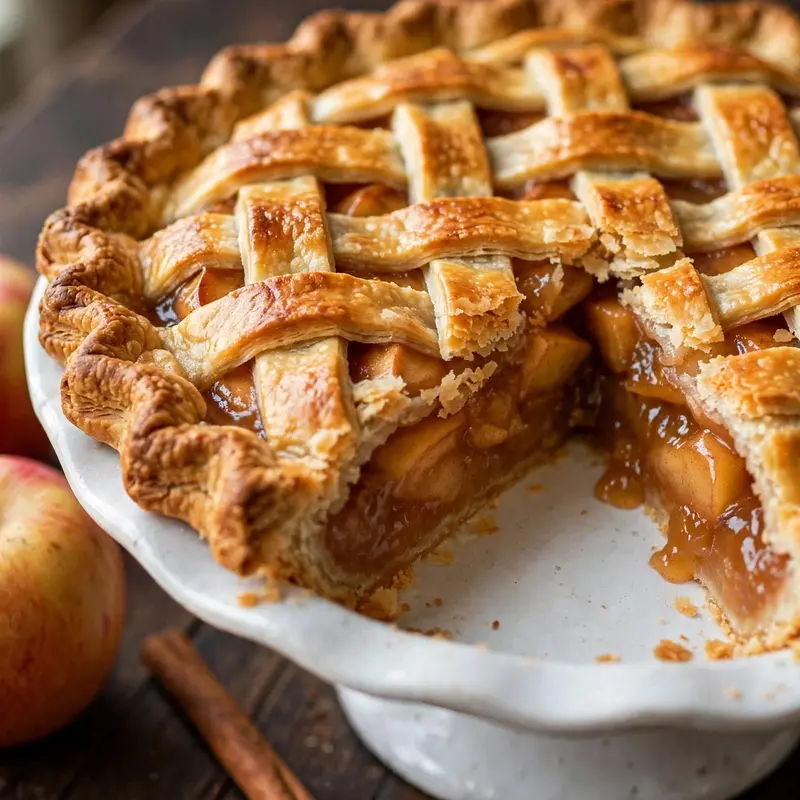
Cut into a properly made apple pie and the slice should hold together long enough to transfer to the plate without the filling pouring out, the bottom crust should be fully baked through rather than pale and doughy, and the top crust should shatter at the fork into golden, butter-layered flakes. Getting all three right at the same time is what separates a genuinely good apple pie from one that’s merely acceptable. None of it is out of reach for a home kitchen; it just requires understanding why each step matters.
This apple pie recipe uses an all-butter double crust with ice water, a filling built from a mixture of firm apple varieties tossed with brown sugar and warm spices, and a specific technique for preventing the notorious soggy bottom that ruins so many otherwise good pies. It bakes at a high initial temperature to set the crust before reducing for the filling. The result is a pie that slices cleanly, holds its shape at the table, and tastes exactly like the version you’ve been trying to recreate.
Why You’ll Love This Apple Pie
- Bottom crust that bakes through completely. A hot initial oven temperature at 220°C (425°F) for the first 20 minutes sets the bottom crust before the filling’s moisture can penetrate, which solves the most common apple pie problem before it starts.
- Filling that holds its shape when sliced. A combination of cornstarch and the natural pectin released by a mix of firm apple varieties produces a filling that sets to a clean, scoopable consistency rather than pouring across the plate.
- All-butter crust with real layering. Cold butter worked into flour by hand creates steam pockets during baking that push the layers apart, producing a crust that shatters rather than crumbling or falling apart at the fork.
- No soggy bottom. The blind-bake technique used here keeps the crust crisp even after the pie has been sitting on the counter for several hours after baking.
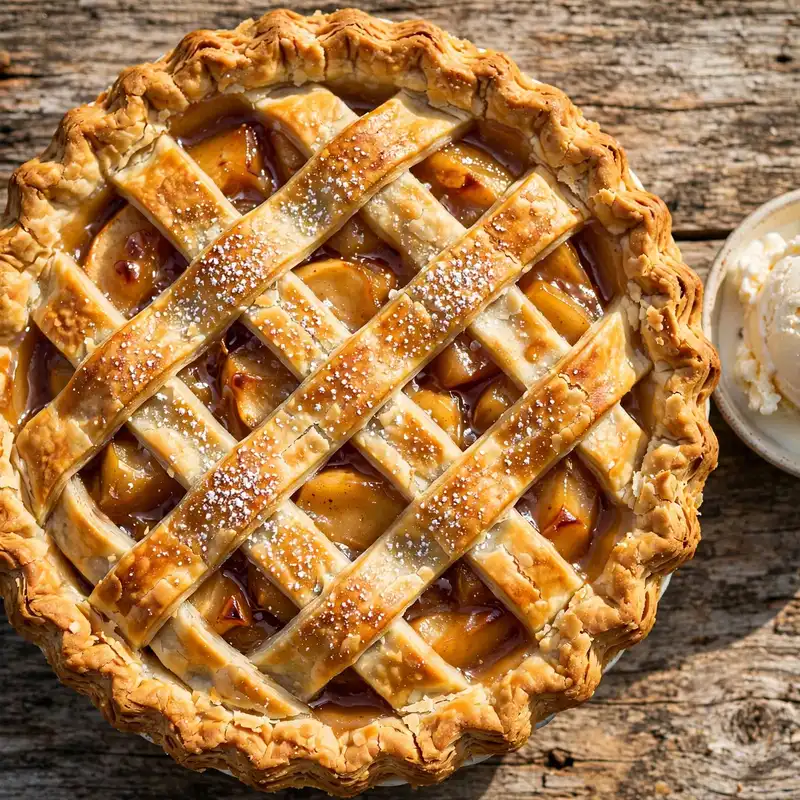
- Works for any occasion. Paired with vanilla ice cream for a casual dinner or presented whole on a ceramic stand for a holiday table, this is the pie that earns the requests to make it again.
Ingredients You’ll Need
Recipe Timing
| Detail | Info |
|---|---|
| Servings | 8 slices |
| Difficulty | Moderate |
| Course | Dessert |
| Cuisine | American |
| Prep Time | 40 minutes |
| Cook Time | 55 minutes |
| Rest Time | 2 hours (cooling before slicing) |
| Total Time | 3 hours 35 minutes |
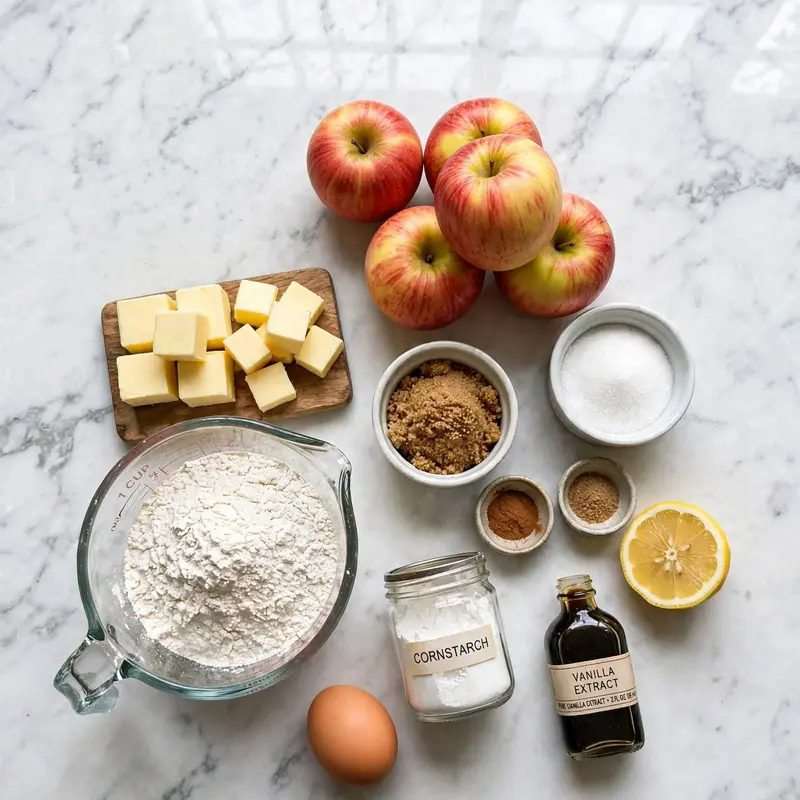
For the apples, a mixture of two firm varieties produces a better filling than using only one type. A tart, firm apple like Granny Smith holds its structure through baking and provides acidity that prevents the filling from tasting flat. A sweeter firm variety like Honeycrisp or Braeburn adds natural sweetness and a slightly softer texture that contrasts with the Granny Smith pieces. Using only Granny Smith produces a filling that’s too tart and uniform in texture; using only a sweet variety like Gala produces one that turns mushy and overly sweet. A 50/50 split is the most reliable starting point.
Peel and slice the apples to a consistent 5 to 6mm thickness. Slices thinner than this cook unevenly, with some pieces becoming overly soft while others remain firm. Thicker slices hold their structure but extend the bake time beyond what the crust can tolerate without over-browning.
For the crust, cold butter is the only variable that matters more than any other. If the butter is warm or partially softened before going into the flour, it incorporates too evenly and produces a crumbly, mealy crust rather than a flaky one. Cut the butter into cubes and return them to the freezer for 10 minutes before starting if your kitchen is warm.
All-Butter Pie Crust (double crust):
- 2 1/2 cups (315g) all-purpose flour — the structural base; measured by spooning into the cup, not scooping; over-measured flour makes the crust tough and dry
- 1 tablespoon granulated sugar — a small amount that promotes browning without making the crust taste sweet
- 1 teaspoon fine salt — seasons the crust from within; unseasoned pastry tastes flat against the spiced filling
- 1 cup (225g) cold unsalted butter, cut into 1cm cubes — the fat that creates the layered structure; must stay cold throughout the mixing process
- 6 to 8 tablespoons ice water — added one tablespoon at a time; the least amount needed for the dough to hold together when pressed is always the right amount
Apple Filling:
- 700g (about 1.5 lbs) Granny Smith apples, peeled, cored, and sliced 5mm thick — approximately 4 medium apples; provides tartness and structure
- 500g (about 1 lb) Honeycrisp or Braeburn apples, peeled, cored, and sliced 5mm thick — approximately 3 medium apples; provides sweetness and textural contrast
- 1/2 cup (100g) light brown sugar, packed — the primary sweetener; the molasses component deepens the filling’s flavor
- 3 tablespoons granulated sugar — balances with the brown sugar for a cleaner sweetness
- 3 tablespoons cornstarch — the primary thickener; produces a glossy, firm filling that slices cleanly; tapioca starch substitutes directly
- 1 1/2 teaspoons ground cinnamon — the dominant spice; adjust to taste
- 1/4 teaspoon ground nutmeg — freshly grated is noticeably more complex than pre-ground; adds a warm, slightly floral depth
- 1/4 teaspoon ground allspice — adds a subtle background complexity that most apple pie fillings miss
- 1/4 teaspoon fine salt — amplifies all the other flavors including the cinnamon
- 1 tablespoon fresh lemon juice — prevents early browning of the sliced apples and adds brightness that balances the sweetness
- 1 tablespoon unsalted butter, in small pieces — dotted over the filling before the top crust goes on; melts during baking and adds richness to the filling liquid
For Finishing:
- 1 egg, beaten with 1 tablespoon water — the egg wash that produces the deep golden color and shine on the baked crust
- 1 tablespoon granulated sugar or coarse sanding sugar — sprinkled over the egg-washed top crust for a sparkling finish and a slight crunch
Allergen and Dietary Disclosure
This apple pie contains gluten (all-purpose flour in the crust), dairy (butter in the crust and dotted in the filling), and eggs (egg wash on the top crust). The filling itself is naturally gluten-free and dairy-free.
For gluten-free: replace the all-purpose flour in the crust with a certified gluten-free 1:1 baking flour blend with xanthan gum. The crust will be slightly more fragile to roll and transfer; work quickly and use plastic wrap to assist the transfer. The filling remains unchanged.
For dairy-free: replace butter in the crust with very cold refined coconut oil worked in the same way as butter; the crust will be slightly less flaky but still produces good results. Skip the butter dots over the filling. The egg wash can remain for color, or substitute with full-fat oat milk for a slightly less deep golden color.
For egg-free: replace the egg wash with a thin brushing of whole milk or full-fat oat milk with a small pinch of sugar dissolved into it. The browning will be slightly less even and golden but still attractive.
This recipe has not been tested in a certified allergen-free kitchen and cannot be guaranteed safe for any specific allergy.
Equipment Needed
- 9-inch (23cm) deep-dish pie plate — depth matters here. A standard shallow pie plate doesn’t accommodate enough filling without overflow, and the filling-to-crust ratio suffers. A deep-dish plate holds the full 1.2 kg of sliced apples that the recipe calls for. Glass or ceramic are preferred over dark metal, which browns the bottom crust faster than the top crust can keep pace with.
- Rolling pin — for rolling the crust to an even 3mm thickness. A heavy rolling pin produces the most consistent pressure; a wine bottle works as a substitute but produces thinner results at the edges. Chill the rolling pin in the freezer for 10 minutes before using if your kitchen is warm.
- Pastry cutter or box grater — for working the cold butter into the flour. Grating frozen butter directly into the flour using the large holes of a box grater is the fastest method and produces the most evenly distributed fat with minimal hand contact. A pastry cutter works equally well.
- Baking sheet — placed on the rack below the pie during baking to catch any filling that bubbles over through the top crust vents. A bubbling-over pie is normal and desirable; it indicates the filling has reached the temperature needed to activate the thickening agents. The baking sheet saves the oven floor.
- Wire cooling rack — the pie must cool on a wire rack for the full 2 hours minimum before slicing. Cooling on a flat surface traps heat underneath the pie dish and keeps the bottom of the filling above thickening temperature longer than necessary, which produces a looser filling when sliced.
- Pastry brush — for applying the egg wash evenly over the top crust and crimped edges without pooling. Pooled egg wash bakes into dark, uneven patches on the crust surface.
Step-by-Step Directions
Step 1: Make the Pie Crust Dough
Whisk together the flour, sugar, and salt in a large bowl for 20 seconds until evenly combined. If using a box grater, freeze the butter cubes for 15 minutes, then grate them directly into the flour and toss to coat each piece immediately. If using a pastry cutter, add the cold cubes and press each one flat, then work through the flour until the mixture looks like rough, sandy crumbs with some pea-sized butter pieces distinctly visible throughout. Add 6 tablespoons of ice water, one at a time, tossing the mixture with a fork after each addition. Add the seventh tablespoon only if the dough won’t hold together when a small handful is squeezed firmly. Turn the dough out, divide into two equal disks, wrap each tightly in plastic wrap, and refrigerate for at least 45 minutes or up to 2 days.

Chef’s Note: The rough, shaggy appearance of the dough at this stage is correct and desirable. A smooth, fully uniform dough has been overworked and will produce a crumbly rather than flaky crust. The final smoothing happens from the rolling pin, and the visible butter pieces are what produce the steam-driven layers during baking.
Step 2: Prepare and Macerate the Apple Filling
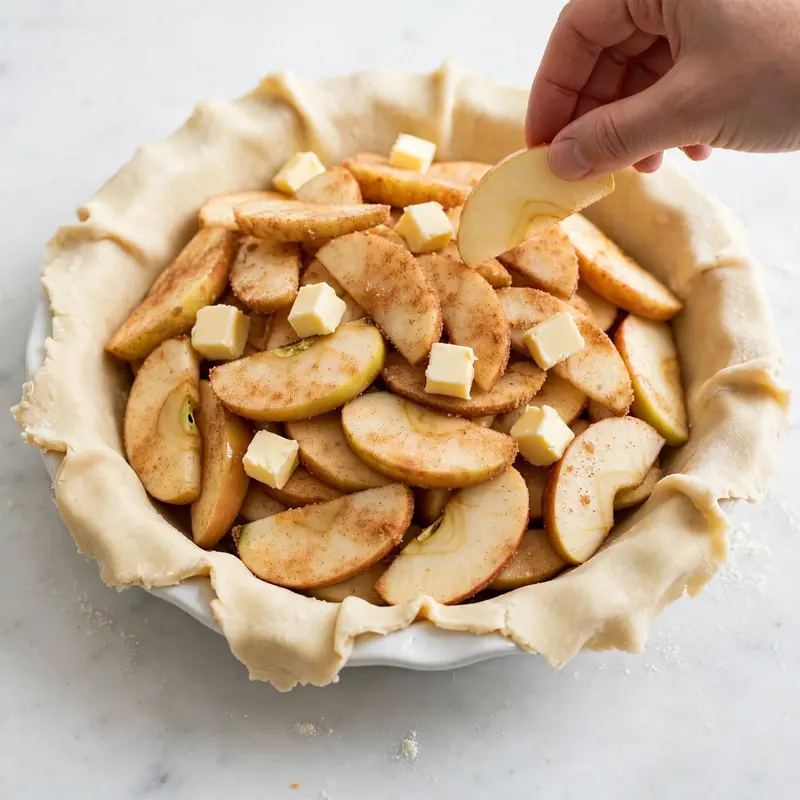
Peel, core, and slice all the apples to a consistent 5 to 6mm thickness and place them in a large bowl. Add the brown sugar, granulated sugar, cornstarch, cinnamon, nutmeg, allspice, salt, and lemon juice. Toss everything together until each apple slice is coated with a visible layer of the spice and sugar mixture. Set the bowl aside at room temperature for 20 to 30 minutes. During this time the sugar draws moisture from the apple surfaces, creating a small pool of apple juice and dissolved sugar at the bottom of the bowl. This liquid becomes the sauce in your filling.
Chef’s Note: This maceration step serves two important functions. It pre-softens the outermost layers of the apple slices so they begin cooking the moment the pie enters the oven, reducing the risk of undercooked apples in the center of the filling. The released juice also distributes the cornstarch thickener through the entire filling rather than leaving it concentrated in patches.

Step 3: Preheat and Prepare
Set the oven to 220°C (425°F) and allow it to fully preheat. Place one oven rack in the lowest position and a second in the center. Put the baking sheet on the lowest rack to preheat alongside the oven; a preheated baking sheet under the pie dish delivers direct bottom heat that helps the bottom crust set and bake through before the filling’s steam can soften it from below.
Step 4: Roll and Line the Bottom Crust
Remove one chilled dough disk from the refrigerator. If it’s very firm from the refrigerator, let it sit for 5 minutes until it’s pliable enough to roll without cracking at the edges. On a lightly floured surface, roll it from the center outward in short, confident strokes, rotating the dough a quarter-turn between each pass. Roll to a 32cm (13-inch) circle, about 3mm thick. Lift the dough by folding it loosely over the rolling pin, then unroll it over the pie dish, centering it carefully. Ease the dough into the dish by pressing gently with your fingertips rather than stretching it; stretched dough shrinks back during baking and pulls away from the filling. Trim the overhang to about 1.5cm.
Step 5: Fill the Pie
Pour the macerating apple slices, along with all of the accumulated juice from the bowl, into the prepared crust. Arrange the apple pieces into an even, compact mound, pressing them gently to reduce air pockets between slices. The filling will be higher than the rim of the crust; this is correct, since the apples compact by about 40% during baking. Dot the surface of the filling with the small pieces of butter scattered evenly.
Chef’s Note: Including all the juice from the maceration bowl is important. That liquid contains the dissolved cornstarch, the sugar, and the concentrated apple flavor. Leaving it behind produces a filling with uneven thickening, dry patches, and a flavor that doesn’t fully develop during baking.
Step 6: Apply the Top Crust and Crimp
Roll the second dough disk to the same 32cm circle. For a full top crust, lift it over the filling and center it. For a lattice, cut the rolled dough into 2cm-wide strips and weave them over the filling in an alternating over-under pattern. For a full top crust, cut 4 to 5 venting slits with a sharp knife before sealing. Press the top and bottom crust edges together firmly and fold the overhang under itself to create a thick, even border at the rim of the dish. Crimp the edge by pressing the index finger of one hand into the dough while pushing from either side with the index finger and thumb of the other hand, creating a uniform fluted pattern around the entire circumference.
Step 7: Egg Wash and Chill
Brush the entire top crust surface, including the crimped edges, with the beaten egg wash, using smooth, even strokes rather than dabbing. Sprinkle the sugar evenly over the egg-washed surface. Refrigerate the assembled, unbaked pie for 15 minutes. The cold temperature re-firms the butter in the pastry, which is especially important if the dough warmed slightly during rolling and assembly. A cold pie going into a hot oven produces a better initial crust set than a room-temperature one.
Step 8: Bake, Reduce, and Cool
Place the chilled pie on the preheated baking sheet on the center rack. Bake at 220°C (425°F) for 20 minutes, until the crust is just beginning to color at the edges. Reduce the oven temperature to 190°C (375°F) without opening the door and continue baking for 35 to 40 more minutes. The pie is finished when the crust is a deep, even amber color all over including the center of the lattice or top crust, and the filling is actively bubbling through the vents or lattice gaps with large, thick bubbles, not thin, watery ones. If the crust edges begin darkening too quickly from about the 35-minute mark, cover them loosely with strips of foil. Transfer the finished pie to a wire cooling rack and allow it to cool completely undisturbed for a minimum of 2 hours before slicing.
Common Mistakes and Troubleshooting
| Problem | Cause | Solution |
|---|---|---|
| Soggy, underbaked bottom crust | Oven not preheated enough, or no preheated baking sheet underneath | Always use a preheated baking sheet on the rack below; start at 220°C for the first 20 minutes |
| Filling pours out when sliced | Pie cut before cooling fully, or filling didn’t bubble during baking | Cool for the minimum 2 hours on a wire rack; the filling must reach active bubbling before leaving the oven |
| Apples undercooked and crunchy | Filling not macerating long enough, or apples sliced too thick | Always macerate for 20 to 30 minutes; keep slices at 5 to 6mm maximum |
| Crust shrinks from the sides of the dish | Dough was stretched rather than eased into the dish, or it went into the oven warm | Never stretch the dough; always ease it in and refrigerate the assembled pie for 15 minutes before baking |
| Crust crumbles rather than flaking | Butter was too warm during mixing, or dough overworked | Keep butter cold throughout; stop mixing the moment the dough holds together when squeezed |
| Crust burns before filling is done | Oven temperature too high throughout, or oven running hot | Follow the two-temperature method; cover the edges with foil strips if they darken before the filling bubbles |
Variations and Substitutions
- Cheddar crust apple pie: Replace 1/4 cup of the butter in the crust with 1/2 cup of finely grated sharp cheddar cheese worked into the flour alongside the butter. The cheddar adds a savory, slightly nutty depth to the crust that pairs particularly well with a tart apple filling. This is a traditional pairing in New England and well worth trying even if the combination sounds surprising.
- Caramel apple pie: Stir 3 tablespoons of good-quality caramel sauce directly into the macerated apple filling before assembling the pie. The caramel deepens the filling’s color and adds a buttery, slightly bitter sweetness that complements the cinnamon-spiced apples. Top the finished, cooled pie with a light drizzle of additional caramel just before serving.
- Apple pear pie: Replace half the apples with an equal weight of firm, slightly underripe Bosc or Anjou pears cut to the same thickness. Pears release more moisture than apples; increase the cornstarch to 4 tablespoons to account for the additional liquid. The flavor combination is more complex and subtly floral than an all-apple version.
- Spiced apple pie with cardamom: Add 1/4 teaspoon of ground cardamom to the filling spice blend alongside the cinnamon, nutmeg, and allspice. Cardamom adds a floral, almost citrusy warmth that lifts the entire spice profile and makes the filling taste considerably more interesting than a standard cinnamon-forward version.
- Brown butter filling: Melt the tablespoon of butter dotted over the filling in a small saucepan over medium heat until the milk solids turn golden brown and the butter smells nutty and toasted, then cool it briefly and drizzle it over the macerating apples instead of placing it in cold pieces. The browned butter adds a deeper, more complex flavor to the finished filling.
- Store-bought crust shortcut: Two sheets of refrigerated rolled pie crust substitute directly for the from-scratch version. Use one for the base and one for the top or lattice. The texture and flavor are different from an all-butter homemade crust, but the filling recipe and all baking instructions remain identical.
Serving Suggestions
- Serve warm, cut at the table so the steam and the smell reach the guests before the first slice does. Apple pie served at 40 to 45°C (104 to 113°F), which is about 30 minutes after coming out of the oven, has the best combination of set filling and warm, fragrant temperature.
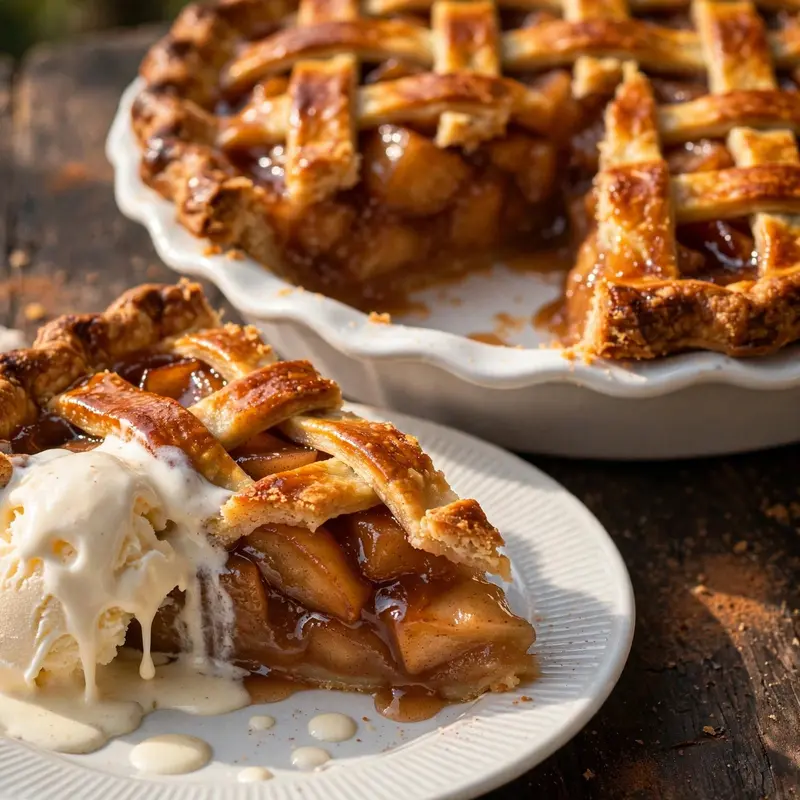
- A generous scoop of good vanilla ice cream alongside a warm slice is the classic pairing for good reason: the cold ice cream melts into the warm filling and creates a secondary sauce at the bottom of the plate that combines the spiced apple liquid and the cream in a way that’s very difficult to improve on.
- Lightly sweetened whipped cream applied in a soft mound over the slice gives a lighter, less cold contrast than ice cream, which is the better choice if the pie has cooled to room temperature.
- A drizzle of warm caramel sauce over the plated slice and a small scoop of cream alongside elevates the presentation to something that would look reasonable on a restaurant plate.
- Pair with a strong cup of black coffee or an English breakfast tea for an afternoon dessert. The slight bitterness of both beverages cuts through the sweetness of the filling and makes the warm spice notes more detectable.
- For a holiday table presentation, serve the pie whole on a white ceramic stand at the center of the table with a classic-handled pie server, allowing guests to cut their own slices. The visual of the whole pie is part of the occasion.

Tips for the Best Results
- Always use a preheated baking sheet. Placing the pie dish on a hot baking sheet is the single most effective technique for preventing a soggy bottom crust. The direct contact heat from the hot metal starts baking the base of the crust the moment the pie goes in, before the filling’s moisture has any time to penetrate. A cold baking sheet or no baking sheet at all produces a noticeably softer, paler bottom crust.
- Macerate the apples for the full 20 to 30 minutes. The juice released during maceration is not just flavor; it’s where the dissolved thickener is. It distributes the cornstarch through the filling so that every section of the pie thickens evenly during baking. A pie assembled from apples that haven’t macerating will have dry spots and uneven sauce concentration in the finished filling.
- Cool for the full 2 hours without exception. The filling thickens as it cools below about 65°C (150°F). Cut before that point and the cornstarch hasn’t had enough time at lower temperature to fully set, and the filling pours out across the plate. Two hours on a wire rack at room temperature is the minimum; overnight is fine and produces an even cleaner slice the next day.
- Refrigerate the assembled pie before baking. The 15-minute refrigeration after assembly firms the butter back up in the pastry if it warmed during rolling and handling. Cold pastry going into a hot oven produces a more dramatic initial rise and a better-defined flaky layer than pastry that’s already warm.
- Use a mix of two apple varieties, never just one. The textural difference between a firm-tart Granny Smith and a firm-sweet Honeycrisp produces a filling where different pieces have slightly different softness levels, which is what makes a well-made apple pie interesting to eat from the first spoonful to the last bite of the wedge.
Storage Tips
Refrigerator
A fully baked apple pie keeps in the refrigerator for up to 4 days, covered loosely with plastic wrap or foil. The crust softens slightly from moisture in the refrigerator but the filling retains its flavor completely. Bring refrigerated slices to room temperature for 20 minutes before serving for the best texture, or warm individual slices as described below.
Freezer
Apple pie freezes very well both baked and unbaked. For unbaked: assemble the pie completely through the egg wash and sugar sprinkle step, wrap tightly in plastic wrap and then foil, and freeze for up to 3 months. Bake directly from frozen at 190°C (375°F) for 75 to 90 minutes, covering the edges with foil from the 30-minute mark. For baked: cool completely, wrap tightly, and freeze for up to 3 months. Thaw overnight in the refrigerator and warm in a 175°C (350°F) oven for 15 to 20 minutes before serving.
Reheating
Individual slices reheat well in a 175°C (350°F) oven on a baking sheet for 12 to 15 minutes, which restores the crust’s slight crispness in a way the microwave cannot. Microwave reheating at 50% power in 60-second intervals warms the filling adequately but leaves the crust uniformly soft.
Make-ahead note: Both components of this recipe benefit from advance preparation. The dough disks can be refrigerated for up to 2 days or frozen for up to 2 months. The apple filling can be made and refrigerated for up to 8 hours before assembling; stir it to redistribute the juice before using since the apples will have released more liquid during the rest.
Nutrition Information
Per serving, approximately one slice (1/8 of the pie):
| Nutrient | Amount |
|---|---|
| Calories | 480 kcal |
| Protein | 5g |
| Total Carbohydrates | 68g |
| Dietary Fiber | 4g |
| Total Sugar | 38g |
| Total Fat | 22g |
| Saturated Fat | 14g |
| Cholesterol | 65mg |
| Sodium | 280mg |
| Vitamin C | 8mg |
| Calcium | 30mg |
| Iron | 1.8mg |
| Potassium | 220mg |
Nutrition values are approximate and may vary based on apple varieties, portion size, and brands used. Ice cream and toppings not included.
Why This Recipe Works
The two-temperature baking method, starting at 220°C (425°F) for 20 minutes and reducing to 190°C (375°F) for the remainder, addresses the fundamental structural challenge of a double-crust fruit pie. At 220°C, the cold butter in the pastry converts to steam almost immediately upon entering the oven. That steam creates pressure within the dough layers and pushes them apart before the gluten network sets. Once the butter’s water has evaporated and the gluten sets from the heat, those separated layers become the distinct, flaky structure you see when a well-made crust is broken. The high initial heat also begins drying the bottom crust from the outside before the apple filling’s moisture can penetrate the interior, which is the mechanism behind preventing the soggy bottom. The temperature reduction to 190°C then allows the filling to cook fully without burning the crust exterior.
Cornstarch as the thickening agent rather than flour produces a cleaner, glossier filling for a specific structural reason. When starch granules absorb water and gelatinize with heat, they form a transparent gel rather than an opaque one. Cornstarch granules do this more efficiently than flour granules and produce a gel that remains clear and glossy as the filling cools. Flour-thickened fillings produce a cloudier, slightly greyish filling that looks less appetizing in the slice. The filling also holds its shape more firmly with cornstarch than flour at the same quantity, because cornstarch starch molecules form a tighter gel network.
Macerating the apples before assembly solves a structural problem that causes many apple pie failures: the filling gap. When raw apples go directly into a raw crust, they cook and release moisture and soften significantly during baking. This releases a large volume of steam that, combined with the liquid released from the apples, causes the apples to compact by 30 to 40% of their original volume. The result is a crust that baked into a dome shape around what was originally a full filling but has since shrunk, leaving a hollow space between the top crust and the filling surface. Pre-macerating releases a significant portion of the total moisture before assembly, which means the volume reduction during baking is much smaller and the filling stays in closer contact with the top crust throughout.
Using an all-butter crust rather than a shortening-based one produces a more flavorful, more complex pastry for a specific compositional reason. Butter is approximately 80% fat and 20% water and milk solids. The water in butter converts to steam during baking, contributing to flakiness. The milk solids undergo Maillard reactions at the surface of the pastry, producing hundreds of aromatic compounds associated with the characteristic toasted, nutty flavor of a well-made butter crust. Vegetable shortening, by contrast, is 100% fat and contributes no water for steam generation and no milk solids for Maillard browning. Shortening-based crusts are tender and easy to work with, but the flavor difference from butter is immediately obvious in a side-by-side comparison.
I’ve tested this recipe using only Granny Smith apples, only Honeycrisp, and a 50/50 combination. The all-Granny-Smith version produces a filling that’s very firm with a pronounced tartness that some people love and others find overwhelming. The all-Honeycrisp version produces a sweeter, softer filling that tends toward mushiness by the center of the pie. The 50/50 combination produces distinct pieces at different softness levels throughout the filling, a balanced flavor profile, and a more interesting eating experience from first bite to last.
Frequently Asked Questions
Can I make apple pie ahead of time?
Yes, and there are two practical approaches. Make and bake the pie the day before serving; it holds very well at room temperature covered with a loose cloth for up to 2 days, and the filling actually sets more firmly and slices more cleanly the next day after the full overnight cool. Alternatively, freeze the fully assembled unbaked pie for up to 3 months and bake it directly from frozen on the day of serving, which produces a result virtually identical to a same-day-baked version.
Why does my apple pie filling come out watery?
Three causes cover most cases. First, the apples weren’t macerating long enough before assembly, so a large volume of moisture was released during baking and exceeded what the cornstarch could absorb. Second, the pie was sliced before cooling fully, and the filling hadn’t had time to set below the thickening temperature. Third, the filling didn’t reach active bubbling during baking, which means the starch never fully gelatinized. All three are solved by macerating for 30 minutes, watching for thick bubbling through the vents before pulling from the oven, and cooling for the full 2 hours minimum.
What apples work best for apple pie?
Firm apple varieties are essential; soft or mealy apples turn to applesauce during baking. Granny Smith is the most reliable choice for structure and tartness. Honeycrisp adds sweetness and a slightly softer texture that contrasts with the Granny Smith pieces. Braeburn, Pink Lady, and Fuji all work well. Avoid McIntosh, Red Delicious, and Gala; all three soften significantly during baking and produce a filling that’s mushy and overly sweet. A blend of at least two varieties produces a more complex, interesting filling than any single apple can.
How do I know when the apple pie is done baking?
Two indicators confirm the pie is finished: the crust color and the filling behavior. The top crust should be a deep, uniform amber color, not pale golden, all the way across including the center. The filling should be actively bubbling through the vents or lattice gaps with large, thick, slow bubbles. Thin, watery-looking bubbles indicate the filling hasn’t reached the temperature needed to fully activate the cornstarch thickening. If the crust color is right but the bubbling looks thin, reduce the oven temperature by 10°C and continue baking.
Can I use a store-bought crust?
Yes. Two sheets of refrigerated rolled pie crust, one for the base and one for the top, substitute directly for the from-scratch version. Unroll them according to the package instructions and proceed with the filling recipe and baking instructions exactly as written. The texture and flavor are different from an all-butter homemade crust, but the filling and the technique are the same. A store-bought crust can produce a very good pie; the filling is where most of the flavor comes from anyway.
How do I prevent the crust edges from burning?
Cover the edges loosely with foil strips or a pie shield from about the 35-minute mark of baking onward. The edges are the thinnest, most exposed part of the crust and brown considerably faster than the top crust center, which has the insulating effect of the apple filling below it. Cutting strips of foil and folding them over the crimped edges takes about 30 seconds and completely resolves the problem without affecting the baking of the rest of the pie.
Is apple pie gluten-free?
The standard recipe contains gluten from the all-purpose flour in the crust. The apple filling itself is naturally gluten-free when made with cornstarch rather than flour as the thickener. To make the full pie gluten-free, substitute the all-purpose flour in the crust with a certified gluten-free 1:1 baking flour blend with xanthan gum. The gluten-free crust is slightly more fragile to roll and transfer; use plastic wrap to assist and work quickly to keep the butter cold.

Conclusion
Apple pie rewards understanding over instinct. The preheated baking sheet, the 20-minute maceration, the two-temperature baking method, the full 2-hour cooling: each of these decisions produces a specific, observable improvement in the finished pie. Skip any of them and the pie will still be a pie, but it won’t be the pie that earns the requests to make it again.
Once you’ve made this apple pie a couple of times, the process becomes reliable. You’ll recognize when the crust dough has enough water, when the filling has macerating long enough, and what the thick bubbling through the vents looks like when the pie is genuinely done. That familiarity is worth building.
If you loved this recipe, save it to your baking and holiday desserts Pinterest board so you can find it easily later. For more recipes and daily food inspiration, follow TheCookingVibes on Pinterest.
Classic Apple Pie
Ingredients
Equipment
Method
- Make the crust: Whisk flour, sugar, and salt. Work cold butter into flour using a pastry cutter or box grater until rough crumbs with pea-sized butter pieces form. Add ice water 1 tablespoon at a time until dough holds when squeezed. Divide into two disks, wrap in plastic, refrigerate at least 45 minutes.
- Make the filling: Toss peeled, sliced apples with both sugars, cornstarch, cinnamon, nutmeg, allspice, salt, and lemon juice. Let macerate at room temperature for 20 to 30 minutes, stirring once halfway through.
- Preheat oven to 220°C (425°F). Place a baking sheet on the center rack to preheat alongside the oven.
- Roll one dough disk to a 32cm circle, 3mm thick. Ease it into the deep-dish pie plate without stretching. Trim overhang to 1.5cm.
- Add all the macerating apple slices and their accumulated juice into the lined dish. Arrange into an even mound. Dot with butter pieces.
- Roll the second disk to a 32cm circle. Apply as a full top crust with venting slits, or cut into strips and weave a lattice. Seal and crimp the edges.
- Brush the entire crust surface with egg wash and sprinkle with sugar. Refrigerate the assembled pie for 15 minutes.
- Bake at 220°C (425°F) for 20 minutes, then reduce to 190°C (375°F) without opening the oven. Bake for 35 to 40 more minutes until the crust is deep amber and the filling is actively bubbling with thick bubbles through the vents. Cool completely on a wire rack for at least 2 hours before slicing.
Notes
- Use a preheated baking sheet under the pie dish to prevent a soggy bottom crust.
- Always include all the accumulated juice from the macerating apples; it contains the dissolved thickener.
- Do not slice the pie until it has cooled for the full 2 hours; cutting early produces a runny filling.
- Cover the crust edges with foil strips from about the 35-minute mark if they begin browning too quickly.