Easy Stuffed Peppers — Savory Beef and Rice, Cheesy Top
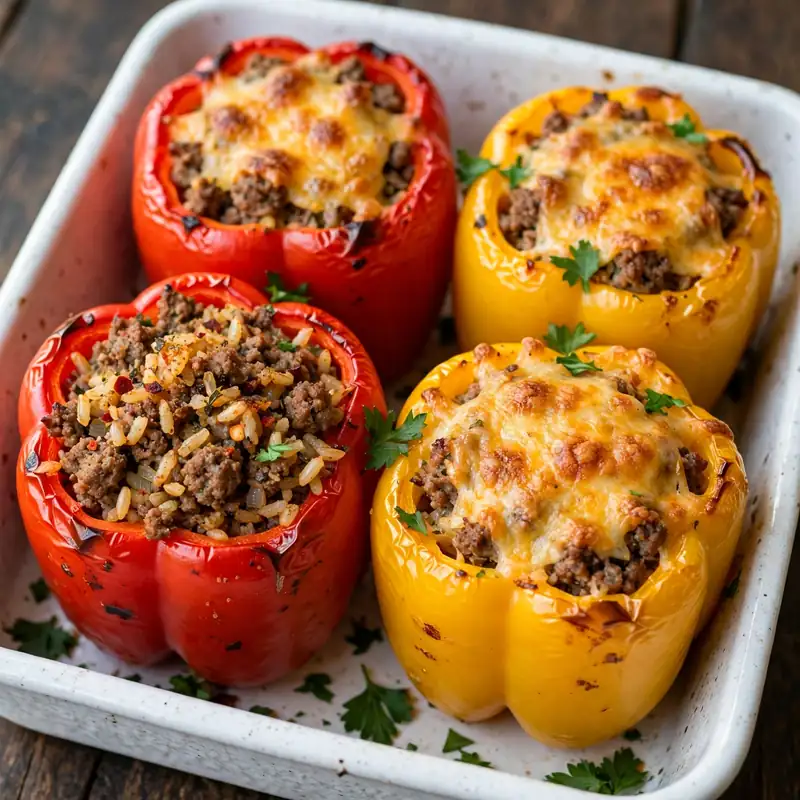
Set a pan of stuffed peppers on the table and the presentation does the work before you say a word: each bell pepper sits upright, walls tender and slightly blistered from the oven, the filling piled generously above the rim, and a cap of melted cheese across the top that’s just beginning to brown at the edges. It looks significantly more involved than the actual prep time, which is part of what makes this one of the most satisfying weeknight dinners to pull from the oven.
This stuffed peppers recipe builds a filling from seasoned ground beef browned with onion and garlic, combined with cooked rice, diced tomatoes, and a blend of warm spices. Each pepper half or whole pepper is loaded with the filling, topped with shredded cheese, and baked at moderate heat until the peppers are completely tender and the cheese is golden and bubbling. The recipe serves 4 to 6 and works as a complete one-dish meal that needs nothing alongside it. It reheats well and freezes reasonably, making it a practical choice for batch cooking.
Why You’ll Love This Stuffed Peppers Recipe
- Complete meal in a single dish. Protein from the ground beef, carbohydrates from the rice, vegetables from the peppers and diced tomatoes: nothing else is needed to make this a full, filling dinner.
- The peppers cook until genuinely tender, not crunchy. A brief par-cook before stuffing, combined with a full bake in a covered dish, produces pepper walls that are soft and pliable all the way through rather than the half-raw texture that results from baking without pre-cooking.
- Filling that doesn’t taste like seasoned meat and rice. The combination of tomato paste, cumin, smoked paprika, and Worcestershire sauce in the beef mixture produces a filling with depth and a slight savory-sweet richness that binds the components together rather than making them taste assembled separately.
- Holds its shape when served. The cooked rice in the filling acts as a binding agent that keeps the filling cohesive in the pepper rather than collapsing into a loose pile when the pepper is cut.
- Practical for feeding a crowd. The recipe scales directly: one pepper per person as a main, half a pepper per person as a starter, and the filling can be made in advance and refrigerated for up to 24 hours before stuffing and baking.

Ingredients You’ll Need
Recipe Timing
| Detail | Info |
|---|---|
| Servings | 4 to 6 (4 whole peppers) |
| Difficulty | Easy |
| Course | Main Course |
| Cuisine | American |
| Prep Time | 20 minutes |
| Cook Time | 50 minutes |
| Rest Time | 5 minutes |
| Total Time | 75 minutes |
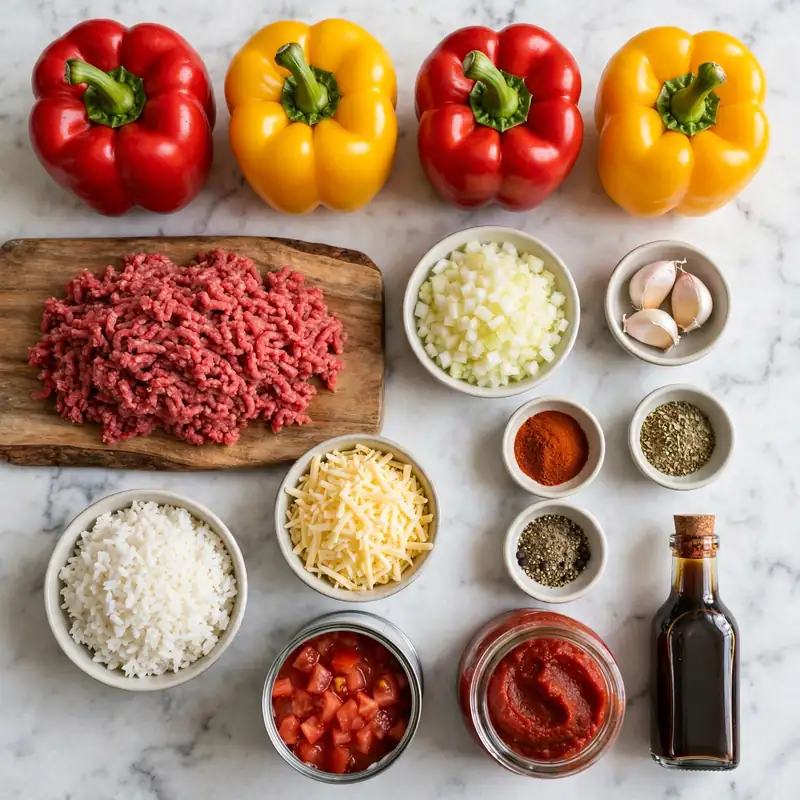
For the bell peppers, choose large, heavy peppers that have a flat base and can stand upright without tipping. Red, orange, and yellow bell peppers are noticeably sweeter than green and produce a better finished flavor against the savory, spiced beef filling. Green peppers are more assertively vegetal and slightly bitter, which some people prefer; they also tend to be less expensive. A mix of colors makes the finished dish look more appealing. Avoid peppers with soft spots or dented skins, which indicate they’ve been stored too long and won’t hold their shape through the full baking time.
For the ground beef, 80/20 lean-to-fat ratio produces the most flavorful filling because the rendered fat carries the spice flavors through the entire mixture. Leaner beef, such as 90/10, produces a drier filling; if that’s what you have, add an extra tablespoon of olive oil to the pan when browning. The beef should reach an internal temperature of 71°C (160°F) before mixing into the filling.
For the rice, use pre-cooked rice at room temperature, not hot straight from the pot. Hot rice continues to absorb moisture from the tomatoes and sauce as it sits; starting with cooled cooked rice produces a filling with the right moisture balance after baking.
The Peppers:
- 4 large bell peppers, any color — the edible vessel and a component of the flavor; choose ones with flat enough bases to stand on their own; cut the tops off or halve lengthwise depending on preferred method
The Filling:
- 500g (about 1 lb) ground beef, 80/20 — the primary protein; food safety note: ground beef must reach an internal temperature of 71°C (160°F) before consuming
- 1 tablespoon olive oil — for browning; adds richness to the beef base
- 1 medium yellow onion, finely diced — the aromatic backbone; softens into the filling and adds savory sweetness
- 3 garlic cloves, minced — adds depth; added after the onion so it doesn’t burn
- 2 tablespoons tomato paste — caramelized briefly before the liquid goes in for a concentrated, slightly sweet tomato depth that ties the filling together
- 1 can (400g/14 oz) diced tomatoes, with juice — adds moisture, acidity, and tomato body to the filling; don’t drain; the juice becomes part of the sauce that keeps the filling moist during baking
- 1 1/2 cups (280g) cooked long-grain white rice — the binding and bulk element; pre-cooked and cooled before mixing in
- 1 teaspoon ground cumin — adds warm earthiness to the filling; complements the tomato and beef without overpowering
- 1 teaspoon smoked paprika — adds a faint smoky depth that makes the filling taste more layered and complex
- 1/2 teaspoon garlic powder — reinforces the fresh garlic through the baking time
- 1/2 teaspoon dried oregano — a subtle herbal background note
- 1 tablespoon Worcestershire sauce — adds a savory, slightly sweet umami depth that binds all the filling flavors; look for a brand without anchovies for a fully non-seafood version if needed
- Salt and freshly ground black pepper — season in layers throughout
- 1/2 cup (120ml) low-sodium beef broth — poured around the peppers in the baking dish; creates steam that keeps the pepper walls moist and helps them cook through evenly
The Topping:
- 1 cup (100g) shredded mozzarella or cheddar cheese — or a combination; mozzarella melts to a creamy, stretchy layer; cheddar adds sharpness and browns more deeply; divided between the 4 peppers
- Fresh flat-leaf parsley, roughly chopped — for serving; adds color and a clean freshness after the richness of the baked filling
Allergen and Dietary Disclosure
This stuffed peppers recipe contains dairy (shredded cheese). It is naturally gluten-free as written if the Worcestershire sauce used is certified gluten-free; some brands contain malt vinegar derived from barley, which contains gluten. The recipe is egg-free and nut-free.
For dairy-free: skip the cheese topping entirely or use a dairy-free mozzarella alternative. The filling itself contains no dairy and is very complete without the cheese; a drizzle of good olive oil over the top before baking produces a similarly satisfying finish.
For vegetarian: replace the ground beef with a mixture of one 400g can of black beans (drained and rinsed) and 200g of finely diced mushrooms. Sauté the mushrooms with the onion and garlic until they release and reabsorb their moisture, add the beans, then proceed with the tomato paste, canned tomatoes, and spices exactly as written. The filling is hearty, flavorful, and holds together well in the pepper.
For gluten-free: use a certified gluten-free Worcestershire sauce and verify the beef broth label. All other ingredients are naturally gluten-free.
This recipe has not been tested in a certified allergen-free kitchen and cannot be guaranteed safe for any specific allergy.
Equipment Needed
- Large skillet or sauté pan, 12-inch — for browning the ground beef and building the filling. A wide pan allows the beef to spread into a single layer for proper browning rather than steaming in a crowded pile. The same pan builds the entire filling without needing a separate pot.
- 9×13-inch (23x33cm) baking dish — for holding the stuffed peppers upright during baking. The dish size matters: too large and the peppers tip; too small and they press against each other and steam rather than baking. A dish that holds the 4 peppers snugly without crowding is ideal.
- Tight-fitting lid or aluminum foil — for covering the dish during the first 35 minutes of baking. The covered baking traps steam from the broth in the bottom of the dish, which is what cooks the pepper walls through to complete tenderness before the cheese goes on.
- Instant-read thermometer — to confirm the ground beef reaches the safe internal temperature of 71°C (160°F) during the skillet browning stage. Verifying temperature in the skillet before the filling goes into the peppers ensures the beef is fully cooked before the oven finishes the dish.
- Sharp knife and cutting board — for cutting the pepper tops cleanly without tearing the pepper walls. A sharp knife used with one decisive downward cut produces a cleaner opening than a sawing motion, which can split the pepper unevenly.
Step-by-Step Directions
Step 1: Prepare the Bell Peppers
Preheat the oven to 190°C (375°F). Cut the tops off each bell pepper approximately 2cm below the stem end. Set the tops aside; they can be diced and stirred into the filling for extra vegetable content or discarded. Remove the white pith and all seeds from inside each pepper using a small spoon or your fingers, leaving the walls clean and hollow. If any pepper won’t stand flat, cut a very thin slice from the base, just enough to create a flat surface, without piercing through to the hollow interior.

Chef’s Note: Par-cooking the peppers before stuffing is the step that ensures the walls cook all the way through rather than staying firm and slightly raw in the final dish. Rather than blanching them in boiling water, which can make them waterlogged, place the hollowed peppers cut-side down in the baking dish with 2 tablespoons of water added to the dish, cover tightly with foil, and microwave on high for 3 to 4 minutes. They should soften noticeably at the walls but still hold their shape upright. Pour off any accumulated liquid before filling.
Step 2: Brown the Ground Beef
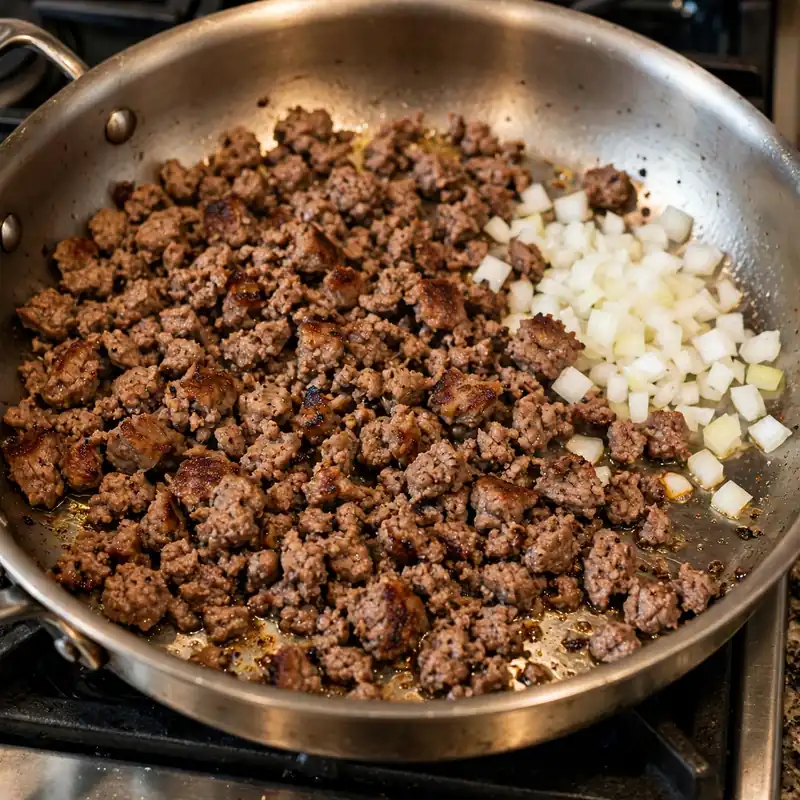
Heat the olive oil in a large skillet over medium-high heat until it shimmers. Add the ground beef in an even layer across the pan base, pressing it flat. Leave it undisturbed for 2 to 3 minutes until a visible caramelized crust forms on the underside, then begin breaking it into crumbles and turning. Cook for another 4 to 5 minutes, stirring every minute, until no pink remains throughout and the beef is browned and fragrant.
Food safety note: Ground beef must reach an internal temperature of 71°C (160°F) throughout before it is safe to eat. Verify with a thermometer before proceeding.
Drain the excess fat from the pan, leaving about 1 tablespoon in the base to cook the aromatics. Removing the excess fat prevents the finished filling from being greasy, but leaving a small amount ensures the onion and garlic have enough fat to sauté properly.
Step 3: Build the Filling Aromatics
Reduce the heat to medium. Add the diced onion to the beef in the skillet and cook for 4 to 5 minutes, stirring every 2 minutes, until the pieces are fully soft and turning translucent with pale golden edges. Add the minced garlic and stir continuously for 60 seconds until the raw sharp smell softens into something warm and faintly sweet. Push the beef and onion mixture to the sides of the pan and add the tomato paste to the bare center. Let it sit undisturbed for 60 to 90 seconds until it darkens from bright red to a deep brick-red color, then stir it through everything in the pan.
Chef’s Note: Caramelizing the tomato paste against the bare hot pan surface, before it’s stirred into the surrounding mixture, converts its concentrated tomato solids through a partial Maillard reaction that produces a noticeably deeper, slightly sweeter tomato flavor. Tomato paste stirred directly into liquid without this step tastes noticeably more raw and sharp.
Step 4: Season and Finish the Filling
Add the cumin, smoked paprika, garlic powder, oregano, Worcestershire sauce, and the full can of diced tomatoes with all their juice to the pan. Stir everything together and bring to a gentle simmer over medium heat. Cook uncovered for 5 to 6 minutes, stirring occasionally, until the liquid has reduced slightly and the mixture looks cohesive and saucy rather than watery. Taste carefully and season with salt and pepper at this point. Remove from the heat and fold in the cooked, cooled rice until evenly distributed throughout the beef and tomato mixture.
Chef’s Note: Adding the rice to the filling after the stovetop cooking is complete rather than letting it simmer with the beef prevents it from absorbing too much liquid during those final minutes and becoming mushy before the peppers even go into the oven. Cooled rice folded in off the heat stays at the right texture through the full baking time.

Step 5: Stuff and Arrange the Peppers
Stand the par-cooked peppers upright in the baking dish. Use a large spoon to fill each pepper with the beef and rice mixture, pressing gently to pack it in firmly and mounding it slightly above the rim of the pepper. Pour the beef broth into the baking dish around the base of the peppers; don’t pour it into the filling. The broth creates steam inside the covered dish during baking that keeps the pepper walls moist and helps them cook to full tenderness without drying out.
Step 6: Bake Covered, Then Uncovered with Cheese
Cover the baking dish tightly with its lid or a sheet of aluminum foil pressed firmly against the edges. Bake on the center rack at 190°C (375°F) for 35 minutes. The peppers should be visibly softer and the filling steaming when you lift the cover. Distribute the shredded cheese evenly across the top of each filled pepper. Return to the oven uncovered for 10 to 15 minutes until the cheese is completely melted, bubbling, and developing golden-brown spots across its surface.
Step 7: Rest and Serve
Remove the baking dish from the oven and allow the peppers to rest in the dish for 5 minutes before serving. The filling continues to firm up slightly from the residual heat during this time and the cheese sets from a liquid-bubbling state to a slightly more cohesive layer that stays on the filling rather than sliding off when the pepper is cut. Serve with fresh parsley scattered over each pepper.
Common Mistakes and Troubleshooting
| Problem | Cause | Solution |
|---|---|---|
| Pepper walls still firm and undercooked | No par-cooking before stuffing, or baking time too short | Always par-cook the hollowed peppers before filling; cover during the first 35 minutes of baking to steam through |
| Filling dry and compacted | Too little liquid in the filling, or rice was hot when added | Keep the full can of diced tomatoes with all juice; add rice only after the stovetop cooking is complete and the filling has been removed from heat |
| Filling falls out when pepper is cut | Rice not added, or filling too wet and loose | Rice binds the filling; don’t skip it; reduce the stovetop simmer time if the filling looks too watery before stuffing |
| Cheese burnt before peppers are done | Uncovered baking from the start, or oven too hot | Always cover for the first 35 minutes; only add cheese for the final 10 to 15 minutes uncovered |
| Peppers tip over during baking | Uneven base, or baking dish too large | Trim a very thin slice from the base of any unsteady pepper; choose a dish that holds the peppers snugly without tilting |
| Filling tastes flat and one-dimensional | Tomato paste not caramelized, or spices not used | Caramelize tomato paste against the bare pan before stirring through; use the full spice blend; season the filling before the rice goes in |
Variations and Substitutions
- Ground turkey stuffed peppers: Replace the ground beef with ground turkey thighs, which have a higher fat content than breast and produce a more flavorful, moist filling. Increase the smoked paprika to 1 1/2 teaspoons to compensate for the lighter flavor profile of turkey compared to beef. The method stays identical; turkey reaches the same safe internal temperature of 74°C (165°F).
- Mexican-style stuffed peppers: Add 1 teaspoon of chili powder and 1/2 teaspoon of ground cumin to the spice blend alongside the existing spices. Replace the diced tomatoes with a can of Rotel-style tomatoes with green chilies. Top with shredded Monterey Jack cheese rather than mozzarella and serve with a spoonful of sour cream and fresh cilantro on each pepper.
- Mediterranean stuffed peppers: Replace the rice with an equal quantity of cooked couscous or bulgur wheat. Replace the cumin and smoked paprika with 1 teaspoon of dried mint and 1/2 teaspoon of allspice. Add 3 tablespoons of pine nuts toasted in a dry skillet and 2 tablespoons of currants to the filling along with the grain. Top with crumbled feta cheese instead of mozzarella.
- Vegetarian stuffed peppers: Replace the ground beef with one 400g can of black beans (drained and rinsed) and 200g of finely diced cremini mushrooms. Sauté the mushrooms until they release and fully reabsorb their moisture before adding the onion and garlic. The beans and mushrooms together produce a filling with a hearty texture and a savory depth that’s satisfying without meat.
- Low-carb stuffed peppers: Replace the cooked rice with cauliflower rice; pulse 1/2 a head of raw cauliflower in a food processor until fine crumbs form, then dry-sauté in a hot pan for 3 to 4 minutes to remove excess moisture before adding to the filling off the heat. The texture and volume are very similar to regular rice in the finished pepper.
- Halved pepper method: Instead of whole upright peppers, halve each pepper lengthwise through the stem and lay them flat in the baking dish. Fill each half as generously as possible, top with cheese, and bake uncovered for the full 40 to 45 minutes; the open, flat baking produces slightly more caramelization on the filling’s surface and is considerably easier to serve to a group.
Serving Suggestions
- Serve directly from the baking dish at the table, using tongs to transfer each pepper to individual plates while keeping it upright. The presentation of the whole stuffed pepper is part of what makes this dish feel complete and intentional rather than assembled.
- A simple green salad with lemon vinaigrette alongside provides a fresh, acidic contrast to the rich, spiced filling and makes the meal feel more balanced without requiring any additional cooking.
- Warm crusty bread alongside is worth including if you want something to mop up the tomato-seasoned broth at the base of the baking dish, which concentrates into a flavorful sauce during the baking time.
- A dollop of sour cream or plain full-fat yogurt placed on top of each finished pepper adds a cool, dairy contrast to the warm, spiced filling that works particularly well with the Mexican-style variation or the standard version.
- For a family-style dinner, serve alongside Spanish-style rice made with diced tomatoes, onion, and chicken broth; the complementary tomato base ties both dishes together and makes the meal feel cohesive.
- Pair with a cold sparkling water with lime or a tall glass of iced herbal tea. Both provide a clean, refreshing contrast to the warm, savory filling and the richness of the melted cheese.

Tips for the Best Results
- Par-cook the peppers before stuffing them. This is the step most recipes skip and the one that most directly determines whether the pepper walls are tender or crunchy in the finished dish. Fully raw peppers stuffed and baked for 45 minutes are still firmer than most people prefer; par-cooked peppers stuffed and baked for the same time are soft, pliable, and fully cooked through.
- Season the filling generously before the rice goes in. Once the rice is folded into the beef mixture, it absorbs flavors and dilutes the seasoning level; taste and adjust salt, pepper, and any other seasoning before adding the rice. The filling should taste slightly more assertively seasoned than you want in the finished pepper, since baking mellows the flavors further.
- Caramelize the tomato paste before adding liquid. One extra minute of cooking the tomato paste against a hot, dry section of the pan before stirring it into the filling produces a measurably richer tomato flavor in the finished dish. This step takes 60 to 90 seconds and produces a filling that tastes developed rather than simply assembled.
- Keep the broth in the dish, not in the filling. The broth goes around the base of the peppers in the baking dish, not into the filling itself. Its job is to create steam inside the covered dish; adding it to the filling makes the filling watery and prevents the rice from binding the mixture into a cohesive texture.
- Bake covered first, then uncovered for the cheese. Starting covered ensures the pepper walls cook completely through before the cheese goes on. Uncovering for the final 10 to 15 minutes gives the cheese time to melt fully and develop the browned spots that signal it’s done. Cheese added from the beginning and baked uncovered throughout dries out and browns unevenly before the peppers are cooked.
Storage Tips
Refrigerator
Fully baked and cooled stuffed peppers keep in the refrigerator for up to 4 days in a sealed container or wrapped individually in plastic wrap. The filling continues to absorb flavor from the surrounding broth and spices overnight, and the peppers actually taste noticeably better on day 2 than on day 1. Store whole peppers upright if the container allows; if not, lay them on their side on a flat surface to prevent the cheese from sticking to the container lid.
Freezer
Stuffed peppers freeze reasonably well for up to 3 months. Freeze fully baked and completely cooled peppers in a sealed freezer container or individually wrapped in plastic wrap and then foil. Thaw overnight in the refrigerator before reheating. The pepper walls become slightly softer after freezing and thawing, which most people find acceptable; the filling retains its flavor well. Freeze without the fresh herb garnish; add it fresh when serving.
Reheating
The oven produces the best reheating result for stuffed peppers. Place them in a baking dish with 2 to 3 tablespoons of broth or water added to the base, cover with foil, and reheat at 175°C (350°F) for 20 to 25 minutes until the filling is hot throughout and the cheese is melted again. For individual portions, microwave at 70% power in 90-second intervals until heated evenly throughout; the pepper will be softer than oven-reheated but the filling heats consistently.
Make-ahead note: The filling can be made completely, cooled, and refrigerated for up to 24 hours before stuffing and baking. Stuff the cold filling into par-cooked peppers just before baking; add 5 minutes to the covered baking time since the filling starts cold rather than at room temperature.
Nutrition Information
Per serving, approximately one whole stuffed pepper (1/4 of the recipe):
| Nutrient | Amount |
|---|---|
| Calories | 450 kcal |
| Protein | 32g |
| Total Carbohydrates | 38g |
| Dietary Fiber | 5g |
| Total Sugar | 10g |
| Total Fat | 18g |
| Saturated Fat | 8g |
| Cholesterol | 85mg |
| Sodium | 560mg |
| Vitamin C | 180mg |
| Calcium | 220mg |
| Iron | 4.2mg |
| Potassium | 780mg |
Nutrition values are approximate and may vary based on pepper size, beef fat content, cheese type, and brands used.
Why This Recipe Works
The textural challenge that every stuffed pepper recipe has to solve is cooking the pepper walls to complete tenderness without overcooking the filling into a dry, compacted mass, since the two components need different things from the oven. Bell pepper walls are composed primarily of cellulose cell walls and water-filled vacuoles; for those walls to turn soft and pliable, the cell walls need to soften from sustained heat and the cellular water needs to redistribute. This process takes longer than the cheese melting or the filling reheating, which is why par-cooking the hollowed peppers before filling them resolves the timing mismatch. The 3 to 4 minutes of steam in the microwave, or a brief blanch in boiling water, partially collapses the cell structure and reduces the remaining baking time needed to achieve full tenderness.
The filling’s cohesion, its ability to hold together in the pepper when sliced rather than falling into loose crumbles, comes from the cooked rice acting as a starch-based binder. The outer starch granules on each rice grain are slightly sticky after cooking; when the rice is mixed with the beef, tomato, and onion mixture and baked, those surface starches bind the surrounding particles together as the dish heats. The moisture in the canned tomatoes rehydrates the outer starch layer during baking and strengthens the binding. A filling made without rice produces a much looser result that doesn’t scoop cleanly from the pepper.
Caramelizing the tomato paste against the bare hot pan produces flavor compounds through the same Maillard reaction mechanism that applies in every other recipe where a concentrated ingredient is heated in fat before liquid is added. Tomato paste is approximately 30% total solids, including a significant concentration of glutamates, amino acids, and sugars. When that concentrated mixture contacts a dry hot surface, the water evaporates rapidly and the remaining solids reach temperatures above 150°C, where the sugars and amino acids react to produce the same flavor-deepening compounds that form when meat is seared. The paste goes from a sharp, slightly raw tomato flavor to something sweeter, more rounded, and deeply savory in about 90 seconds of direct contact with the hot pan.
The broth poured around the peppers in the baking dish works entirely through steam. At 190°C (375°F), the broth heats rapidly and its water converts to steam inside the covered dish. That steam saturates the air around the peppers and heats the outer surface of the pepper walls from the outside in through convection, which is faster and more even than radiant oven heat alone. The steam environment also prevents the exposed top surface of the filling from drying out during the covered baking period, keeping the filling moist until the cheese goes on. The broth itself contributes some flavor to the pepper exteriors through direct contact and through the condensation that forms on the inside of the foil and drips back onto the peppers.
Using a mix of smoked paprika and cumin in the filling rather than a single spice produces a flavor that’s more complex and harder to identify as any single source. Smoked paprika contributes a warm, slightly sweet smokiness from the dried and smoked peppers used to make it; cumin adds a distinctly earthy, warm, slightly bitter note from its volatile terpene compounds. Together with the browned beef and caramelized tomato paste, they produce a filling that tastes savory, slightly smoky, and deeply seasoned without tasting of any one spice in particular.
Frequently Asked Questions
Can I make stuffed peppers ahead of time?
Yes, with two practical options. Make the filling completely, cool it, and refrigerate for up to 24 hours before stuffing and baking; add 5 minutes to the covered baking time since the cold filling takes longer to heat through. Alternatively, stuff and bake the peppers completely, cool them, and refrigerate for up to 4 days; reheat covered in a 175°C (350°F) oven with a splash of broth added to the dish for 20 to 25 minutes. Both approaches produce a result very close to same-day quality.
Why are my stuffed peppers still crunchy after baking?
Raw peppers that go directly into the oven stuffed and uncovered almost always come out with some firmness remaining in the walls, even after 45 to 50 minutes. The solution is two-step: par-cook the hollowed peppers for 3 to 4 minutes in the microwave with a small amount of water and a tight foil cover before filling, and then bake the stuffed peppers covered for the first 35 minutes so the trapped steam continues cooking the walls from the outside in. Both steps together produce completely tender walls without needing to extend the baking time significantly.
Can I use brown rice instead of white rice?
Yes, but cook it separately before adding to the filling rather than trying to cook it inside the pepper. Brown rice takes 40 to 50 minutes to cook, which far exceeds what happens inside a stuffed pepper during baking. Pre-cook brown rice, cool it to room temperature, and use it in the filling at the same 1 1/2 cup quantity. The slightly nuttier, chewier texture of brown rice works well in the filling and the nutritional profile improves; the binding function stays identical to white rice.
How do I know when the stuffed peppers are done?
Two indicators confirm doneness: the pepper walls should yield easily when you press the side of the pepper gently with a spoon, feeling soft and pliable rather than firm and resistant, and the cheese should be fully melted with visible golden-brown bubbled spots across its surface. If the cheese looks done but the pepper still feels firm, cover the dish again and bake for an additional 10 minutes before adding more cheese time. The filling’s internal temperature should read above 74°C (165°F) since it’s essentially a reheating step for the already-cooked beef and rice mixture.
Can I freeze stuffed peppers?
Yes, though the pepper walls soften slightly after freezing and thawing. Fully bake and cool the peppers completely before freezing; wrap each one individually in plastic wrap and then foil for up to 3 months. Thaw overnight in the refrigerator before reheating in a covered baking dish at 175°C (350°F) for 25 to 30 minutes. The filling retains its flavor very well through freezing; the texture change in the pepper itself is minor and most people don’t find it objectionable.
Can I make stuffed peppers without rice?
Yes, though the filling will be looser and less cohesive without the rice as a binder. Good alternatives include cooked quinoa at the same quantity, which binds similarly and adds a slightly nutty flavor; cooked orzo pasta; or a can of well-drained black beans that hold the filling’s structure through their fiber content. If using beans rather than a grain, reduce the quantity of diced tomatoes by half to prevent the filling from being too wet. The method stays identical regardless of the binder used.
What’s the best cheese for stuffed peppers?
Mozzarella melts to the smoothest, most cohesive layer and is the most forgiving choice; it browns gradually and evenly in the 10 to 15 minutes of uncovered baking. Cheddar adds a sharper, more pronounced cheese flavor and browns faster and more deeply, so watch it closely after the 8-minute mark. A combination of 70% mozzarella and 30% cheddar produces the best of both: good melting behavior, distinct cheese flavor, and attractive browning without burning risk. Avoid very aged or hard cheeses like Parmesan as the only topping; they don’t melt to the same cohesive layer and can turn grainy.

Conclusion
Stuffed peppers work as a permanent weeknight recipe because the method is reliable and the result is genuinely complete: protein, vegetable, and starch in one dish, with a presentation that looks more deliberate than the prep time justifies. The par-cooking step before filling is the detail most often skipped and the one that most directly determines the final texture of the pepper walls; build it into the routine and the result is consistently tender.
The filling formula here, caramelized tomato paste, warm spices, Worcestershire, and cooked rice as the binder, is worth memorizing because it applies across every variation. Swap the protein, change the grain, adjust the spice profile, and the same underlying logic produces a filling that holds together, seasons evenly, and tastes like something worth making again.
If you loved this recipe, save it to your easy weeknight dinners and comfort food Pinterest board so you can find it easily later. For more healthy recipes and daily food inspiration, follow TheCookingVibes on Pinterest.
Easy Stuffed Peppers
Ingredients
Equipment
Method
- Preheat oven to 190°C (375°F). Cut tops from peppers and remove seeds and pith. Par-cook peppers by placing them cut-side down in a microwave-safe dish with 2 tablespoons water, covering tightly, and microwaving 3 to 4 minutes until walls soften slightly but hold their shape. Drain accumulated liquid.
- Heat olive oil in a large skillet over medium-high heat. Add ground beef in a flat layer. Cook undisturbed 2 to 3 minutes until the underside caramelizes, then crumble and cook until no pink remains throughout. Confirm internal temperature of 71°C (160°F). Drain excess fat, leaving about 1 tablespoon.
- Reduce heat to medium. Add diced onion to the beef and cook 4 to 5 minutes until soft. Add garlic and stir 60 seconds. Push mixture to the sides and add tomato paste to the bare pan center. Cook 60 to 90 seconds until brick-red, then stir through.
- Add cumin, smoked paprika, garlic powder, oregano, Worcestershire sauce, and the full can of diced tomatoes with juice. Simmer uncovered 5 to 6 minutes until slightly reduced. Season with salt and pepper. Remove from heat and fold in cooled rice.
- Stand par-cooked peppers upright in a 9×13-inch baking dish. Spoon filling into each pepper, pressing gently and mounding above the rim. Pour beef broth around the base of the peppers in the dish.
- Cover tightly with foil and bake 35 minutes. Remove foil, distribute shredded cheese across each pepper top, and bake uncovered 10 to 15 minutes until cheese is melted with golden-brown spots.
- Rest 5 minutes in the dish before serving. Scatter fresh parsley over each pepper.
Notes
- Always par-cook the hollowed peppers before filling; this ensures the walls cook completely tender during the baking time.
- Season the filling before adding the rice; the rice dilutes seasoning once incorporated.
- Pour broth around the peppers, not into the filling; it creates steam to cook the pepper walls, not moisture for the filling.
- The cooked filling can be made up to 24 hours ahead and refrigerated before stuffing and baking.